Creating a new Apple Account provides access to a universe of services, from iCloud storage to the App Store and beyond. At HOW.EDU.VN, we understand the importance of seamless access to these services, and we’re here to guide you through the process of creating your Apple Account, ensuring a smooth and efficient experience. This guide covers different methods for account creation and provides expert tips for optimizing your Apple ecosystem.
Table of Contents
- Why You Need an Apple Account
- Creating an Apple Account on iPhone, iPad, or Apple Vision Pro
- 2.1. Creating an Apple Account During Device Setup
- 2.2. Creating an Apple Account via the App Store
- Creating an Apple Account on Mac
- Creating an Apple Account on a Windows PC
- 4.1. Creating an Apple Account in the Apple TV or Apple Music App
- 4.2. Creating an Apple Account in iTunes for Windows
- Creating an Apple Account on Other Devices
- Creating an Apple Account on the Web
- Troubleshooting: Addressing the “Sign in to iTunes” Message
- Expert Insights: Maximizing Your Apple Account
- Leveraging HOW.EDU.VN for Expert Tech Consultation
- FAQ: Frequently Asked Questions About Creating an Apple Account
1. Why You Need an Apple Account
An Apple Account, formerly known as Apple ID, is your passport to the entire Apple ecosystem. It enables you to access a plethora of services and features, essential for anyone using Apple devices. Here’s why creating an Apple Account is crucial:
- Access to Apple Services: Your Apple Account grants you access to services like iCloud, App Store, Apple Music, Apple TV+, iMessage, and FaceTime. Without an Apple Account, you can’t download apps, store data in the cloud, or communicate via Apple’s messaging services.
- Device Synchronization: Seamlessly sync your data across all your Apple devices. Contacts, calendars, notes, photos, and documents are automatically updated on your iPhone, iPad, Mac, and other Apple devices.
- iCloud Storage: iCloud provides cloud storage for your photos, videos, documents, and backups. This ensures your data is safe and accessible, even if your device is lost or damaged.
- App Store Access: Download and install apps from the App Store. From productivity tools to entertainment apps, the App Store offers a vast selection to enhance your device’s functionality.
- Apple Music and Apple TV+: Enjoy streaming music and video content with Apple Music and Apple TV+. Access millions of songs, exclusive TV shows, and movies.
- Find My: Locate your lost or stolen Apple devices using the Find My app. This feature can help you track your iPhone, iPad, Mac, and AirPods, increasing the chances of recovery.
- Secure Transactions: Make secure purchases on the App Store, Apple Music, and other Apple services. Your payment information is securely stored and encrypted.
- Family Sharing: Share purchases, subscriptions, and iCloud storage with your family members. Family Sharing makes it easy to manage your family’s Apple services and content.
- Device Setup and Activation: Activate and set up new Apple devices. Your Apple Account is required to configure your iPhone, iPad, Mac, and other Apple devices.
- Software Updates: Download and install software updates for your Apple devices. Keeping your devices up to date ensures you have the latest features, security patches, and performance improvements.
Having an Apple Account is not just about accessing services; it’s about creating a connected and integrated digital lifestyle within the Apple ecosystem.
2. Creating an Apple Account on iPhone, iPad, or Apple Vision Pro
Creating an Apple Account on your iPhone, iPad, or Apple Vision Pro is straightforward. You can create one during the initial device setup or later through the App Store.
2.1. Creating an Apple Account During Device Setup
During the initial setup of your iPhone, iPad, or Apple Vision Pro, you’ll be prompted to sign in with an Apple Account. If you don’t have one, follow these steps:
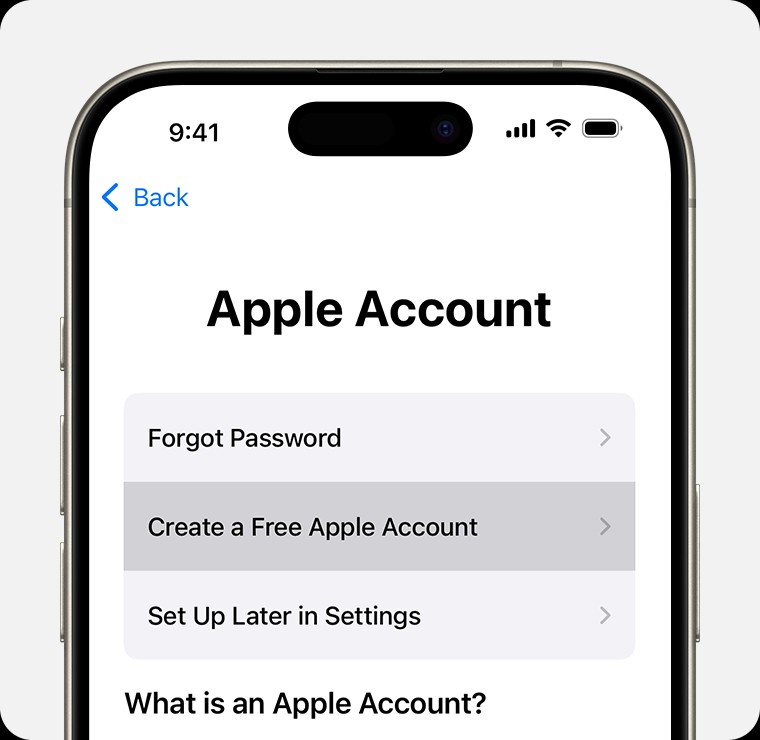
- Start the Setup Process: Turn on your device and follow the onscreen instructions until you reach the “Sign in with your Apple Account” screen.
- Tap “Forgot password or don’t have an Apple Account?”: This option is located below the sign-in fields.
- Tap Create a Free Apple Account: This will initiate the account creation process.
-
Enter Your Birthday and Name: Provide your date of birth and full name. Ensure the information is accurate, as it may be used for account recovery purposes. Tap Continue.
-
Provide Your Email Address: Enter a valid email address that will serve as your primary Apple Account. If you don’t have an email address, tap “Don’t have an email address?” to get a free iCloud email address.
-
Verify Your Email Address: Follow the onscreen steps to verify your email address. Apple will send a verification email to the address you provided. Click the verification link in the email to confirm your address.
-
Create a Strong Password: Create a strong, unique password for your Apple Account. A strong password should be at least eight characters long and include a combination of uppercase letters, lowercase letters, numbers, and symbols. Avoid using easily guessable information, such as your birthday or name.
-
Set Your Country or Region: Select your country or region from the dropdown menu. This setting affects the App Store content and pricing.
-
Set Up Two-Factor Authentication: Enable two-factor authentication to add an extra layer of security to your account. This requires you to enter a verification code sent to your trusted device or phone number when signing in on a new device. If you choose to skip this step, you’ll be prompted to do this later in Settings.
-
Agree to the Terms and Conditions: Read and agree to Apple’s terms and conditions. This is required to complete the account creation process.
After verifying your email address, you can sign in to your new Apple Account to use the App Store and other Apple services like iCloud. You may be asked to enter your phone number or a payment method. Your phone number helps verify your identity and recover your account if needed. Entering a payment method is optional and you won’t be charged until you make a purchase.
2.2. Creating an Apple Account via the App Store
You can also create an Apple Account through the App Store on your iPhone, iPad, or Apple Vision Pro. Here’s how:
- Open the App Store: Locate the App Store icon on your home screen and tap to open it.
- Tap the My Account Button: This is usually a profile icon or your photo, located in the upper-right corner of the screen.
- Tap Create New Apple Account: If you’re not signed in, you’ll see this option. If you don’t see this option, make sure that you’re signed out of iCloud.
- Provide Your Email Address: Enter a valid email address that will be used to sign in to your new Apple Account. This email address must not be associated with another Apple Account.
- Create a Strong Password: Create a strong password that meets Apple’s requirements. The password should be at least eight characters long and include uppercase letters, lowercase letters, and numbers.
- Set Your Country or Region: Select your country or region from the dropdown menu. This setting determines the currency and content available in the App Store.
- Enter Payment Method and Billing Information: Provide your payment method and billing information. You can choose to enter a credit card, debit card, or Apple Account balance. You can also choose None if you don’t want to add a payment method at this time. You won’t be charged until you make a purchase.
- Confirm Your Phone Number: Enter your phone number. This can help verify your identity and recover your account if needed.
- Verify Your Email Address: Check your email for a verification email from Apple. Click the link in the email to verify your email address.
After verifying your email address, you can sign in to your new Apple Account to use the App Store and other Apple services like iCloud.
3. Creating an Apple Account on Mac
Creating an Apple Account on your Mac is simple and can be done through System Settings. Here’s how:
- Open System Settings: Click the Apple menu () in the top-left corner of your screen, then select System Settings.
- Click Sign in: In the sidebar, click Sign in.
- Click “Don’t Have an Account?”: Follow the onscreen steps to enter your birthday, provide an email address, create a strong password, and set your country or region. This primary email address will be what you use to sign in to your Apple Account.
- Enter Your Payment Method and Billing Information: Enter your payment method and billing information, then click Continue. You can also choose None. You won’t be charged until you make a purchase.
- Confirm Your Phone Number: This can help to verify your identity and recover your account if needed. Click Next.
- Verify Your Email Address: Check your email for a verification email from Apple and verify your email address.
After you verify your email address, you can sign in to your new Apple Account to use the App Store and other Apple services such as iCloud.
4. Creating an Apple Account on a Windows PC
You can create an Apple Account on a Windows PC through the Apple TV app, the Apple Music app, or iTunes for Windows.
4.1. Creating an Apple Account in the Apple TV or Apple Music App
- Open the Apple TV or Apple Music App: Download and install the Apple TV app or Apple Music app from the Microsoft Store.
- Click Sign In: At the bottom of the sidebar, click Sign In.
- Click Create New Apple Account: This will initiate the account creation process.
- Follow the Onscreen Steps: Provide an email address, create a strong password, and set your device region. This primary email address will be what you use to sign in to your Apple Account.
- Enter Your Payment Method and Billing Information: You can also choose None. You won’t be charged until you make a purchase.
- Verify Your Email Address: Check your email for a verification email from Apple and verify your email address.
After you verify your email address, you can sign in to your new Apple Account to use Apple services.
4.2. Creating an Apple Account in iTunes for Windows
- Open iTunes for Windows: If you don’t have iTunes, download and install it from Apple’s website.
- Go to Account > Sign In: From the menu bar at the top of your computer screen or at the top of the iTunes window, choose Account > Sign In. Then click Create New Apple Account.
- Follow the Onscreen Steps: Provide an email address, create a strong password, and set your device region. This primary email address will be what you use to sign in to your Apple Account.
- Enter Your Payment Method and Billing Information: You can also choose None. You won’t be charged until you make a purchase.
- Verify Your Email Address: Check your email for a verification email from Apple and verify your email address.
After you verify your email address, you can sign in to your new Apple Account to use Apple services.
5. Creating an Apple Account on Other Devices
To create your Apple Account on an Apple TV, Android device, smart TV, or streaming device, you can usually follow the steps provided onscreen and enter your full name, date of birth, an email address or phone number, and a payment method. If you set up the Apple TV app on your smart TV, you might be redirected to activate.apple.com to create your Apple Account.
6. Creating an Apple Account on the Web
Creating an Apple Account on the web is a straightforward process. Follow these steps:
- Go to Apple Account Website: Open your web browser and navigate to account.apple.com.
- Click Create Your Apple Account: You’ll find this link on the page.
- Provide Your Email Address: Enter a valid email address that will be used to sign in to your new Apple Account.
- Create a Strong Password: Create a strong password that meets Apple’s requirements. The password should be at least eight characters long and include uppercase letters, lowercase letters, and numbers.
- Set Your Country or Region: Select your country or region from the dropdown menu. This setting determines the currency and content available in the App Store.
- Enter Your Birthday and Phone Number: Provide your date of birth and a phone number that you can always access.
- Opt-In for Apple Updates (Optional): Check the boxes to subscribe to Apple Updates if you’d like. This keeps you up to date on the latest news, software, products, and services from Apple.
- Click Continue: Review the information you’ve entered and click Continue to proceed.
- Verify Your Email Address and Phone Number: Follow the onscreen steps to verify your email address and phone number. Apple will send verification codes to both your email address and phone number. Enter the codes to confirm your information.
After you verify your email address, you can sign in to your new Apple Account to use the App Store and other Apple services like iCloud.
7. Troubleshooting: Addressing the “Sign in to iTunes” Message
If you created your Apple Account on the web and see a message that you need to sign in to iTunes, follow these steps for your device:
- On iPhone or iPad: Open Settings, then tap Sign in to [device]. Then sign in to your Apple Account.
- On Mac: Choose Apple menu > System Settings, then select Apple Account and sign in to your Apple Account.
- On Apple TV: Sign in to the App Store or other Apple services with your Apple Account. You can also open Settings, then tap Users and Accounts. Select Add Default User or Add New User and sign in to your Apple Account, then follow the prompted steps.
- On an Android Device: Go to tv.apple.com or music.apple.com and sign in to your Apple Account.
- On a Windows PC: Go to the Microsoft Store, then download and install the Apple TV app or the Apple Music app and sign in to your Apple Account.
8. Expert Insights: Maximizing Your Apple Account
Once you’ve created your Apple Account, there are several ways to maximize its benefits. Here are some expert insights to help you make the most of your Apple ecosystem:
- Enable Two-Factor Authentication: Protect your account from unauthorized access by enabling two-factor authentication. This adds an extra layer of security, requiring a verification code from a trusted device or phone number when signing in on a new device.
- Set Up Family Sharing: Share your purchases, subscriptions, and iCloud storage with up to five family members. This makes it easy to manage your family’s Apple services and content.
- Use iCloud Keychain: Store your passwords, credit card information, and Wi-Fi passwords securely in iCloud Keychain. This allows you to easily access your information across all your Apple devices.
- Customize iCloud Settings: Choose which data to sync with iCloud. You can sync contacts, calendars, notes, photos, documents, and more. Customize your settings to optimize storage and performance.
- Explore Apple’s Services: Take advantage of Apple’s services, such as Apple Music, Apple TV+, Apple Arcade, and Apple News+. These services offer a wide range of content and features to enhance your digital lifestyle.
- Regularly Update Your Devices: Keep your Apple devices updated with the latest software. Software updates include new features, security patches, and performance improvements.
- Use Find My: Enable Find My on all your Apple devices. This feature can help you locate your lost or stolen devices.
- Manage Your Subscriptions: Review and manage your Apple subscriptions regularly. Cancel any subscriptions you no longer need to save money.
- Back Up Your Data: Regularly back up your data to iCloud or a computer. This ensures your data is safe and can be restored in case of device failure or loss.
- Privacy Settings: Review and adjust your privacy settings to control how Apple collects and uses your data. You can limit ad tracking, location services, and data sharing.
9. Leveraging HOW.EDU.VN for Expert Tech Consultation
Navigating the Apple ecosystem can sometimes be challenging. At HOW.EDU.VN, we offer expert consultations to help you with any tech-related issues. Our team of experienced professionals is available to provide personalized advice and solutions tailored to your specific needs.
- Connect with Experts: HOW.EDU.VN provides direct access to leading experts in various fields. Whether you need help with setting up your Apple Account, troubleshooting technical issues, or optimizing your device settings, our experts can provide valuable guidance.
- Personalized Advice: Receive customized advice tailored to your specific needs and circumstances. Our experts take the time to understand your situation and provide solutions that are relevant and effective.
- Save Time and Money: Avoid costly mistakes and time-consuming troubleshooting by getting expert advice from HOW.EDU.VN. Our experts can help you resolve issues quickly and efficiently.
- Ensure Data Security: Protect your sensitive information by getting advice from trusted experts. HOW.EDU.VN prioritizes data security and confidentiality.
- Stay Up-to-Date: Keep up with the latest tech trends and best practices by consulting with HOW.EDU.VN. Our experts are constantly learning and adapting to new technologies.
If you encounter any issues or have questions about creating or managing your Apple Account, don’t hesitate to reach out to us. Our team is dedicated to providing you with the best possible support. Contact us at 456 Expertise Plaza, Consult City, CA 90210, United States, or via WhatsApp at +1 (310) 555-1212. You can also visit our website at HOW.EDU.VN for more information.
10. FAQ: Frequently Asked Questions About Creating an Apple Account
Here are some frequently asked questions about creating and managing an Apple Account:
- What is an Apple Account and why do I need one?
- An Apple Account is your personal account for accessing Apple services like iCloud, App Store, and Apple Music. You need it to download apps, store data, and sync devices.
- How do I create an Apple Account on my iPhone?
- You can create one during device setup or through the App Store. Follow the onscreen instructions to provide your email, password, and other required information.
- Can I create an Apple Account without a credit card?
- Yes, you can choose “None” when asked for payment information during the account creation process.
- What should I do if I forget my Apple Account password?
- You can reset your password by going to iforgot.apple.com and following the instructions.
- How do I enable two-factor authentication for my Apple Account?
- Go to Settings > Your Name > Sign-In & Security > Two-Factor Authentication and follow the instructions to enable it.
- Can I share my Apple services with my family?
- Yes, you can set up Family Sharing to share purchases, subscriptions, and iCloud storage with up to five family members.
- How do I change the country or region associated with my Apple Account?
- Go to Settings > Your Name > Media & Purchases > View Account > Country/Region and follow the instructions to change it.
- What is iCloud and how do I use it with my Apple Account?
- iCloud is Apple’s cloud storage service. You can use it to store photos, videos, documents, and backups. Enable iCloud in Settings > Your Name > iCloud.
- How do I update my Apple Account information, such as my email address or phone number?
- Go to Settings > Your Name > Personal Information to update your email address, phone number, and other account details.
- What should I do if I receive a suspicious email or message related to my Apple Account?
- Do not click any links or provide any personal information. Report the suspicious email or message to Apple at [email protected].
By following this comprehensive guide and leveraging the expertise available at HOW.EDU.VN, you can create and manage your Apple Account with ease and confidence. For personalized assistance, reach out to our team of experts today. Our address is 456 Expertise Plaza, Consult City, CA 90210, United States. Contact us via WhatsApp at +1 (310) 555-1212, or visit our website at how.edu.vn.