When working with 3D design software like Shapr3D, knowing how to effectively cut and modify bodies is crucial. It’s easy to make mistakes, and sometimes those mistakes can be hard to undo. This guide will show you a safe and efficient method to cut bodies in Shapr3D, ensuring your original design remains intact while you experiment with modifications. We’ll focus on using duplicates and simple tools to achieve precise cuts.
Before we dive into the cutting process, it’s paramount to understand the importance of preserving your original design. Accidental modifications to your primary design can lead to irreversible changes and lost work. Therefore, the first and most crucial step is to create a duplicate of your design.
Why Duplicate Your Design First?
Imagine spending hours crafting a complex 3D model, only to accidentally make a cut that ruins a critical component. Starting over can be incredibly time-consuming and frustrating. Duplicating your design before making any significant changes acts as a safety net. Think of it as creating a backup copy before editing an important document. By working on a duplicate, your original design remains untouched and readily available should anything go wrong or if you want to revert to the initial state.
Step-by-Step Guide to Cutting Bodies in Shapr3D
Now, let’s get into the practical steps of cutting bodies in Shapr3D. This method utilizes the duplicate feature along with basic sketching and plane tools to achieve clean and controlled cuts.
Step 1: Duplicate Your Design
The first step is to create a duplicate of the design you wish to modify. This is a simple yet vital step to safeguard your original work.
- Access Designs Thumbnails: Tap the Designs Thumbnails Page Icon, which is usually represented by four rectangles located at the top left of your Shapr3D interface.
- Duplicate Design: Tap and Hold the design you want to work on. Options will appear; select Duplicate.
- Rename Duplicate: Give your duplicated design a new, descriptive name. This helps you easily distinguish it from the original and keeps your projects organized.
This duplication process is quick and ensures you are working on a copy, leaving your original design safe.
Step 2: Duplicate a Body within the Design
Once you have your duplicated design open, the next step involves duplicating the specific body you intend to cut. This allows for a non-destructive editing approach.
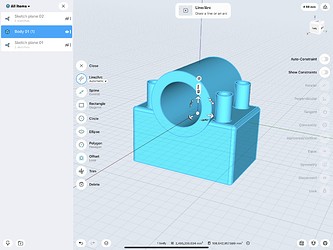
- Select the Body: In the Items list on the left side of your screen, select the Body you want to cut (e.g., Body 01 (1)).
- Duplicate Body: Tap the ✚ Icon (usually representing the “Add” or “Duplicate” function).
- Cancel Movement (Optional):
- Method 1 (Direction Arrow): Move the Direction Arrow slightly, then immediately move it back to its original position.
- Method 2 (Zero Input): Move the Direction Arrow, then type 0 (zero) and confirm with the Green Checkbox.
Both methods effectively cancel any displacement, resulting in a duplicate body created directly in the original position. Alternatively, you can intentionally move the duplicated body for better visualization and then move it back.
For visual clarity, consider this alternative method for duplication:
- Move and Duplicate: After hitting the ✚ Icon, move the Direction Arrow by a noticeable distance (e.g., 60mm, using the snap distances for convenience).
- Duplicate in Place: Hit the ✚ Icon again to turn off the Copy feature. Then, move the duplicated body back to its original position.
After completing these steps, check the Items list. You should now see a new duplicated body, such as Body 01 (2), alongside the original.
Step 3: Use Construction Plane and Sketch for Cutting
With a duplicated body in place, we can now prepare for the cut using a Construction Plane and a Sketch.
- Hide Duplicate Body: In the Items list, hide the duplicated body (e.g., Body 01 (2)) to avoid visual clutter.
- Create Offset Plane: Use Add > Construction plane > offset.
- Select Face: Select a suitable face on the original body (e.g., Body 01 (1)) from which you want to create your cutting plane.
- Set Offset Distance: Hit Next and use the Double Arrow to adjust the offset distance. For example, set it to 20mm.
- View Plane: Double tap with a finger on the newly created Construction Plane to orient the view for sketching.
- Sketch Rectangles: Use Sketch > Rectangle > Diagonal to sketch two rectangles on the Construction Plane. Ensure the edges of the rectangles are touching at the point where you intend to split the body.
Step 4: Complete the Cut (Boolean Operation)
Now we will use the sketched rectangles to perform the cut using a Boolean operation.
- Extrude Sketch: Select the upper rectangle (the one intended to cut Body 01 (1) as the base body). Drag the Double Arrow completely through the body in one continuous movement. This will perform a “Subtract” Boolean operation, effectively cutting the body.
- Hide Original Body: Hide the original body (Body 01 (1)) in the Items list.
- Unhide Duplicate Body: Unhide the duplicated body (Body 01 (2)).
Observe the Items list and the model in the viewport. The body should now be cut according to the shape of your sketched rectangle. The lower rectangle remains unextruded for the next step.
- Extrude Second Sketch: Select the lower rectangle and again drag the Double Arrow through the body in one motion. This will create the “cap” or the other part of your cut body.
- Unhide Original Body: Unhide the original body (Body 01 (1)) in the Items list.
You have now successfully cut the body using a duplicate and Boolean operations. You will have two separate bodies resulting from the cut, along with your untouched original design safely stored.
Conclusion
This step-by-step guide provides a safe and straightforward method for cutting bodies in Shapr3D. By prioritizing duplication and utilizing basic tools like Construction Planes and Sketches, you can confidently modify your designs without risking your original work. While there are various methods to achieve similar results in Shapr3D, this approach emphasizes clarity and minimizes potential errors, making it an excellent technique for both beginners and experienced users. Experiment with different shapes and cutting planes to further explore the possibilities within Shapr3D.