Freeing up storage space and decluttering your digital life on your Mac often starts with removing applications you no longer need. Deleting apps on macOS is a straightforward process, but the method can vary slightly depending on where you originally downloaded the application from. This guide provides you with comprehensive, step-by-step instructions on How To Delete Apps from your Mac effectively, covering all scenarios and ensuring you reclaim valuable disk space.
Whether you downloaded an app from the App Store or directly from a developer’s website, this article will walk you through the necessary steps to completely remove it from your system. We’ll cover using Launchpad for App Store apps, utilizing the Finder for other applications, and what to do if you encounter any issues during the deletion process.
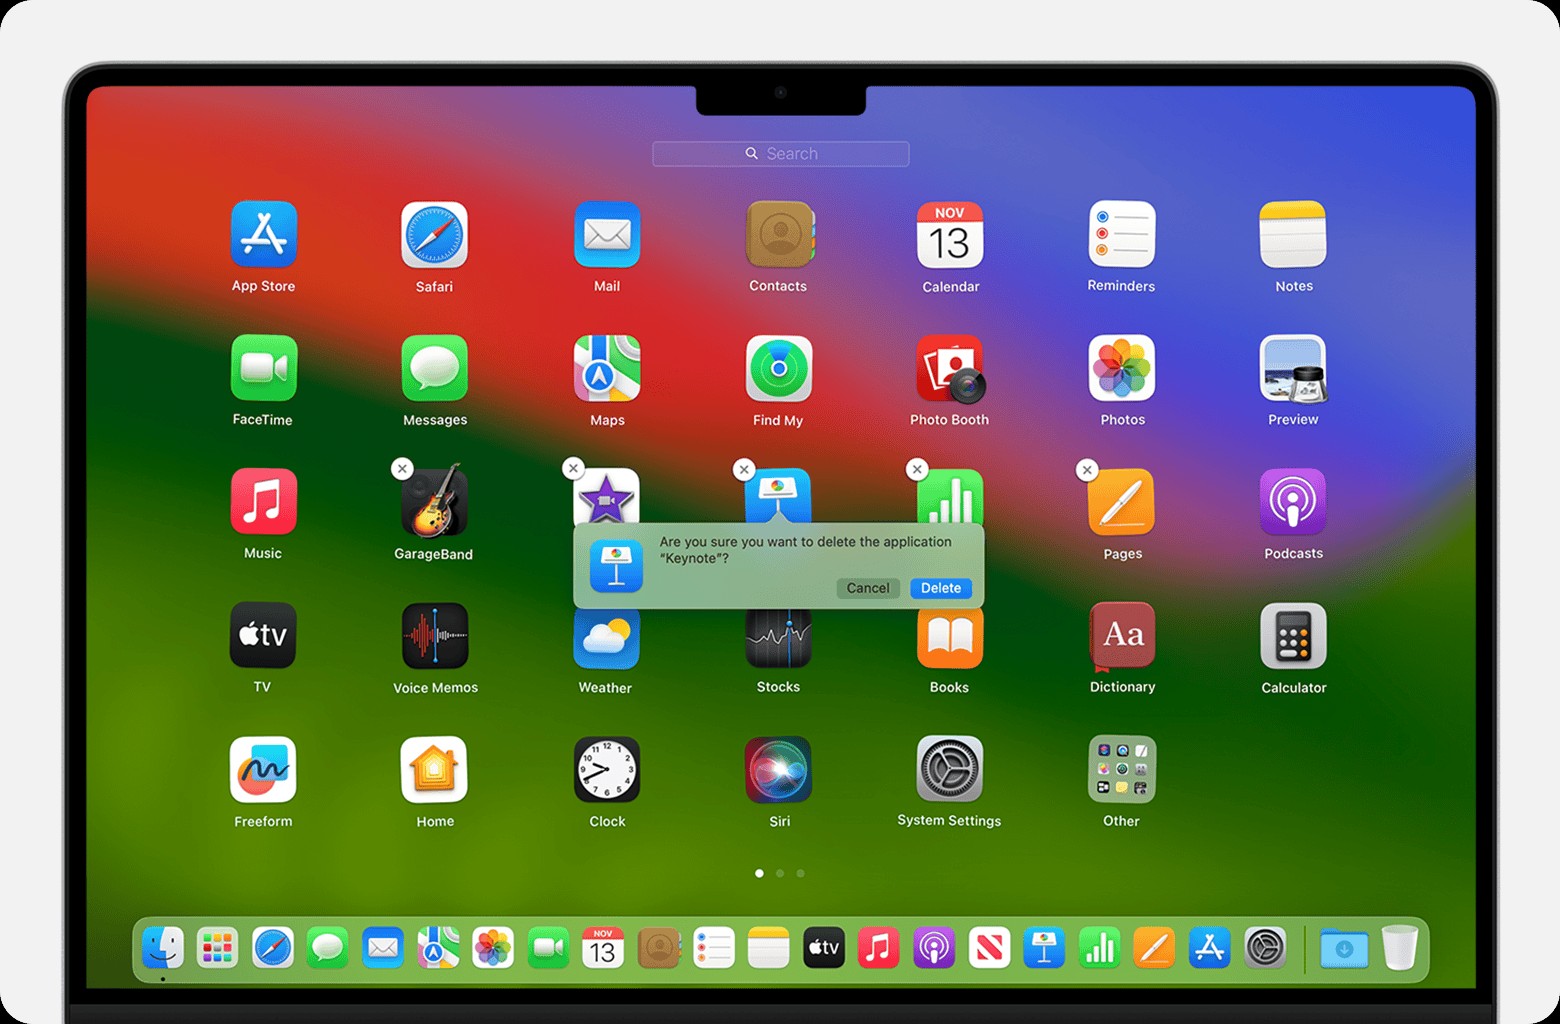
Deleting Apps Downloaded from the App Store Using Launchpad
Launchpad is a convenient application launcher built into macOS, and it offers a particularly easy way to delete apps you’ve installed from the Mac App Store. Here’s how to use it:
-
Quit the Application: Before you attempt to delete any app, ensure it is completely closed. If the app is running, even in the background, you may encounter issues during the uninstallation process.
-
Open Launchpad: Access Launchpad by clicking its icon in the Dock. It typically resembles a rocket ship. Alternatively, you can open Launchpad from your Applications folder, or use a trackpad gesture by pinching closed with your thumb and three fingers.
-
Locate the App: Once Launchpad is open, you need to find the app you wish to delete. If you have many apps installed, you can use the search bar at the top of the Launchpad window to quickly locate the app by typing its name. If your apps are spread across multiple pages in Launchpad, navigate between pages by clicking the dots at the bottom of the screen or swiping left or right on your trackpad with two fingers.
-
Enter Jiggle Mode: To initiate the deletion process, press and hold the Option key on your keyboard. Alternatively, click and hold on any app icon in Launchpad for a few moments. This will cause all the app icons to start jiggling, indicating that you are in edit mode and can delete apps.
-
Delete the App: Look for a Delete button (it looks like an “X”) that appears in the top-left corner of apps downloaded from the App Store. Click the Delete button next to the app you want to remove. A confirmation dialog box will appear, asking “Are you sure you want to delete [App Name]?” Click Delete to confirm your decision. The app will be immediately uninstalled from your Mac.
Troubleshooting Launchpad Deletion
If you don’t see the Delete button next to an app in Launchpad, it means the app was likely not downloaded from the App Store. For apps installed from other sources, you’ll need to use the Finder to uninstall them, as described in the next section.
Deleting Apps Using the Finder: For Apps from Any Source
The Finder is the default file manager on macOS, and it provides a universal method for deleting applications, regardless of their origin. This method is essential for removing apps downloaded from the internet, installed via disk images, or through other sources outside the App Store.
-
Quit the Application: As with Launchpad, the first step is to ensure the app you want to delete is not running. Quit the application completely before proceeding.
-
Open Finder: Switch to the Finder. You can do this by clicking on your desktop background or by clicking the Finder icon in your Dock, which looks like a blue and white smiling face.
-
Navigate to the Applications Folder: The majority of applications on your Mac are stored in the Applications folder. There are several ways to access this folder:
- Sidebar: In any Finder window, look for “Applications” in the sidebar. Click on it to open the Applications folder.
- Go Menu: In the Finder menu bar at the top of your screen, click on Go and then select Applications from the dropdown menu.
- Spotlight: Use Spotlight search. Press Command-Space bar to open Spotlight, type “Applications,” and press Return when the Applications folder is highlighted in the results.
-
Locate and Select the App: Once you are in the Applications folder, find the app you wish to delete. You can scroll through the list or use the Finder’s search function (in the top-right corner of the Finder window) to locate the app by name. Click on the app icon to select it.
-
Move to Trash: After selecting the app, you need to move it to the Trash. There are multiple ways to do this:
- Drag and Drop: Click and drag the app icon directly to the Trash icon in your Dock.
- File Menu: With the app selected, click on File in the Finder menu bar, and then choose Move to Trash from the dropdown menu.
- Keyboard Shortcut: Select the app and press Command-Delete (⌘⌫) on your keyboard.
-
Authenticate (If Required): In some cases, especially when deleting applications installed system-wide, you may be prompted to enter your administrator username and password. If a dialog box appears asking for your credentials, enter the username and password you use to log in to your Mac and click OK.
-
Empty the Trash: Moving an app to the Trash does not immediately delete it from your Mac; it simply moves it to the Trash bin. To permanently delete the app and reclaim the storage space, you need to empty the Trash. To do this, click on Finder in the menu bar and select Empty Trash. Confirm your action when prompted by clicking Empty Trash in the dialog box.
Troubleshooting Finder Deletion
-
System Apps: You cannot delete certain apps that are essential to macOS functionality using the Finder. These include built-in apps like Mail, Safari, Music, and other core system applications. macOS prevents their deletion to ensure system stability.
-
App in Use Error: If you receive a message saying the app cannot be deleted because it is in use, ensure the app is not running. Force quit the application if necessary (using Command-Option-Escape). If the problem persists, restarting your Mac or booting into Safe Mode can resolve the issue by ensuring no background processes are using the app. Then, try deleting the app again.
Important Considerations After Deleting Apps
-
Related Files and Folders: Deleting an app using Launchpad or Finder primarily removes the application itself. However, some apps may create associated files and folders in other locations on your system, such as preference files, support files, or user data. To completely remove all traces of an application, you might need to manually search for and delete these related files. Apps like AppCleaner can assist in this process by automatically finding and removing associated files.
-
Subscriptions: Uninstalling an app does not automatically cancel any subscriptions you may have purchased through the App Store or directly with the app developer. If the app involves a subscription, you’ll need to cancel it separately to avoid future charges. For App Store subscriptions, you can manage them through your Apple ID settings. Learn how to cancel subscriptions for apps downloaded from the App Store.
-
Uninstallers: Some applications, especially more complex software, come with their own dedicated uninstaller applications. These uninstallers are often located within the app’s folder in the Applications directory or provided as a separate download. If an app came with an uninstaller (often named “Uninstall [App Name]” or “[App Name] Uninstaller”), using it is generally the most thorough way to remove the application and all its components.
-
Deleting Apps on Other Apple Devices: If you also use iPhones or iPads, the process for deleting apps on those devices is different. Learn how to delete apps on your iPhone, iPad, and iPod touch.
By following these instructions, you can confidently delete apps from your Mac and effectively manage your storage space, keeping your system clean and optimized. Remember to always quit applications before attempting to delete them and consider whether you need to remove associated files for a complete cleanup.