Are you looking to permanently remove your Facebook presence from your mobile device? Whether you’re concerned about privacy, tired of social media distractions, or simply ready to move on, deleting your Facebook account is a definitive step. Unlike deactivation, which is a temporary pause, deletion is permanent and irreversible after a short grace period. This guide will walk you through the process of how to delete your Facebook account permanently from your mobile phone, ensuring you understand each step and the implications.
Before we dive in, it’s crucial to understand the difference between deactivating and deleting your Facebook account. Deactivation is like hitting the pause button – your profile is hidden, but you can reactivate it anytime. Deletion, on the other hand, is like hitting the stop and reset button – your account and all its data will be permanently removed after a 30-day window. If you are certain about permanently leaving Facebook behind, deletion is the path to take.
Steps to Permanently Delete Your Facebook Account on Android
Deleting your Facebook account using an Android phone is straightforward. Follow these steps to permanently remove your profile:
-
Open the Facebook App: Locate and open the Facebook application on your Android device.
Alt Text: Facebook app icon on an Android phone screen, ready to open the application.
-
Access Settings & Privacy: Tap on your profile picture, usually located in the top right corner, to expand the menu. Scroll down and select “Settings & Privacy”.
Alt Text: Settings & Privacy option highlighted in the Facebook app menu on Android.
-
Go to Settings: Within the “Settings & Privacy” dropdown menu, tap on “Settings”.
-
Navigate to Access and Control: Scroll down to the “Your Facebook Information” section and tap on “Access and Control”.
-
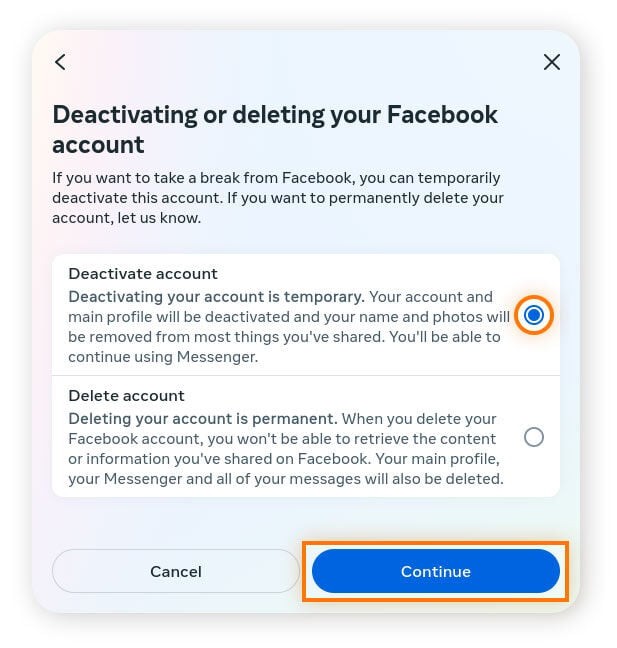
Choose Deactivation and Deletion: In the “Access and Control” settings, select “Deactivation and deletion”.
-
Select Delete Account: You will be presented with two options: “Deactivate account” and “Delete account”. Choose “Delete account” to proceed with permanent deletion.
-
Continue to Account Deletion: Tap on “Continue to Account Deletion”. Facebook will present you with information about deleting your account, including the option to download your information. Review this information and then tap “Continue to Account Deletion” again if you are ready to proceed.
Alt Text: Continue to Account Deletion button highlighted on the Facebook app screen during the deletion process.
-
Enter Password and Confirm: For security purposes, you will be asked to re-enter your Facebook password. Enter your password and tap “Continue” to confirm the permanent deletion of your Facebook account.
Steps to Permanently Delete Your Facebook Account on iPhone
The process for deleting your Facebook account permanently from an iPhone is very similar to Android. Here’s how to do it:
-
Open the Facebook App: Open the Facebook application on your iPhone or iPad.
Alt Text: Facebook app interface on an iPhone, ready to navigate to settings.
-
Access Settings & Privacy: Tap the menu icon (three horizontal lines), usually located in the bottom right corner, and then tap “Settings & Privacy”.
Alt Text: Settings & Privacy option within the Facebook app menu on iPhone.
-
Go to Settings: In the “Settings & Privacy” dropdown, select “Settings”.
-
Navigate to Access and Control: Scroll down to “Your Facebook Information” and tap “Access and Control”.
-
Choose Deactivation and Deletion: Select “Deactivation and deletion”.
-
Select Delete Account: Choose “Delete Account” as your option.
-
Continue to Account Deletion: Tap “Continue to Account Deletion”, review the information, and confirm again by tapping “Continue to Account Deletion”.
-
Enter Password and Confirm: Enter your Facebook password when prompted and tap “Continue” to finalize the permanent deletion.
Deleting Your Facebook Account from a Browser (Alternative Method)
While this article focuses on mobile deletion, knowing how to delete your account from a browser is also helpful, especially if you prefer a larger screen or are having trouble with the app. The steps are very similar:
- Log into Facebook: Open a web browser on your computer or mobile and go to Facebook.com. Log in with your credentials.
- Access Settings & Privacy: Click on your profile picture in the top right corner and select “Settings & privacy”.
- Go to Settings: Click on “Settings”.
- Navigate to Your Facebook Information: In the left sidebar, click on “Privacy” and then “Your Facebook Information”.
- Choose Deactivation and Deletion: Click on “Deactivation and Deletion”.
- Select Delete Account: Choose “Delete account” and then “Continue to account deletion”.
- Enter Password and Confirm: Re-enter your password and click “Continue” to confirm the permanent deletion.
Deactivation vs. Deletion: Understanding the Difference
It’s worth reiterating the key difference between deactivation and deletion to ensure you are making the choice that aligns with your intentions.
-
Deactivation: This is a temporary suspension. Your profile is hidden from other users, and you can reactivate it at any time by simply logging back in. Facebook retains your data, and everything will be as you left it when you return. You can even continue using Messenger while your Facebook account is deactivated.
-
Deletion: This is a permanent removal. After initiating deletion, you have a 30-day grace period to cancel the request. If you do nothing or let the 30 days pass, your account and all your information will be permanently deleted and unrecoverable.
Reactivating a Facebook Account After Deactivation vs. Recovering After Deletion
-
Reactivation: Reactivating a deactivated account is instant. Just log in with your email and password, and your profile will be live again.
-
Recovery after Deletion: If you’ve chosen to delete your account, you have a 30-day window to cancel the deletion. To do this, log back into Facebook within those 30 days. After 30 days, the deletion process begins, and account recovery is no longer possible.
Reasons to Permanently Delete Your Facebook Account
People choose to permanently delete their Facebook accounts for various reasons, including:
- Privacy Concerns: Worries about data collection, online tracking, and how Facebook uses personal information.
- Time Management: Reducing time spent on social media to improve productivity and focus.
- Mental Health: Minimizing exposure to social comparison, cyberbullying, and the pressures of online social life.
- Moving On: Simply feeling ready to disconnect from the platform and its associated connections and content.
Bolstering Your Online Privacy Beyond Facebook Deletion
Deleting your Facebook account is a significant step towards enhancing your online privacy, but it’s just one piece of the puzzle. To further protect your digital footprint, consider using tools like AVG AntiTrack. Software like AntiTrack helps prevent websites and advertisers from tracking your online activity, giving you greater control over your personal data and browsing privacy.
Get AVG AntiTrack
Get it for PC
Conclusion
Permanently deleting your Facebook account from your mobile phone is a definitive action to take control of your online presence. By following these steps for Android or iPhone, you can remove your profile and data from Facebook’s servers. Remember to consider downloading your data before you proceed with deletion, and be certain about your decision, as it is irreversible after the 30-day grace period. If you’re looking to enhance your overall online privacy, explore additional tools and practices to protect your digital footprint beyond just deleting social media accounts.