Keeping your Google search history clean is a crucial step in managing your digital footprint and protecting your personal information. Whether you’re concerned about privacy, sharing a computer, or simply prefer a clutter-free online experience, deleting your Google search history is a straightforward process. This guide provides detailed instructions on how to delete your Google search history across various devices and browsers, ensuring you stay in control of your data.
Clearing Google Search History on PC or Mac
Deleting your Google search history on a desktop computer, whether it’s a PC or Mac, can be done directly through your web browser. The steps are similar across different browsers, but here’s a detailed walkthrough for Google Chrome, the most widely used browser.
- Launch Google Chrome: Open the Chrome browser on your computer.
- Access Browser History: Click on the three vertical dots located in the top right corner of the browser window. In the dropdown menu, hover over History, and then click on History again in the submenu. Alternatively, you can use the keyboard shortcut
Ctrl+Hon Windows orCmd+Yon Mac to directly open the history page. - Open Clear Browsing Data: On the left-hand menu of the History page, click on Clear browsing data. This will open a popup window with options to delete various types of browsing data.
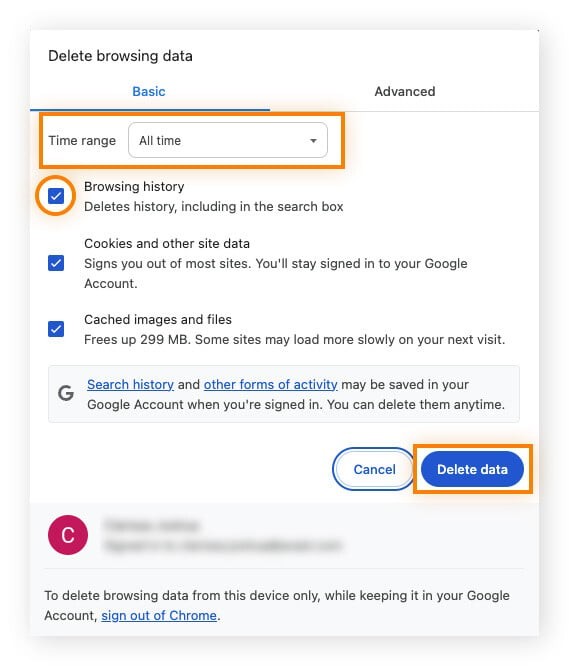
- Choose Time Range and Data to Delete: In the “Clear browsing data” window, you’ll see a “Time range” dropdown menu. Click on it and select All time to delete your entire Google search history. Ensure that the Browsing history checkbox is ticked. If you also want to clear other data like cookies or cached images and files, you can check those boxes as well.
- Delete Data: Finally, click the Clear data button to permanently delete your selected browsing data, including your Google search history.
It’s important to note that these steps clear your browser’s Google search history. If you are logged into your Google account while searching, Google also saves your activity to your Google account history. To completely remove your search history, you’ll need to clear it from your Google account as well.
How to Delete Search History from Your Google Account
Even after clearing your browser history, Google might still retain records of your online activity if you’re signed in to your Google account. This activity, tracked independently of your browser, includes your searches, websites you visit, videos watched, and even location history if enabled. To ensure complete privacy, you should also clear your Google account history.
- Go to Google My Activity: Open your web browser and navigate to Google’s My Activity page. Make sure you are logged in to the Google account for which you want to delete the search history.
- Access Delete Activity By: On the My Activity page, you will find a “Delete” button in the left-hand menu or sometimes directly below the “Search your activity” bar. Click on this Delete button.
- Select Time Range: In the “Delete activity by” window, choose the time period for which you want to delete your data. To delete your entire Google search history, select All time from the dropdown menu.
- Choose Products/Activity Types: You can choose to delete activity from specific Google products or activity types. Select All products to delete history across all Google services, or you can select specific services like “Search,” “YouTube,” etc. After making your selection, click Next.
- Review and Confirm Deletion: Google will show you a summary of the data you are about to delete. Review this information and click Delete to confirm and permanently remove your Google search history from your Google account.
- Confirmation: You will see a confirmation message indicating that you have successfully deleted your Google searches. Click Got it to finish the process.
Deleting Specific Items from Your Search History
Sometimes, you may not want to delete your entire search history but only remove specific searches or websites you’ve visited. Both browser history and Google account history allow you to delete individual items.
Removing Items from Browser Search History
To delete individual items from your browser search history (using Chrome as an example):
- Open Chrome History: Follow steps 1 and 2 from the “Clearing Google Search History on PC or Mac” section to access your Chrome history page.
- Select Items to Delete: In the History menu, locate the specific websites or searches you want to remove. Tick the checkbox next to each item you wish to delete.
- Delete Selected Items: Once you’ve selected all the items, click the Delete button at the top right of the history page.
- Confirm Removal: Click Remove in the confirmation popup to permanently delete the selected pages and searches from your browser history.
Removing Items from Google Account History
To delete individual items from your Google account history:
- Go to Google My Activity: Navigate to Google’s My Activity page and ensure you are logged in.
- Locate Items to Delete: Scroll down through your activity feed to find the specific search entries or websites you want to delete. You can also use the search bar to filter your activity.
- Delete Individual Items: Once you find an item you want to delete, click the X icon located next to it. This will immediately delete that specific item from your Google account search history.
Deleting Google Search History on Android Devices
Deleting your Google search history on your Android phone or tablet is equally important, especially since mobile devices are personal and carry sensitive information. You can clear history from both the Google Search app and the Chrome browser on Android.
Clearing History in the Google Search App
- Open Google App: Launch the Google app on your Android device.
- Access Search History: Tap your profile image or initials in the top right corner of the app. Then, tap Search history from the menu.
- Tap Delete: On the Search history page, tap Delete.
- Choose Time Range: Select a time period from the dropdown menu. Choose Delete all time to erase your entire search history in the app.
- Select Activities and Delete: Choose the activities you want to delete. You can check Select All for complete removal. Tap Delete at the bottom to finalize the process.
Clearing History in Google Chrome on Android
- Open Chrome: Open the Chrome browser app on your Android device.
- Access History: Tap the three dots in the top right corner and select History.
- Clear Browsing Data: Tap Clear browsing data.
- Select Browsing History and Time Range: Ensure Browsing history is checked. Choose your desired time range, selecting All time to delete everything.
- Clear Data: Tap Clear data to delete your Chrome browsing history.
Deleting Google Search History on iPhone & iPad
For iPhone and iPad users, deleting Google search history is similar to Android. You can clear history from the Google app and the Chrome browser app.
Clearing History in the Google App on iOS
The process for deleting search history in the Google app on iOS is identical to the steps outlined for the Google Search app on Android. Refer to the “Clearing History in the Google Search App” section above.
Clearing History in Chrome on iPhone & iPad
- Open Chrome: Open the Chrome app on your iPhone or iPad.
- Access History: Tap the three horizontal dots at the bottom of the screen, then tap History.
- Delete Browsing Data: Tap Delete Browsing Data at the bottom of the History screen.
- Choose Time Range and Data: Select the time range. To delete all Google history, choose All time. Make sure Browsing History is checked. You can also choose to clear cookies and cache here.
- Confirm Deletion: Tap Delete Browsing Data again to confirm, then tap Done.
Managing Your Google History for Enhanced Privacy
Beyond manual deletion, Google provides options to manage your history proactively, including setting up auto-delete and controlling activity tracking.
Setting Up Auto-Delete for Google History
Google allows you to automatically delete your web and app activity, including search history, after a set period: 3, 18, or 36 months. This can be configured on both desktop and mobile.
Setting Auto-Delete on PC or Mac
- Go to Google My Account: Navigate to Google’s My Account page and sign in.
- Access Data & Privacy: Select Data & privacy from the left menu.
- Web & App Activity: Scroll down to “History settings” and click Web & App Activity.
- Choose Auto-delete Option: Under “Auto-delete,” select Choose an auto-delete option.
- Select Time Period: Choose Auto-delete activity older than. Select your preferred time period (3, 18, or 36 months) from the dropdown menu and click Next.
- Confirm Auto-Delete: Click Confirm to activate auto-deletion of your web activity.
Setting Auto-Delete on Mobile (Google App)
- Open Google App and Access Search History: Follow steps 1 and 2 from “Clearing History in the Google Search App” to reach the Search history page in the Google app.
- Tap Auto-delete: Tap Auto-delete.
- Choose Time Period and Confirm: Select Auto-delete activity older than, choose your time period, tap Next, and then Confirm.
Turning Off Google Activity Tracking
To prevent Google from tracking your searches and web activity in the future, you can turn off Web & App Activity tracking in your Google account settings.
- Go to Google My Activity: Visit Google’s My Activity page.
- Web & App Activity Controls: Look for Web & App Activity. If it says “On,” click the On button.
- Turn Off Tracking: Select Turn off and then Got it to disable Web & App Activity tracking. You can also turn off Location History and YouTube History on this page for further privacy.
Common Issues Deleting Google Search History
If you encounter problems deleting your Google search history, consider these common reasons:
- Outdated Browser: Ensure you are using the latest version of Chrome or your browser. Update if necessary and try again.
- Browser History Only Cleared: Remember that clearing browser history is different from clearing your Google account history. Make sure to clear both for complete removal.
- Synced Devices: If your Google account is synced across multiple devices, you need to clear history on each device individually.
Why Delete Your Google Search History?
Regularly deleting your Google search history is a good privacy practice. Your search history can reveal a lot about your interests, habits, and even sensitive information. Deleting it helps:
- Protect Privacy: Limit the amount of personal data available to Google and potential advertisers.
- Reduce Targeted Ads: While Google still tracks data, deleting history might lead to less personalized advertising.
- Prevent Data Exposure: Minimize the risk of sensitive information being exposed in case of account breaches or if someone else accesses your device.
- Avoid Price Discrimination: Data brokers and companies can use browsing history for price discrimination; deleting history can help mitigate this.
Maintaining Online Privacy Beyond Deleting History
While deleting your Google search history is beneficial, for comprehensive online privacy, consider these additional steps:
- Use a VPN: A Virtual Private Network (VPN) encrypts your internet connection and masks your IP address, enhancing your anonymity online.
- Anonymous Browsing: Use incognito mode or private browsing in your browser for sessions you want to keep separate from your main browsing history.
- Privacy-Focused Browser Extensions: Utilize browser extensions designed to block trackers and enhance privacy.
- Avast AntiTrack: Consider using specialized privacy software like Avast AntiTrack, which helps prevent tracking and browser fingerprinting, providing a higher level of online privacy protection.
[Free trial
Download Avast AntiTrack ](https://www.avast.com/download-thank-you.php?product=APW)
Get it for Mac
[Free trial
Download Avast AntiTrack ](https://www.avast.com/download-thank-you.php?product=APW)
Get it for PC
By following these comprehensive steps, you can effectively delete your Google search history across various platforms and take proactive measures to manage your online privacy. Regularly managing your search history and exploring additional privacy tools are essential in today’s digital landscape to safeguard your personal information.