Taking a screenshot is a fundamental digital skill in today’s world, essential for everyone from tech-savvy teens to parents navigating the online landscape. Whether you need to capture important online information, share something you see on your screen, or document instances of cyberbullying, knowing How To Do A Screenshot is invaluable. This guide will walk you through the process of taking screenshots on various devices, including your computer, smartphone, and tablet.
Screenshots are not only useful for practical purposes like preserving online resources when offline access isn’t available or illustrating how-to guides for computer programs. They also play a critical role in online safety, particularly in providing evidence of cyberbullying. While it’s important to acknowledge that screenshots can be misused, understanding how to take a screenshot empowers individuals, especially young people, to effectively document and address negative online interactions.
What is a Screenshot?
Before diving into the methods, let’s define what a screenshot actually is. A screenshot, also known as a screen capture or screen grab, is a digital image of what’s displayed on your device’s screen at a specific moment. Think of it as taking a photograph of your screen. This image is saved as a graphics file, allowing you to store, share, and edit the captured content. You can take screenshots using built-in features of your operating system, specific software, or simple keyboard or button shortcuts, depending on your device.
How to Take a Screenshot on a Computer
Taking a screenshot on a computer is generally straightforward, with different methods available for Windows and Mac operating systems.
Windows
Windows offers several ways to capture your screen, catering to different needs and preferences.
-
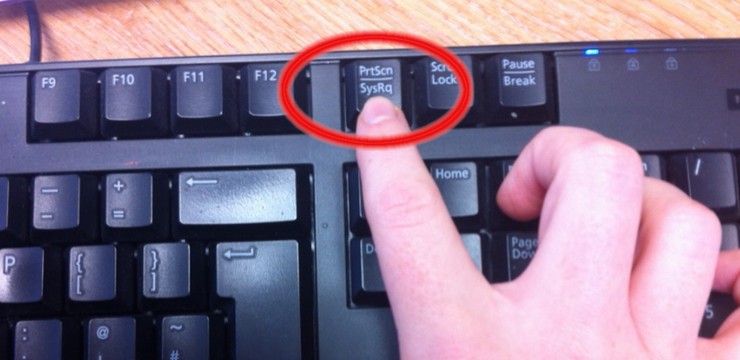
Using the Print Screen (PrtScn) Key for a Full-Screen Capture: The quickest way to capture your entire screen on a Windows computer is by pressing the Print Screen key, often labeled as PrtScn or Print Scrn. This key is typically located in the top right area of your keyboard. Pressing this button copies an image of your entire screen to your clipboard, a temporary storage area. To view, edit, or save this image, you’ll need to paste it into an application like Microsoft Word, Paint, or any image editing software. For example, open a Word document and press Ctrl + V (or right-click and select “Paste”). This will insert the screenshot into your document.
-
Capturing an Active Window: If you only need to capture the currently active window instead of the entire screen, press the Alt key and the PrtScn key simultaneously (Alt + PrtScn). This will capture only the window you are currently working in and copy it to the clipboard, ready to be pasted into another application.
-
Utilizing the Snipping Tool for Selective Screenshots: For more control over what you capture, Windows includes a handy program called Snipping Tool. This tool is available in Windows 7, Windows Vista, and later versions. To use it, search for “Snipping Tool” in your Windows search bar and open the application. Click on “New” and then select the type of snip you want to create: Free-form, Rectangular, Window, or Full-screen. Drag your cursor to select the area you wish to capture. Once captured, Snipping Tool allows you to annotate the screenshot using pen and highlighter tools before saving it.
Note: Some laptops may have different keyboard layouts or require using the Fn (Function) key in combination with the PrtScn key. Consult your laptop’s user manual for specific instructions if you encounter difficulties.
Mac
Mac computers also provide several built-in methods for taking screenshots, using keyboard shortcuts and a dedicated utility.
-
Capturing the Entire Screen with Keyboard Shortcut: To take a screenshot of your entire screen on a Mac, press the Command (⌘) + Shift + 3 keys together. The screenshot will be automatically saved as a file on your desktop, making it easily accessible.
-
Screenshotting a Selected Area: If you want to capture only a specific portion of your screen, press the Command (⌘) + Shift + 4 keys together. Your cursor will change to a crosshair. Click and drag to select the area you want to screenshot. Once you release the mouse button, the selected area will be captured and saved as a file on your desktop.
- Using the Grab Utility for Screenshot Options: Similar to Windows’ Snipping Tool, macOS offers a built-in utility called Grab. You can find Grab by searching for it in Spotlight (Command + Spacebar). Grab allows you to take screenshots by going to the “Capture” menu and selecting the type of screenshot you want: Selection, Window, Screen, or Timed Screen. Grab provides similar functionality to the keyboard shortcuts but offers a graphical interface for choosing screenshot types.
How to Take a Screenshot on a Smartphone/Tablet
Taking screenshots on smartphones and tablets varies slightly depending on the operating system, primarily Android and iOS (Apple). While specific button combinations might differ across devices, the general principle remains the same.
-
General Method: Power and Volume Buttons: For most Android and some older iOS devices, the common method to do a screenshot is to simultaneously press and hold the Power button and the Volume Down button. Hold them for a second or two, and you should see a screen flash or hear a camera shutter sound, indicating that a screenshot has been taken. The screenshot is typically saved to your device’s gallery or photos app.
-
iOS (Apple) Devices: Power and Home/Volume Up Buttons: On iPhones and iPads with a Home button, press and hold the Power button and the Home button at the same time. For newer iPhones and iPads without a Home button, press and quickly release the Power button and the Volume Up button simultaneously. Again, a screen flash or shutter sound will confirm the screenshot, which is saved to your Photos app.
-
Android Variations: Some Android devices, particularly Samsung phones, may use the Power button and Home button combination (if a Home button is present). Others might use gestures like swiping the screen with your palm to capture a screenshot. The best way to find the specific method for your Android device is to search online for “[your device model] how to take a screenshot.”
For visual guidance, you can refer to online video tutorials. For example, YouTube offers numerous videos demonstrating how to screenshot on specific phone and tablet models.
How to Take a Screen Recording on a Phone
Expanding beyond static screenshots, many modern smartphones offer screen recording capabilities, allowing you to capture videos of your screen activity.
-
Built-in Screen Recording (iOS and Android): Recent versions of both iOS (iOS 11 and later) and Android operating systems have integrated screen recording features. On iOS, you can enable screen recording in Settings > Control Centre > Customise Controls > Screen Recording. Once enabled, you can access the screen recording feature from your Control Centre (swipe down from the top-right corner on newer iPhones or swipe up from the bottom on older iPhones). On Android, the process varies slightly depending on the manufacturer, but often involves accessing quick settings from the notification shade and looking for a “Screen record” icon.
-
Third-Party Apps (Older Devices): For older Android or iOS devices that lack built-in screen recording, various third-party apps are available in app stores that provide screen recording functionality.
Screen recordings can be particularly useful for creating tutorials, demonstrating app usage, or capturing dynamic online interactions. Recordings are typically saved to your device’s camera roll or photos app.
Mastering how to do a screenshot and screen recording is an essential skill set for navigating the digital world effectively and safely. Whether you are preserving important information, creating content, or documenting online experiences, these tools are at your fingertips across various devices.
