Maximize your productivity on your Mac by mastering Split View, a powerful feature that allows you to work with two apps side by side simultaneously. This guide provides a detailed walkthrough on how to use split screen on Mac, enhancing your multitasking capabilities and streamlining your workflow. Whether you’re comparing documents, referencing information while writing, or simply want to keep multiple applications in view, Split View is an invaluable tool for any Mac user.
Getting Started with Split View on macOS
Split View on Mac offers an efficient way to manage your workspace, eliminating the need to constantly switch between applications. Here’s how to activate and customize Split View to suit your needs:
Step-by-Step Guide to Entering Split View
-
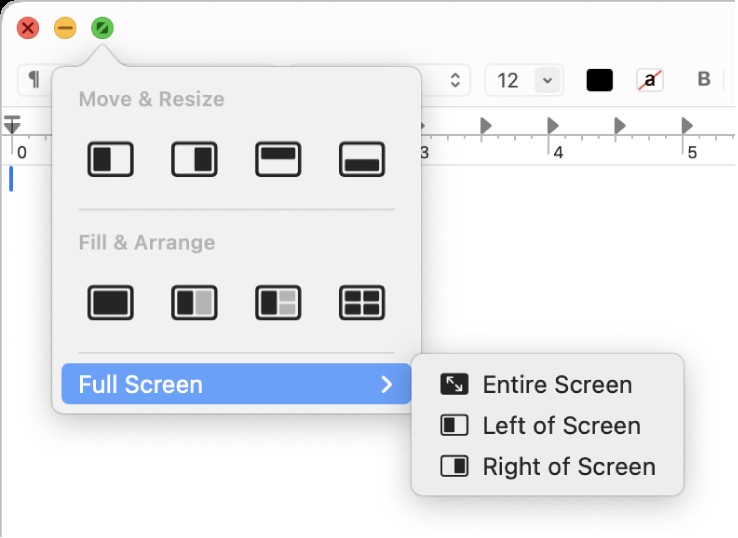
Initiate Split View: Begin by hovering your mouse pointer over the green button located in the top-left corner of any app window. This button, typically used to maximize or enter full screen, reveals a hidden menu when you hover over it.
-
Choose Tiling Direction: From the dropdown menu, select either “Tile Window to Left of Screen” or “Tile Window to Right of Screen”. This action will cause the current window to occupy exactly half of your screen, snapping to the chosen side.
-
Select the Second App: After tiling the first window, the other half of your screen will display your desktop, showing all other open app windows as thumbnails. Click on the second application you wish to work with in Split View. This app will then expand to fill the remaining half of your screen, placing it alongside your first selected app.
Upon completing these steps, you will have successfully activated Split View, and both selected applications will be open and fully functional side-by-side in a new desktop space, ready for you to work more efficiently.
Mastering Split View: Tips and Tricks
Once you’re in Split View, macOS provides several intuitive controls to customize your experience and optimize your workflow:
Adjusting Window Sizes
To resize the split screen windows, locate the separator bar—the vertical line dividing the two apps in the middle of your screen.
- Resize: Hover your cursor over the separator bar until it changes to a double arrow. Click and drag the bar to the left or right to enlarge one window while simultaneously reducing the size of the other. This allows you to prioritize screen real estate for the app you need to focus on most.
- Return to Equal Sizes: To quickly revert the windows back to an equal split, simply double-click the separator bar. The screen will automatically redistribute space evenly between both applications.
Swapping Window Positions
If you decide you need the apps on opposite sides of the screen, Split View allows for easy swapping:
- Drag to Swap: Click and hold the title bar (the top bar of the window displaying the app’s name) of the app you wish to move. Drag this window across the separator bar to the opposite side of the screen. Release the mouse button, and the two apps will switch positions.
Replacing an App in Split View
Need to change one of the apps in your Split View setup? Here’s how to replace an application without exiting Split View entirely:
- Replace Window Option: Click on the window of the app you want to replace. Hover over the green button in the top-left corner and from the dropdown menu, select “Replace Tiled Window”.
- Choose New App: Your desktop will appear, showcasing available app windows. Select the new application you want to use in Split View. It will replace the previous app, maintaining the Split View arrangement with the other original app.
- Cancel Replacement: If you change your mind and decide not to replace the window, simply click anywhere on the desktop to return to your current Split View setup.
Exiting Split View
There are multiple ways to exit Split View, depending on whether you want to return one app to full screen or move both apps back to individual windows:
- Move to Desktop: To move just one app out of Split View and into its own window on the desktop, click on the window you want to exit. Hover over the green button, and choose “Move Window to Desktop”. This will send the selected app to a regular desktop window, while the other app will remain in full-screen mode in its own space.
- Full Screen One App: To make one of the apps full screen and remove the Split View, click on the window you want to maximize. Hover over the green button and select “Make Window Full Screen.” The selected app will expand to full screen in its own space, and the other app from the Split View will also be in full-screen mode in a separate space.
After moving an app to the desktop or full screen, you can easily access the remaining app (now in full screen in its own space) by using Mission Control. Press Control-Up Arrow (or swipe up with three or four fingers on your trackpad) to enter Mission Control, and then click on the app in the Spaces bar at the top of the screen.
Split View and Mission Control Integration
Split View seamlessly integrates with Mission Control and Spaces, enhancing your ability to manage multiple tasks and windows:
- Split View in Spaces: Split View setups are created within new desktop spaces. This organization helps keep your workspaces clean and focused. You can easily switch between different Split View spaces and regular desktops using Mission Control or trackpad gestures for efficient navigation.
- Creating Split View from Full Screen: If you’re already using an app in full screen, you can still initiate Split View. Enter Mission Control (Control-Up Arrow or swipe up). Drag another window from Mission Control onto the thumbnail of the full-screen app in the Spaces bar at the top of the screen. This creates a new Split View space with both applications. Alternatively, you can drag one app thumbnail onto another app thumbnail in the Spaces bar to merge them into a Split View.
Split View on Multiple Displays
For users with multiple monitors, Split View can extend across your displays, provided the correct setting is enabled:
- Enable Separate Spaces for Displays: Ensure that “Displays have separate Spaces” is checked in System Settings (or System Preferences in older macOS versions) under Desktop & Dock. This setting allows you to have different Spaces, including Split View setups, active on each of your displays, maximizing your multitasking capability across all your screens.
By mastering Split View on your Mac, you can significantly enhance your productivity, manage your applications more efficiently, and create a more organized and effective digital workspace. Whether you’re a student, creative professional, or anyone who juggles multiple tasks, Split View is a powerful tool to streamline your workflow and make the most of your macOS experience.