Drawing a face can seem daunting, but with the right approach and understanding of basic proportions, anyone can learn to create realistic and expressive portraits. This guide breaks down the process into simple, manageable steps, perfect for beginners wanting to master the art of face drawing. Whether you’re interested in sketching faces from imagination or capturing a likeness from observation, understanding the fundamentals is key.
Step 1 – Laying the Foundation: Circle, Square, and Guidelines
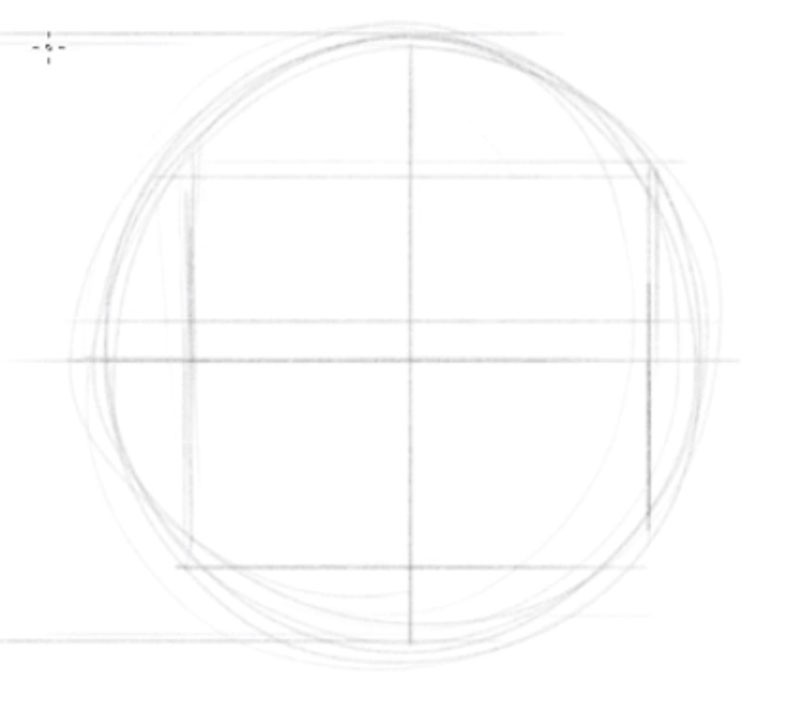
Just like building a house, drawing a face starts with a framework. We’ll begin by drawing a circle. This circle represents the cranium, the upper rounded part of the head. Next, draw two intersecting lines through the center of the circle, one vertical and one horizontal. These lines act as guidelines to help us place facial features accurately.
To further refine our framework, draw a square around the circle, ensuring the circle touches all four sides of the square. These lines aren’t arbitrary; they mark important points on the face. The top line of the square indicates the hairline, the middle horizontal line represents the brow line (where the eyebrows are located), and the bottom line marks the nose line.
Alt text: Step 1: Draw a circle, intersecting lines, and a square to begin your face drawing.
Step 2 – Defining the Face Shape: From Top of Head to Chin
Now, let’s shape the face. We need to determine the length of the face below the brow line. Measure the distance from the center of the square to its bottom edge. Use this measurement and extend it downwards from the bottom of the square. This point marks the bottom of the chin.
With the chin point established, we can draw the front contour of the face. Starting from the top of the circle (the crown of the head), draw a curved line downwards towards the chin point we just marked. This line defines the front profile of the face, from the forehead to the chin.
Alt text: Step 2: Sketch the front contour line of the face, connecting the top of the head to the chin.
Step 3 – Sculpting the Jawline: Connecting Chin to Head
Next, we’ll define the jawline. Draw a line starting from the chin point and extending back to the center point on the bottom edge of the square. This line represents the jaw and lower cheek. In most cases, this line will curve slightly upwards as it moves towards the ear, creating the natural contour of the jaw.
Alt text: Step 3: Draw the jawline by connecting the chin point to the bottom center of the square with a curved line.
Step 4 – Locating the Eye Line and Back of the Head
Now, it’s time to pinpoint the eye level. The eye line is typically situated slightly below the brow line. Imagine or lightly draw a horizontal line just beneath the brow line guideline. This will be the horizontal axis for placing the eyes.
To complete the basic head shape, we’ll draw the back of the head. Utilize the circle we initially drew as a guide for the curvature of the skull. Starting from the top of the circle, draw a curved line downwards and towards the jawline, completing the back of the head. Visualize the skull’s structure as you draw this line to ensure a natural head shape.
Alt text: Step 4: Locate the eye line slightly below the brow line and sketch the back of the head using the circle as a guide.
Step 5 – Sketching Facial Features and Basic Shading
With the foundational structure in place, we can now start sketching the facial features. Using the guidelines we’ve established, lightly draw the eyes, nose, and mouth in profile. Pay attention to the placement of these features in relation to the guidelines. Notice, in a side view, how the eye is set back from the front of the face, and how the mouth and lips angle inwards towards the neck.
To add depth and dimension, introduce some basic shading. Lightly shade areas that would naturally be in shadow, such as under the brow bone, beneath the nose, and under the chin. This simple shading will begin to give your face a sense of form.
Alt text: Step 5: Sketch in the facial features in profile view and add basic shading for depth.
Step 6 – Positioning the Ear
The ear’s location is crucial for a realistic profile. Use the brow line, eye line, and nose line as vertical guides for placing the ear. In a profile facing left, as in our example, the majority of the ear will be positioned behind the vertical center guideline.
The ear typically extends from the eye line upwards to the brow line and then curves down, with the earlobe reaching the nose line. Sketch the basic ‘C’ shape of the ear within these guidelines. In this step, you can also sketch the outline of the hairline and a couple of lines to indicate the neck starting from below the jawline.
Alt text: Step 6: Draw the ear positioned between the eye line and nose line, and sketch the hairline and neck.
Step 7 – Adding Hair and Refining Shading
Finally, let’s add hair to complete the portrait. Sketch the hairstyle you desire, remembering that hair has volume and sits on top of the head. In a profile view, consider how the hair frames the face and head shape.
To enhance the drawing further, add more refined shading to both the face and the hair. Use varying degrees of pressure with your pencil to create darker shadows and lighter highlights. This will give your drawing a more three-dimensional and finished look.
Alt text: Step 7: Add hair to the drawing and refine the shading for a more complete look.
The Loomis Method and Simplifying Face Drawing
The method we’ve just explored is inspired by the techniques of Andrew Loomis, a renowned illustrator and art instructor. Loomis advocated breaking down complex subjects like the human head into simple geometric shapes. His approach, often referred to as the Loomis method, is invaluable for understanding facial proportions and structure, especially when drawing from imagination.
Alt text: Diagram of the Loomis Method showing geometric shapes and guidelines for drawing a head.
However, the Loomis method can sometimes feel intricate for beginners. A simpler approach, while still grounded in Loomis’s principles, streamlines the process. This simplified method focuses on key proportions and observational skills, making it easier to grasp the fundamentals of face drawing.
Drawing a face, whether in profile or full-frontal view, is an exercise in observation and proportion. While guidelines are helpful, remember that every face is unique. The key is to practice, observe real faces, and gradually develop your artistic eye.
Alt text: Example of a face drawing using a simplified Loomis approach, highlighting proportions and guidelines.
A Simpler Approach to Facial Proportions
For a more streamlined approach to drawing faces, consider these simplified steps, which are excellent for beginners and focus on direct observation and comparative measurements:
Alt text: Step-by-step visual guide to a simplified method for drawing a face with proportions.
- Start with a Circle and Face Length Line: Begin by drawing a circle for the cranium. Then, draw a vertical line extending downwards from the circle, roughly twice the diameter of the circle. This line determines the overall length of the face.
- Shape the Face: Connect the bottom of the vertical line to the edges of the circle with angled lines. This outlines the basic shape of the face, tapering towards the chin.
- Establish Key Horizontal Lines:
- Eye Line: Draw a horizontal line across the center of the face (midway down the vertical length line).
- Nose Line: Locate the midpoint between the eye line and the chin and draw another horizontal line for the nose.
- Mouth Line: Divide the space between the nose line and chin into thirds. The mouth line is approximately one-third of the way down from the nose line.
- Determine Eye Width: Mentally divide the eye line into five equal ‘eye widths’. This helps to gauge the overall width of the eyes and the spacing between them.
- Draw the Eyes: Position the eyes within the second and fourth ‘eye width’ segments on the eye line.
- Nose Width: Vertically align the width of the nose with the inner corners of the eyes. Draw lines down from the inner corners of the eyes to the nose line to determine the nose’s width.
- Draw the Nose: Sketch the nose within the width you just determined, positioned on the nose line.
- Mouth Width: The corners of the mouth typically align with the inner edge of the iris or pupil of the eyes. Draw vertical lines down from these points to the mouth line to find the corners of the mouth.
- Draw the Mouth: Sketch the lips between the corners of the mouth on the mouth line.
- Ears: The tops of the ears generally align with the eye line (or slightly higher, up to the brow line), and the bottoms align with the nose line. Place the ears accordingly on the sides of the head.
- Eyebrows: The eyebrows are usually positioned above the eyes, with the brow line often aligning with the tops of the ears.
- Neck: Draw the neck starting from below the ears, angling inwards slightly. For female faces, the neck is typically narrower than for male faces.
- Hair: Add the hair, considering its volume and how it frames the face.
- Shading: Finally, add shading to give the face form and dimension, enhancing the three-dimensional appearance.
Alt text: Diagram illustrating key facial proportions and the alignment of eyes, nose, and mouth.
Key Proportions to Remember:
- Eyes are Midway: The eyes are located roughly in the middle of the head’s height.
- Nose and Inner Eye Corners: The inner corners of the eyes generally align vertically with the sides of the nose.
- Mouth Position: The mouth line is about one-third of the distance between the nose line and the bottom of the chin.
- Mouth Corners and Iris/Pupil: The corners of the mouth tend to align vertically with the inner edge of the iris or pupil.
- Ear Placement: Ears are typically positioned between the eye line and nose line vertically, extending upwards towards the brow line.
These generalized proportions serve as a starting point. Observing individual faces and noting variations is crucial for developing your portrait drawing skills.
Understanding Facial Planes for Shading
Shading is essential for making a face drawing look realistic. To shade effectively, it’s helpful to understand the planes of the face. Think of the face as composed of a series of flat surfaces that catch light differently.
Alt text: Diagram of the planes of the face, illustrating how light and shadow fall on different surfaces.
Faces aren’t perfectly smooth; they have subtle planes that change direction. These changes in plane determine how light and shadow fall on the face. Typically, light comes from above, causing areas that protrude (like the forehead, cheekbones, nose, and chin) to be lighter, and areas that recede (eye sockets, under the nose, under the lower lip, and under the chin) to be darker.
Creating smooth transitions between light and shadow is key to rendering skin texture realistically.
Alt text: Example of face shading techniques demonstrating light and shadow transitions.
The approach to shading depends on your drawing medium. With graphite pencils, you can vary pressure to achieve different values. Blending stumps can help create smoother transitions. Mastering shading is a broader topic, and further lessons can provide in-depth guidance.
Conclusion: Practice and Observation are Key
Drawing a face is a journey of learning and practice. While these techniques provide a solid foundation for understanding facial proportions and structure, remember that individual faces vary. To truly capture a likeness in your portraits, keen observation is paramount.
By combining the knowledge of facial structure and proportions with consistent practice and careful observation, you’ll be well on your way to drawing compelling and accurate faces. Now that you have a guide on How To Draw A Face, start practicing and explore the unique features of every face you encounter!