How To Draw A Shark? This guide offers a comprehensive, easy-to-follow approach to shark drawing, enhancing your artistic skills. At HOW.EDU.VN, we are committed to providing expert guidance to unleash your creative potential, providing resources for learning to draw sharks realistically, improving your drawing skills and mastering the art of marine life illustration.
1. Understanding the Allure of Shark Drawing
Sharks, with their sleek bodies and powerful presence, have long captivated the human imagination. Artists throughout history have sought to capture the essence of these magnificent creatures, drawn to their blend of beauty and mystique. Learning how to draw a shark is not just about replicating an image; it’s about understanding the anatomy, movement, and character of these apex predators. This guide is designed to help you achieve a realistic and compelling shark drawing, whether you’re a beginner or an experienced artist. Understanding the fascination with shark art can also highlight the importance of conservation and education of the species through art.
1.1. Why Draw Sharks?
Drawing sharks can be a rewarding experience for several reasons:
- Appreciation for Marine Life: The process encourages a deeper understanding and appreciation of sharks and their role in the ocean ecosystem.
- Artistic Challenge: Sharks offer a unique challenge in terms of capturing their streamlined shape and powerful presence.
- Creative Expression: You can explore different artistic styles and techniques while depicting these fascinating creatures.
- Educational Tool: Drawing sharks can be a fun and engaging way to learn about their anatomy and behavior.
- Personal Satisfaction: Completing a detailed shark drawing can be a source of pride and accomplishment.
1.2. Sharks in Art History
From ancient cave paintings to modern-day illustrations, sharks have appeared in various forms of art throughout history. They often symbolize power, mystery, and the untamed nature of the ocean. By studying how other artists have depicted sharks, you can gain inspiration and insights for your own drawings.
- Ancient Cultures: Sharks were often depicted in the art of coastal cultures, reflecting their importance as both a resource and a potential threat.
- Maritime Art: Sharks frequently appeared in paintings and illustrations of maritime scenes, adding a sense of danger and adventure.
- Scientific Illustration: Detailed illustrations of sharks have been crucial for scientific research and education, showcasing their unique anatomy and features.
- Contemporary Art: Modern artists continue to explore the symbolism and beauty of sharks, often using their art to raise awareness about conservation issues.
1.3 Understanding Search Intentions for “How to Draw a Shark”
Understanding the search intentions behind the keyword “how to draw a shark” is crucial for creating content that meets the needs of the target audience. Here are five potential search intentions:
- Beginner’s Guide: Users are looking for easy-to-follow, step-by-step instructions for drawing a basic shark.
- Realistic Drawing Techniques: Intermediate artists want to learn techniques for creating realistic shark drawings, including details like shading, texture, and proportions.
- Specific Shark Species: Users may be interested in drawing specific types of sharks, such as great white sharks, hammerhead sharks, or whale sharks.
- Cartoon/Stylized Sharks: Some users may be looking for tutorials on drawing cartoon or stylized versions of sharks for fun or educational purposes.
- Advanced Art Projects: Experienced artists seek inspiration and guidance for complex shark-themed art projects, possibly incorporating mixed media or digital techniques.
2. Essential Materials for Your Shark Drawing Journey
Before you embark on your shark drawing adventure, it’s essential to gather the right tools. Having high-quality materials can significantly enhance your drawing experience and the final result. Here’s a comprehensive list of recommended supplies:
2.1. Drawing Pencils
- Graphite Pencils: A range of graphite pencils, from hard (H) to soft (B), is ideal for creating different values and textures.
- HB Pencil: A good all-purpose pencil for sketching and outlining.
- 2B-4B Pencils: Softer pencils for adding shading and darker tones.
- 2H-4H Pencils: Harder pencils for light sketching and fine details.
- Mechanical Pencils: These are excellent for precise lines and intricate details.
- Charcoal Pencils: Charcoal pencils can be used to create dramatic effects and deep shadows.
2.2. Drawing Paper
- Sketchbook: A sketchbook with medium-weight paper is perfect for practicing and experimenting with different techniques.
- Drawing Paper Pad: High-quality drawing paper with a smooth surface is ideal for finished artwork.
- Watercolor Paper: If you plan to use watercolor or other wet media, choose watercolor paper with a heavier weight.
2.3. Erasers
- Kneaded Eraser: This type of eraser is moldable and can be used to lift graphite from the paper without damaging the surface.
- Plastic Eraser: A plastic eraser is useful for removing larger areas of graphite.
- Pencil Eraser: A pencil eraser is handy for erasing small details and fine lines.
2.4. Blending Tools
- Blending Stumps: These paper tools are used to blend graphite and create smooth transitions.
- Tortillions: Similar to blending stumps, tortillions are tightly wound paper tools that can be used for blending.
- Cotton Swabs: Cotton swabs can be used for blending in small areas or creating soft textures.
2.5. Coloring Mediums (Optional)
- Colored Pencils: Colored pencils are great for adding subtle colors and details to your shark drawing.
- Markers: Alcohol-based markers, such as EverBlend markers, can be used to create vibrant colors and bold lines.
- Watercolor Paints: Watercolor paints are ideal for creating soft, luminous effects.
2.6. Other Useful Tools
- Ruler: A ruler is helpful for drawing straight lines and measuring proportions.
- Sharpener: A sharpener is essential for keeping your pencils sharp and ready for drawing.
- Reference Images: High-quality reference images of sharks are invaluable for capturing their anatomy and details accurately.
- Drawing Board: A drawing board provides a stable surface for your paper and can be tilted to a comfortable angle.
Choosing the right materials can greatly impact the quality of your shark drawing. Experiment with different tools and find what works best for your style and preferences. HOW.EDU.VN’s team of expert artists and educators recommends investing in quality supplies to enhance your artistic journey and create stunning shark artwork.
3. Step-by-Step Guide to Drawing a Realistic Shark
This section provides a detailed, step-by-step guide to drawing a realistic shark. Each step includes clear instructions and visual aids to help you achieve a professional-looking result.
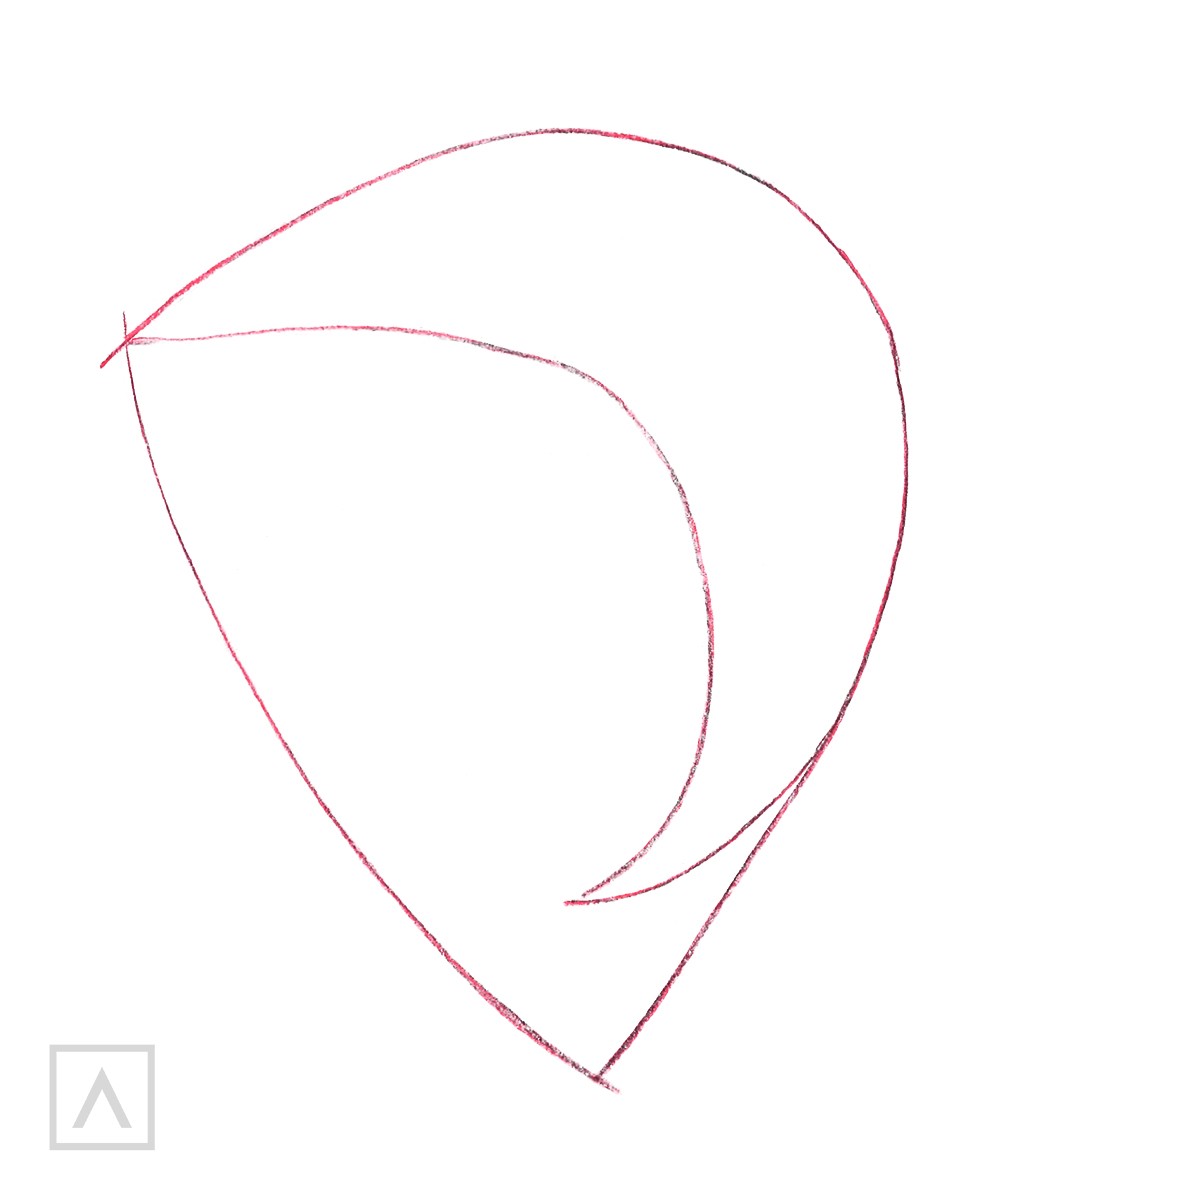
3.1. Step 1: Basic Shape and Outline
- Start with a “D” Shape: Begin by drawing a shape that resembles the letter “D” or an archery bow. This will serve as the basic outline of the shark’s body.
- Add a Crescent Moon: Inside the “D” shape, draw a crescent moon. This will help define the curvature of the shark’s body.
This initial step is crucial for establishing the overall shape and proportions of your shark drawing. Take your time and ensure that the outline is accurate before moving on to the next step.
3.2. Step 2: Defining the Head and Fins
- Outline the Head and Nose: In the top left corner of the crescent moon, outline the head and nose of the shark. Pay attention to the subtle curves and angles that give the shark its distinctive profile.
- Draw a Centerline: Draw a centerline along the entire body of the shark. This line will serve as a guide for placing the fins and other features.
- Add Fins: Using the centerline as a guide, draw large and small triangles to represent the side fins and tail fin. The size and placement of these fins are important for capturing the shark’s hydrodynamic shape.
This step focuses on adding the key features that define the shark’s silhouette. Use light, confident strokes to create the outlines, and don’t be afraid to make adjustments as you go.
3.3. Step 3: Adding Details – Mouth, Eye, and Dorsal Fin
- Draw the Mouth: Use the centerline to separate the top and bottom of the mouth. The mouth should be slightly curved and extend towards the back of the head.
- Add the Eye: Draw a circle for the eye. The eye should be positioned slightly above the centerline and towards the front of the head.
- Draw Small Fins: Add small fins on the lower part of the body, near the tail.
- Don’t Forget the Dorsal Fin: Draw the dorsal fin on the top of the body, near the middle. The dorsal fin is a prominent feature of many shark species and should be carefully shaped.
This step involves adding the details that bring the shark to life. Pay attention to the placement and proportions of each feature to ensure an accurate and realistic representation.
3.4. Step 4: Refining the Details – Teeth and Streamlined Body
- Add Teeth: Sharks have rows of sharp teeth, so add tiny triangles inside the mouth to represent these. The teeth should be closely spaced and slightly angled.
- Streamline the Body: To create a smooth, streamlined body, make a continuous outline around the shark. Pay attention to the subtle curves and contours that define the shark’s shape.
This step is all about refining the details and adding the finishing touches that make your shark drawing stand out. Take your time and focus on creating a polished and professional-looking result.
3.5. Step 5: Erasing Excess Lines
- Erase Construction Lines: Carefully erase all excess construction lines and guidelines. This will clean up your drawing and make it easier to see the final result.
This step is crucial for creating a clean and polished shark drawing. Use a kneaded eraser to gently lift the graphite from the paper without damaging the surface.
3.6. Step 6: Adding Color and Shading
- Color the Body: Use colored pencils, markers, or watercolor paints to add color to the shark’s body. Consider using different shades of gray and blue to create a realistic effect.
- Add Shading: Use shading techniques to create depth and dimension in your shark drawing. Pay attention to the direction of the light and add shadows accordingly.
This final step is where you can truly bring your shark drawing to life. Experiment with different colors and shading techniques to create a unique and compelling work of art.
4. Advanced Techniques for Realistic Shark Drawings
Once you’ve mastered the basic steps of drawing a shark, you can explore more advanced techniques to create even more realistic and compelling artwork. These techniques involve a deeper understanding of shark anatomy, shading, and texture.
4.1. Understanding Shark Anatomy
- Skeletal Structure: Study the skeletal structure of sharks to understand how their bodies are shaped and how their muscles attach. This knowledge will help you create more accurate and dynamic poses.
- Musculature: Learn about the different muscle groups in sharks and how they contribute to their movement. This will help you create more realistic and powerful drawings.
- Skin Texture: Observe the texture of shark skin, which is covered in tiny, tooth-like scales called dermal denticles. These scales give the skin a rough texture that can be challenging to replicate in a drawing.
4.2. Mastering Shading Techniques
- Value Scale: Practice creating a value scale to understand the range of tones you can achieve with your drawing materials.
- Hatching and Cross-Hatching: Use hatching and cross-hatching techniques to create texture and depth in your shark drawing.
- Blending: Use blending stumps or tortillions to create smooth transitions between tones and add realism to your shading.
- Highlights and Shadows: Pay attention to the placement of highlights and shadows to create a sense of form and volume in your shark drawing.
4.3. Adding Realistic Details
- Teeth: Study the shape and arrangement of shark teeth to create a realistic and menacing mouth.
- Eyes: Pay attention to the details of the shark’s eyes, including the shape of the pupil and the surrounding skin.
- Gills: Accurately depict the gills and gill slits to add realism to your shark drawing.
- Scars and Markings: Add scars and markings to your shark drawing to give it character and make it more unique.
4.4. Utilizing Reference Photos
- High-Quality Images: Use high-quality reference photos of sharks to study their anatomy, texture, and details.
- Multiple Angles: Find reference photos that show the shark from different angles to get a better understanding of its form.
- Lighting and Shadows: Pay attention to the lighting and shadows in your reference photos to help you create realistic shading in your drawing.
By mastering these advanced techniques, you can elevate your shark drawings to a new level of realism and artistry. HOW.EDU.VN offers in-depth courses and tutorials on these techniques, taught by experienced artists who can provide personalized feedback and guidance.
5. Drawing Different Shark Species
The world of sharks is incredibly diverse, with over 500 different species inhabiting the oceans. Each species has its unique characteristics and features, making them fascinating subjects for artists. Here’s a guide to drawing some of the most popular shark species:
5.1. Great White Shark
- Key Features: Large size, powerful jaws, dark gray back, and white underbelly.
- Drawing Tips: Focus on the shark’s streamlined body and menacing teeth. Use shading to create a sense of depth and power.
5.2. Hammerhead Shark
- Key Features: Distinctive hammer-shaped head with eyes on either end.
- Drawing Tips: Accurately depict the shape of the hammerhead and the placement of the eyes. Use perspective to create a sense of depth.
5.3. Whale Shark
- Key Features: Enormous size, flattened head, and distinctive spot pattern.
- Drawing Tips: Focus on the shark’s gentle expression and unique markings. Use soft shading to create a sense of size and weight.
5.4. Tiger Shark
- Key Features: Vertical stripes along the body, powerful jaws, and a broad head.
- Drawing Tips: Accurately depict the tiger-like stripes and the shark’s muscular build. Use strong shading to create a sense of power and aggression.
5.5. Mako Shark
- Key Features: Sleek body, pointed snout, and crescent-shaped tail fin.
- Drawing Tips: Focus on the shark’s hydrodynamic shape and speed. Use dynamic lines to create a sense of movement.
By studying the unique characteristics of each shark species, you can create accurate and compelling drawings that capture their individual personalities and features. HOW.EDU.VN provides a wealth of resources on drawing different animal species, including sharks, with detailed guides and tutorials to help you master the art of wildlife illustration.
6. Adding Creative Elements to Your Shark Drawings
Once you’ve mastered the basics of drawing realistic sharks, you can start experimenting with creative elements to add your personal touch to your artwork. This could involve incorporating different artistic styles, adding imaginative backgrounds, or exploring symbolic themes.
6.1. Different Artistic Styles
- Cartoon Style: Create a simplified and stylized version of a shark with exaggerated features and playful expressions.
- Abstract Style: Use abstract shapes and colors to represent the essence of a shark without focusing on realistic details.
- Surreal Style: Combine realistic shark elements with surreal or dreamlike imagery to create a unique and thought-provoking artwork.
- Pop Art Style: Use bold colors, graphic lines, and repetitive patterns to create a vibrant and eye-catching shark drawing.
6.2. Imaginative Backgrounds
- Coral Reef: Depict your shark swimming through a vibrant coral reef with colorful fish and other marine life.
- Deep Sea: Create a dark and mysterious deep-sea environment with bioluminescent creatures and hidden dangers.
- Shipwreck: Draw your shark lurking near a sunken shipwreck, adding a sense of history and adventure.
- Underwater Cave: Depict your shark exploring an underwater cave with hidden chambers and mysterious formations.
6.3. Symbolic Themes
- Power and Strength: Emphasize the shark’s muscular build and sharp teeth to convey a sense of power and strength.
- Mystery and Danger: Use dark colors and dramatic lighting to create a sense of mystery and danger around the shark.
- Grace and Beauty: Focus on the shark’s sleek body and fluid movements to convey a sense of grace and beauty.
- Conservation and Awareness: Use your shark drawing to raise awareness about the importance of shark conservation and the threats they face in the wild.
By incorporating these creative elements into your shark drawings, you can create artwork that is not only visually stunning but also meaningful and impactful. HOW.EDU.VN encourages artists to explore their creativity and develop their unique artistic voice through a variety of workshops and mentorship programs.
7. Common Mistakes to Avoid When Drawing Sharks
Drawing sharks can be challenging, and it’s easy to make mistakes along the way. Here are some common pitfalls to avoid:
- Incorrect Proportions: Pay close attention to the proportions of the shark’s body, head, and fins to ensure an accurate representation.
- Lack of Detail: Don’t neglect the small details that make a shark look realistic, such as the teeth, eyes, and gills.
- Flat Shading: Avoid using flat, uniform shading that can make your shark drawing look lifeless. Instead, use a variety of shading techniques to create depth and dimension.
- Stiff Poses: Try to capture the shark’s fluid movements and dynamic poses. Avoid drawing stiff, unnatural poses that can make your shark look awkward.
- Ignoring Reference Photos: Always use reference photos to guide your drawing and ensure accuracy. Don’t rely solely on your memory or imagination.
- Over Complicating the Process: Break the drawing down into manageable steps. This approach helps avoid feeling overwhelmed and ensures a more accurate final piece.
By being aware of these common mistakes, you can avoid them and create more successful and realistic shark drawings. HOW.EDU.VN offers personalized feedback and critiques on your artwork to help you identify and correct any mistakes, allowing you to improve your skills and achieve your artistic goals.
8. Resources for Further Learning
To further enhance your shark drawing skills, consider exploring these resources:
- Online Tutorials: Websites like YouTube and Skillshare offer a wealth of free and paid tutorials on drawing sharks.
- Art Books: Look for books on animal anatomy, drawing techniques, and marine life illustration.
- Museums and Aquariums: Visit museums and aquariums to study sharks up close and observe their behavior.
- Online Communities: Join online art communities and forums to share your work, get feedback, and connect with other artists.
- Art Classes and Workshops: Consider taking art classes or workshops to learn from experienced instructors and receive personalized guidance.
HOW.EDU.VN is committed to providing a comprehensive learning platform for artists of all levels. We offer a variety of resources, including online courses, tutorials, and mentorship programs, to help you master the art of shark drawing and unleash your creative potential.
9. The Expertise of HOW.EDU.VN’s PhDs
At HOW.EDU.VN, we understand the challenges and aspirations of artists seeking expert guidance. That’s why we’ve assembled a team of over 100 PhDs and leading experts in various fields, including art, biology, and marine science. Our experts are dedicated to providing you with the knowledge, skills, and support you need to achieve your artistic goals.
9.1. Benefits of Learning from Our Experts
- Personalized Guidance: Our experts provide personalized feedback and guidance tailored to your individual needs and goals.
- In-Depth Knowledge: Benefit from the in-depth knowledge and expertise of our PhD-level instructors.
- Comprehensive Resources: Access a wealth of comprehensive resources, including online courses, tutorials, and reference materials.
- Community Support: Connect with a supportive community of artists and experts who share your passion for learning and creativity.
- Career Advancement: Enhance your artistic skills and open up new career opportunities in the field of art and illustration.
9.2. How Our PhDs Can Help You
Our PhDs can help you in various aspects of shark drawing, including:
- Anatomy: Providing in-depth knowledge of shark anatomy and skeletal structure.
- Technique: Teaching advanced drawing and shading techniques.
- Species Identification: Helping you identify and accurately depict different shark species.
- Creative Development: Guiding you in developing your unique artistic style and vision.
- Portfolio Building: Assisting you in creating a professional portfolio that showcases your best work.
With the guidance of our expert PhDs, you can unlock your full artistic potential and create stunning shark drawings that capture the beauty and power of these magnificent creatures.
10. Frequently Asked Questions (FAQs) About Shark Drawing
Here are some frequently asked questions about shark drawing:
- What are the best materials for drawing sharks?
- A range of graphite pencils, drawing paper, erasers, and blending tools are essential. Colored pencils, markers, or watercolor paints can be used to add color.
- How do I draw realistic shark teeth?
- Study reference photos of shark teeth to understand their shape and arrangement. Use small, sharp triangles to represent the teeth, and pay attention to the spacing and angle.
- What is the best way to shade a shark drawing?
- Use a variety of shading techniques, such as hatching, cross-hatching, and blending, to create depth and dimension. Pay attention to the direction of the light and add shadows accordingly.
- How do I capture the fluid movements of a shark in my drawing?
- Use dynamic lines and flowing curves to represent the shark’s body and fins. Study reference photos of sharks in motion to understand their movements.
- What are some common mistakes to avoid when drawing sharks?
- Avoid incorrect proportions, lack of detail, flat shading, stiff poses, and ignoring reference photos.
- How can I draw different shark species?
- Study the unique characteristics of each shark species, such as the shape of the head, fins, and body markings. Use reference photos to guide your drawing.
- Where can I find reference photos of sharks?
- Websites like Unsplash, Pixabay, and Google Images offer a wide selection of high-quality reference photos of sharks.
- How can I improve my shark drawing skills?
- Practice regularly, study reference photos, take art classes or workshops, and get feedback from experienced artists.
- What are some creative elements I can add to my shark drawings?
- Experiment with different artistic styles, imaginative backgrounds, and symbolic themes to add your personal touch to your artwork.
- Are there any ethical considerations when drawing sharks?
- Yes, be mindful of promoting conservation and awareness about the importance of sharks in the ecosystem. Avoid depicting sharks in a negative or fear-inducing way that could contribute to their stigmatization.
Ready to Dive Deeper?
Drawing a shark can be a deeply rewarding artistic pursuit, whether you’re aiming for scientific accuracy or creative expression. By following this guide, you’ve gained valuable insights into the techniques, materials, and knowledge needed to bring these magnificent creatures to life on paper. Remember, the journey of an artist is one of continuous learning and growth.
Take the Next Step with HOW.EDU.VN
Don’t let your newfound inspiration fade. At HOW.EDU.VN, we provide the expertise and resources to help you continue your artistic journey and achieve your full potential.
- Connect with Leading Experts: Consult with our team of over 100 PhDs and specialists in art, marine biology, and more. Receive personalized guidance and feedback tailored to your specific needs.
- Access Comprehensive Resources: Explore our extensive library of courses, tutorials, and reference materials, covering everything from basic drawing techniques to advanced artistic concepts.
- Join a Supportive Community: Connect with a vibrant community of artists, share your work, and receive encouragement and inspiration from peers and experts.
Ready to transform your passion into expertise?
- Visit our website: HOW.EDU.VN
- Contact us via WhatsApp: +1 (310) 555-1212
- Visit us in person: 456 Expertise Plaza, Consult City, CA 90210, United States
At how.edu.vn, we believe that everyone has the potential to create extraordinary art. Let us help you unlock your inner artist and make your mark on the world. Don’t wait, start your journey today.