I’ve hesitated to create a guide like this for a while. In my experience, many “how to draw ‘X'” tutorials in books, blogs, and YouTube videos oversimplify and often mislead aspiring artists.
There are primarily two reasons for my reluctance. Firstly, portrait drawing is inherently complex. Every subject presents unique variables such as individual morphology, viewer perspective, and lighting conditions. These factors significantly influence artistic decisions. Mastering drawing goes beyond formulaic steps that neglect these crucial variables.
Secondly, focusing solely on “How To Draw Eyes”—as if eyes are isolated entities separate from the face, head, and body—fragments the figure into artificial parts. The truth is, observing structure is just as vital on the cheek or forehead as it is on the eyes. However, we often overlook these areas, neglecting the holistic approach. “How to Draw Eyes” articles can inadvertently reinforce this fragmented way of thinking, which I find concerning.
Nevertheless, many students struggle with drawing convincing eyes, often unnecessarily. Eyes tend to be approached with anxiety because of their psychological importance. In portraits, they are naturally the focal point. A mistake in the eyes can instantly label a drawing as “bad,” while similar errors in the neck or chin might go unnoticed. It’s an unfair reality in portraiture.
In this guide, I will outline my key considerations when drawing eyes for portraits. While I will address some variables, remember that these instructions are not universally applicable. You will inevitably encounter unique challenges not covered here. That’s the nature of learning portrait drawing. Despite human similarities, there’s no one-size-fits-all method for drawing eyes—or anything else. The best approach is to absorb knowledge from trusted sources but be ready to adapt and improvise when facing individual problems.
So, let’s begin.
Start with the Big Picture
This advice is crucial for drawing any subject, not just eyes. It’s easy to get lost in details when tackling something complex. Eyelashes, wrinkles, and subtle highlights are tempting, but they are distractions in the initial stages. As students in Vitruvian Studio’s online courses know, it’s always best to work from “general” to “specific.” Establish the largest, broadest shapes first, then subdivide them to reveal smaller, more specific details.
Context Matters in Eye Drawings
Just like setting up a joke before the punchline, context is crucial in drawing. Skipping the setup in drawing is like delivering the punchline without context – it simply won’t work.
The main flaw in many “how to draw eyes” tutorials is rushing into the details—eyelids, iris, pupil, etc.—without establishing a structural context for the eye. Eyes appear as they do partly because of their surroundings.
Therefore, we must look beyond the eye itself and consider the broader eye region, including the bony structures of the forehead, brow, cheekbones, and nose.
Step 1: Construct the Eye Socket
The eyeball sits within a cavity in the skull called the “orbit,” or more commonly, the “eye socket.” Each eye socket is visually defined by three bones:
- Frontal Bone: Forms the top border and the “brow ridge.”
- Maxilla: Located along the inner (medial) edge and lower medial corner.
- Zygomatic Bones (Cheekbones): Define the outer (lateral) edge and lower lateral corner.
Diagram highlighting the frontal, maxilla, and zygomatic bones that define the eye socket structure.
(In a front view, nasal bones might seem to border the eye socket, but they are actually positioned forward of the orbital cavity, so they are not listed here.)
These three bones give the eye socket its characteristic shape, which, in a front view, is more rhombus-like with rounded corners rather than perfectly round.
Using an HB pencil, lightly sketch the boundaries of the eye socket on your paper. Landmarks to guide you include:
- Eyebrow: Though it’s not the socket’s top edge (which is lower), the eyebrow is useful as it’s often visible and marks a plane change where the brow ridge curves down and inwards towards the eye socket.
- Supraorbital Margin: This is the actual top border of the socket, often indicated by a deep crease at the upper lid fold, where it rolls under the brow ridge, like a retractable awning. This sharp definition might also be visible down the lateral side, along the upper zygomatic bone. (This crease may not be visible on individuals of Asian descent due to the eyelid fold.)
- Inner Canthus (Tear Duct): Marks the medial (inner) edge of the eye socket.
- Infraorbital Furrow: Defines the bottom boundary, often seen as a soft ridge running downwards and laterally from the inner eye corner. Its path mirrors the brow ridge above.
Keep your lines light! These are placeholders to be removed later. Avoid pressing too hard; use the pencil’s shoulder to draw lightly and prevent damaging the paper.
Step 2: Block in Eyelid Shape and Position
When sketching eyelids, remember they are stretched around the eyeball underneath, which largely dictates their form. The paths of the eyelids across the eyeball are similar to cross-contours on a sphere—like lines of latitude on a globe. While not perfectly elliptical due to the cornea and bony socket structure, the eyeball’s roundness significantly influences the shape and path of the eyelids.
Building the eye socket first helps define the outer boundaries of the eyelids:
- The top of the upper lid is defined by the supraorbital margin (top of the eye socket), following its downward-lateral path.
- The bottom of the lower lid sits just above the infraorbital furrow (bottom of the eye socket), also mirroring its downward-lateral path.
- The inner corner of the eye aligns directly with the inner edge of the eye socket. We only need to determine its vertical position.
- The lateral corner of the eye aligns with the supraorbital margin laterally as it curves down towards the zygomatic bone.
Illustration showing how the eyeball is positioned high within the eye socket, nestled under the supraorbital margin.
Note: You might wonder why drawing the eyeball isn’t suggested at this stage. Some tutorials advocate for this, and it seems logical. After all, the eyeball fills much of the eye socket and shapes the perceived eye form.
However, I advise against drawing the eyeball directly because we see so little of it. Mostly covered by the brow ridge and eyelids, the eyeball’s exact size and socket position can be ambiguous. The tendency is to draw the eyeball too large or small, and too low in the socket, causing later issues.
Instead, let’s block in the visible parts of the eye (directly or through influence), starting with larger, containing shapes. With the eye socket established, this means drawing the eyelids.
Eye Orientation
It’s common to assume eyes are horizontally aligned on the head, corner to corner, but this is often incorrect. Usually, one corner sits slightly higher than the other.
This varies between individuals and viewing angle, but it’s always worth checking. Imagine a line connecting the eye corners to determine its tilt and replicate that angle on your drawing.
Eyelid Shape Nuances
Eyes are not football or almond-shaped, a common mistake in student drawings and many “how to draw eyes” tutorials.
While the opening between lids tapers to points on each side, this shape is also asymmetrical.
Outer Boundaries: The “high point” or apex of the upper lid’s curve is somewhat medially positioned (towards the inside). This is because the lid’s form follows the supraorbital margin’s path, angled downward laterally.
Inner Boundaries: Eyelid boundaries echo each other but are not parallel. Inner boundaries appear less curved when eyes are open due to perspective. They aren’t rolled as much over the eyeball as outer boundaries, making their curvature less pronounced from our view.
Also, in conventional portraiture with an eye-level view, the upper lid often appears more rounded and the lower lid “flatter” (though not always). When the eye opens, the upper lid moves most, rolling up and over the eyeball like an awning. The lower lid stays relatively still. Thus, the upper lid sits on top of the open eye, arcing over the eyeball’s round form, appearing more rounded. The lower lid, in comparison, doesn’t “roll down” much, appearing less curved.
Eyelid Thickness
Even in line drawings, a single line is often insufficient to describe each eyelid’s structure. Eyelids have thickness, and we often see their top or bottom surfaces projecting outward from the eyeball’s surface. Including these planes adds dimension, making eyeballs appear recessed in the eye sockets—which they are.
Step 3: Adding Iris and Pupil
For the physical eyeball, consider four components:
- Pupil: A hole allowing light into the eyeball.
- Iris: A pigmented disc around the pupil, with a mechanism to expand or contract the aperture.
- Cornea: A raised, transparent dome over the pupil and iris.
- Sclera: The remaining eyeball surface, commonly known as the “white of the eye.”
Scale Considerations
Students often struggle with iris and pupil scale. They tend to draw them too large, filling too much space between eyelids, making portraits look infantile or like anime characters.
A common rule of thumb is the iris is about ⅓ the whole eyeball size. This is roughly true, but hard to apply. We don’t see the full eyeball width due to bones and eyelids, so determining ⅓ involves guesswork. Keep the thirds rule in mind but observe the iris-to-sclera proportion visible from your view. If the iris is too large, the sclera space will be too small.
Shape Accuracy
From the front, the iris and pupil appear circular, or close to it. While some individuals might have slightly imperfectly round shapes, drawing them as circles is wise to avoid looking like a drawing error.
If the model’s gaze is turned away, the iris and pupil circles become elliptical. For drawing ellipses correctly, refer to our Drawing Basics course!
Iris Depth
An often-overlooked iris feature is its depth. The outer iris rim is flush with the sclera, but the pupil’s inner aperture is somewhat inward. This gives the iris a “bucket” or “lampshade” structure (or “like the laser cannon on the Death Star,” as one student aptly put it). This inverted shape impacts light and shade development, as we’ll see.
The Cornea’s Role
Covering the iris and pupil is the transparent cornea, which helps focus light. Think of it as a contact lens on the eyeball. Though invisible, its influence is seen in highlights on the eyeball, often sitting on the cornea and partially obscuring the iris and pupil because the cornea projects forward.
The cornea’s forward projection also affects the upper eyelid’s shape. Depending on gaze direction, the lid might be pushed up and out over the cornea’s “bump,” influencing the perceived high point of the upper lid as it arcs over the eyeball.
Light & Shade: Bringing Eyes to Life
With linear structure established, transition to light and shade. This stage builds upon previous work to make eyes appear convincingly illuminated and 3D.
You may have started this by drawing shadow shapes, helpful in the linear stage for positions and proportions, and for indicating plane orientations. Done correctly, this creates a basic form sense with two values: light and shadow, a “poster” effect.
Think of light and shadow masses as puzzle pieces that fit perfectly. Their border is the “shadow edge” or “terminator,” which we’ll draw with a soft line, outlining the eye’s forms.
As you define shadow shapes on and around the eye, lightly hatch them with an HB pencil to check their correctness.
Lighting Note: Poor reference material can cause problems here. Studio photography often uses multiple lights and large diffusers to soften shadows, hiding blemishes and wrinkles. This can be flattering but flattening. Without shadows, it’s hard to perceive plane orientations, making 3D form illusion nearly impossible without invention.
To avoid this, draw from life when possible. If using photos, always ask: “Where is the primary light source?”. If unclear, find a better photo or take one yourself!
Step 4: Establish Reference Values
Before full light and shade development, set value ranges. “Light” and “dark” are relative; we determine lightness or darkness by comparing to the lightest light and darkest dark, our “reference values.” Like an oboe tuning an orchestra, all subsequent values are relative to these.
The darkest darks are predictably in a few areas (assuming light from above). The deep upper lid crease along the supraorbital margin is one. The pupil is another (if not obscured by cornea reflections).
Lightest lights are usually on upturned lid surfaces or highlights on the cornea or sclera. Highlights are light source reflections and tend to be very bright.
Step 5: Tuning Value “Chords”
With reference values set, “tune” nearby area values, carefully gauging the “interval” between notes. This can be tricky initially, but here are tips:
- Work Adjacent Areas: Don’t jump around. Value relationships are easier to judge when areas are close.
- Tune Small Intervals First: Small intervals are easier to judge than large ones. With the darkest dark set, find the next darkest nearby value and develop that first.
- Work Across Boundaries: Don’t be confined by object names. If working on the iris/pupil, develop nearby sclera and lid values too. Don’t try to finish anything before integrating it with surrounding values.
Step 6: Modeling Forms
At this stage, your drawing might look like a patchwork quilt with value clusters. Now, organize these flat values into progressions or gradients that get darker or lighter as form turns away from or towards the light source.
Remember the eyeball is a sphere. Lids follow its curvature, so surface orientation to light constantly changes. For 3D appearance, describe surface “turning” with gradual value changes in different directions.
Visually compare your drawing to the reference and match value relationships. Also consider light direction—think 3D. Surfaces facing light more directly should be lighter than those facing less directly, assuming consistent local value and light source distance. This helps convey subtle but important value changes.
A good example is the iris. Its “bucket shape” influences values significantly because planes are inverted. The lightest iris part is at the bottom (facing up to light), and the darkest is at the top—opposite of sclera and eyelids. Surface orientation to light is crucial.
As you develop values, “sculpt” the form. This is why we call this “modeling,” not “shading.” Use gradients and value progressions to gently “turn” surfaces towards light (lighter) or away (darker). Imagine your pencil as a tiny clay tool, shaping a virtual sculpture behind the picture plane. This helps fine-tune values and avoid just “copying,” which rarely yields best results.
Step 7: Eyelashes, Highlights, and Details
With major forms developed, you’re nearing completion. Now, observe smaller details and integrate them into the established value structure.
However, you don’t have to do this. I’ve added some lower lid wrinkles already, but you could simplify by not being so granular. More “details” isn’t always better in realism; it can look choppy and busy. But details can be fun, so do what feels right.
Eyelashes
Grouping Lashes
Eyelashes can cause issues like hair: we see individual hairs and miss that hair usually groups.
Think of sculpting hair on a bust – you wouldn’t add thousands of clay spaghettis individually but sculpt the overall hair mass. Individual hairs are minor details, added last, if at all.
Handle hair similarly in drawing, including eyelashes. Don’t draw individual lines for each lash. Observe how they group. Sometimes, from a distance, they appear as a single ribbon along the upper lid edge. Other times, like with mascara, lashes clump, forming spiky points like curved daggers jutting from the eyelid.
Lash Orientation
Consider eyelash orientation from each lid edge. Remember, the eyeball and eyelids are curved. Eyelashes almost always project outward, roughly perpendicular to the eyeball surface. Lashes in the eyelid center project roughly forward. As the eyelid wraps around, its surface orientation changes. Near the lateral eye corner, lashes project sideways, still perpendicular to the eyeball surface (or close).
Lash Curvature
Eyelashes are never straight, always curved. Upper lashes project from the lower eyelid edge, then curve gently upward towards tips. This is more pronounced with mascara or fake eyelashes, where the curved sweep is unmistakable.
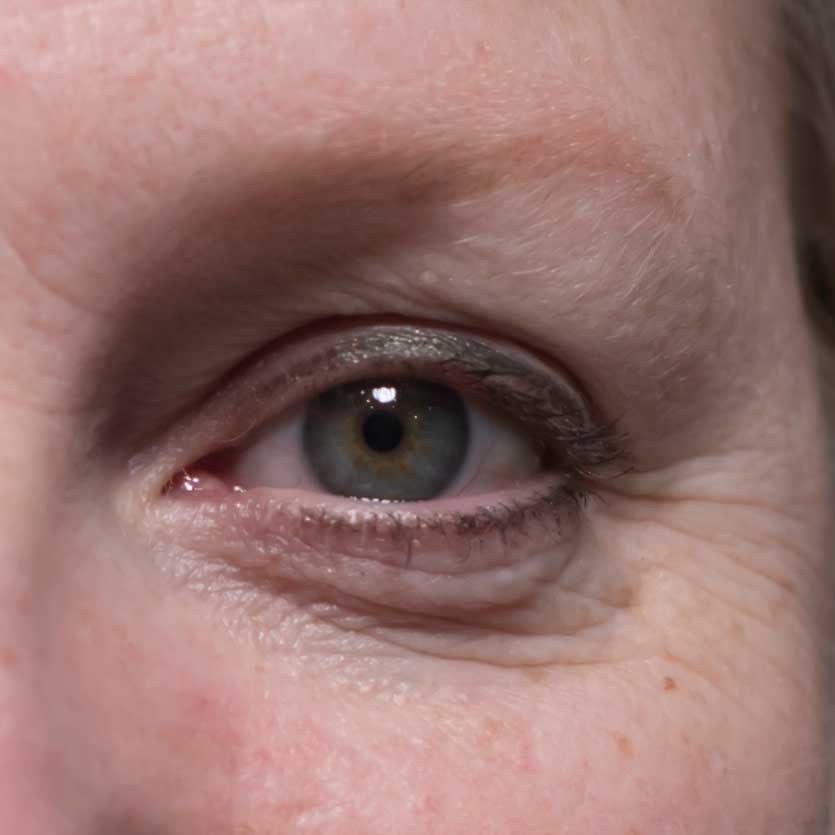
Highlights
Highlights are tiny light source reflections off a surface, usually on smooth, glossy surfaces like eyeballs.
A highlight is visible on the eyeball when light rays bounce off at the right angle to the viewer. Here, there’s a strong highlight above the pupil. Smaller, dimmer highlights are on the inner canthus and along the lower lid top where it meets the wet eyeball surface.
Depending on highlight brightness and paper value, you might need white chalk. Here, because the iris is so dark, I erased graphite first, then applied opaque chalk with a sharp General’s Charcoal White pencil. Dimmer highlights were also applied with chalk, but less opaquely.
Other Detail Considerations
At this point, you might be done drawing the eye. Surface details like wrinkles and pores are often unnecessary and can detract if mishandled.
If you add this level of detail, note that wrinkles or “crows feet” are perpendicular to Orbicularis Oculi muscle fibers, which circle the eye. When these muscles contract, they scrunch the eye, causing wrinkles to radiate outward, across their circular path.
Skin under the eye, between the lower lid and infraorbital furrow, is soft and sensitive, showing color variations like redness or violet tones. With age, this area can have small wrinkles as sagging skin collects above the eye socket’s rigid bottom edge.
If you describe wrinkles as I did, remember small skin features are forms, like larger ones, with light and dark sides. Students often err by focusing too much on grooves, drawing them as lines. Remember, most texture, including skin, is peaks and valleys.
Wrinkle grooves are surface depressions—ruts and ravines between puckering fullnesses that project outward, each catching light. Focus on these small but full forms between wrinkles, describing their light and dark sides within an appropriate value range, and “wrinkles” almost draw themselves.
Conclusion: Practice Makes Perfect in Eye Drawing
Despite the extensive information in this guide, it’s still not exhaustive. Human faces are incredibly diverse, and everyone’s eyes are slightly different. Factor in varying perspectives and lighting, and there’s simply no single correct or complete approach to drawing eyes.
Ultimately, the best way to draw better eyes is through extensive practice. Practice is key to honing any skill, including drawing. I hope this information is helpful as you develop your drawing abilities.