In today’s digital age, safeguarding your email communications is more critical than ever. Email encryption in Outlook provides a robust layer of security, transforming your messages from easily readable text into an unreadable jumble of characters. This ensures that only your intended recipient, possessing the correct private key, can decipher and read your sensitive information. For anyone else who might intercept the email, it remains completely unintelligible.
This comprehensive guide will walk you through the process of How To Encrypt Email In Outlook, utilizing two primary encryption methods: S/MIME (Secure/Multipurpose Internet Mail Extensions) and Microsoft Purview Message Encryption with Information Rights Management (IRM). Choosing the right method and understanding the steps involved are key to securing your digital correspondence.
Microsoft Outlook, especially with a Microsoft 365 subscription, offers powerful encryption capabilities. Microsoft Purview Message Encryption, part of the Office 365 Enterprise E3 license, provides advanced message encryption features. Alternatively, S/MIME encryption stands as a widely recognized and accepted standard for digitally signing and encrypting emails. To leverage S/MIME, both sender and recipient need an email application like Outlook that supports this standard.
S/MIME encryption in Exchange provides essential services for email security:
- Encryption: Secures the content of your email messages, keeping them private.
- Digital Signatures: Authenticates the sender’s identity, ensuring the recipient that the email truly comes from who it claims to be.
To start sending encrypted emails, the instructions vary slightly depending on whether you are using the New Outlook or Classic Outlook interface. Let’s explore both to ensure you can confidently encrypt your emails regardless of your Outlook version.
Encrypting Emails in New Outlook
New Outlook offers streamlined options to encrypt your emails, whether you want to encrypt individual messages or set up encryption for all outgoing emails. You can choose between S/MIME encryption and Microsoft Purview Message Encryption based on your needs and subscription.
Encrypt a Single Message using S/MIME in New Outlook
Before you encrypt your first email using S/MIME, it’s essential to obtain a digital ID, also known as a digital certificate, and install it on your computer’s keychain. This digital ID is your unique credential for secure email communication.
Note: New Outlook requires manual installation of digital certificates. You’ll need to install the certificate yourself or have your administrator configure automatic installation policies.
Here’s how to encrypt a single email message using S/MIME in New Outlook:
-
Compose Your Email: Begin by writing your email in New Outlook as you normally would.
-
Access Message Options: In the email message window, locate the ribbon at the top. Click on Options, and then select More Options.
-
Choose Encryption: In the Message options dialog box, you’ll find settings for sensitivity levels, read/delivery receipts, and S/MIME protection. Select More Options again to expand the options. Choose the desired S/MIME protection:**
- Tick the box next to Encrypt this message (S/MIME) to encrypt the email content.
- Optionally, you can also select Digitally sign this message (S/MIME) to add a digital signature for sender verification.
-
Confirm and Send: Click OK to apply the encryption settings.
-
Recipient Verification Warning (If Applicable): If you are encrypting an email and New Outlook cannot verify that all recipients can decrypt S/MIME messages, a warning message will appear. This warning highlights recipients who might have trouble reading the encrypted email. You can choose to:
- Send Anyway: Send the encrypted email despite the potential issue.
- Remove Recipients: Remove the highlighted recipients from the email.
- Retry Check: Attempt to verify recipient decryption capabilities again.
-
Finalize and Send: Complete composing your email, and then click Send. Your email will be sent encrypted using S/MIME.
Encrypt All Messages using S/MIME in New Outlook
For consistent email security, you can configure New Outlook to automatically encrypt all outgoing messages using S/MIME. This ensures that every email you send is protected without having to encrypt each one individually.
Here’s how to set up S/MIME encryption for all outgoing emails in New Outlook:
-
Access Settings: Click on the Settings icon (gear icon) usually located in the top right corner of the New Outlook window. Then, navigate to Mail and then S/MIME.
-
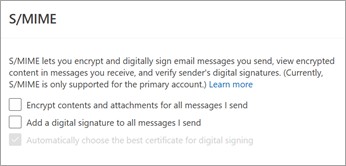
Configure S/MIME Settings: In the S/MIME settings panel, you’ll see options to encrypt and digitally sign all outgoing messages. Choose from the following:
- Encrypt contents and attachment for all messages I send: Select this option to automatically encrypt all outgoing emails, including attachments.
- Add a digital signature to all messages I send: Choose this to digitally sign every outgoing email for sender authentication.
- Automatically choose the best certificate for digital signing: Enable this to let Outlook automatically select a base certificate for signing. If you uncheck this, you will be prompted to choose the appropriate certificate each time.
-
Save Changes: Click OK to save your S/MIME encryption settings. From now on, all your outgoing emails will be encrypted according to your chosen settings.
Encrypt a Message with Microsoft Purview Message Encryption in New Outlook
Microsoft Purview Message Encryption, leveraging Information Rights Management (IRM), offers another powerful encryption method in New Outlook, especially for Microsoft 365 users with qualifying subscriptions. It’s important to note that you should not apply Microsoft Purview Message Encryption to emails already encrypted or signed with S/MIME, and vice versa.
To encrypt a single message using Microsoft Purview Message Encryption in New Outlook:
-
Compose Your Email: Start by writing your email in New Outlook.
-
Access Encryption Options: In the email message, go to Options in the ribbon. Then, select Encrypt.
-
Choose Encryption Type: A dropdown menu will appear with various encryption options provided by Microsoft Purview Message Encryption. Select the encryption type that suits your security needs. Common options include:
- Encrypt: This option encrypts the email, ensuring only the recipient can read it, but typically allows forwarding and other actions.
- Do Not Forward: This more restrictive option encrypts the email and also prevents recipients from forwarding, printing, or copying the content, providing enhanced control over the information.
- Other organization-specific restriction templates might be available based on your Microsoft 365 configuration.
-
Finalize and Send: Complete your email and click Send. Your email will be encrypted with Microsoft Purview Message Encryption based on the restrictions you selected.
Encrypting Emails in Classic Outlook
If you are using Classic Outlook, the process to encrypt emails is also straightforward, with options for both S/MIME and potentially Microsoft Purview Message Encryption depending on your organization’s setup.
Add and Configure Your S/MIME Certificate in Classic Outlook
Similar to New Outlook, using S/MIME in Classic Outlook requires a digital certificate. First, you need to obtain a digital ID and configure it within Outlook.
Adding a Certificate:
- Obtain a Digital ID: If you haven’t already, you’ll need to get a digital ID or digital certificate from a Certificate Authority or your organization.
- Import Certificate: The process for importing the certificate typically involves double-clicking the certificate file, which will guide you through the import process into your operating system’s certificate store.
Configuring S/MIME Certificate in Classic Outlook:
-
Access Trust Center Settings: In Outlook, click on File in the top left corner. Then, go to Options > Trust Center > Trust Center Settings.
-
Navigate to Email Security: In the Trust Center Settings window, select Email Security in the left pane.
-
Configure Encrypted Email Settings: Under Encrypted email, click on Settings.
-
Choose S/MIME Certificate: In the Certificates and Algorithms section, click Choose. Select your S/MIME certificate from the list of available certificates.
-
Confirm Settings: Click OK in the Certificate Settings window, and then OK again in the Trust Center Settings window to save your configuration.
Encrypt a Single Message using S/MIME in Classic Outlook
Once your S/MIME certificate is configured, you can easily encrypt individual emails in Classic Outlook:
-
Compose Your Email: Write your email message in Classic Outlook.
-
Access Encryption Option: In the email message window, click on Options in the ribbon. Then, select Encrypt.
-
Select Encryption Type: Choose the desired encryption option from the dropdown menu. Options might include:
- Encrypt: For standard S/MIME encryption.
- Potentially other IRM-based options like Do Not Forward if your organization has configured them.
-
Send Encrypted Email: Finish composing your email and click Send. The email will be encrypted using the selected method.
Encrypt All Outgoing Messages using S/MIME in Classic Outlook
To encrypt every email by default in Classic Outlook using S/MIME:
-
Access Trust Center Settings: Go to File > Options > Trust Center > Trust Center Settings in Outlook.
-
Go to Email Security Tab: In the Trust Center Settings window, select the Email Security tab.
-
Enable Encryption for Outgoing Messages: Under Encrypted email, check the box next to Encrypt contents and attachments for outgoing messages.
-
Advanced Settings (Optional): To adjust further settings, such as choosing a specific certificate, click on Settings.
-
Save Changes: Click OK in the Trust Center Settings window to apply and save the setting. Now, all outgoing emails will be encrypted by default.
Conclusion
Encrypting your emails in Outlook is a vital step in protecting your private and sensitive information. Whether you choose S/MIME for its broad compatibility and digital signature features, or Microsoft Purview Message Encryption for its advanced control and integration with Microsoft 365, Outlook provides the tools you need. By following these step-by-step instructions for both New Outlook and Classic Outlook, you can confidently secure your email communications and ensure your messages are read only by those you intend. Take control of your email security and implement encryption today.
See also
- View and reply to encrypted messages in Outlook
- Secure messages by using a digital signature
- Get a digital ID
- Find digital ID or digital ID services
- Send a digitally signed or encrypted message for Mac
- Advanced Outlook.com security for Microsoft 365 subscribers
- Learn about encrypted messages in Outlook.com
- Encrypt messages using S/MIME in Outlook on the web