Fall is upon us, and as the weather turns cooler, it’s the perfect time to think about planting garlic. Far from being just a flavor enhancer in our favorite dishes, garlic is celebrated for its numerous health benefits and, according to folklore, its ability to ward off vampires. Whether that last part is true or not, growing your own garlic is a rewarding experience.
For optimal growth, garlic needs to be planted in the fall and allowed to over-winter outdoors. This extended growing cycle, lasting about 8 months, along with a necessary chilling period of at least 6 weeks for bulb formation, makes garlic an ideal crop for many home gardens.
Here’s a comprehensive guide to get you started with growing your own garlic, ensuring successful harvests year after year.
Selecting the Right Garlic for Your Garden
Choosing the best garlic to plant is the first crucial step. In your first year, you should source your garlic from a reputable nursery or a fellow gardener. It’s important not to plant garlic from the grocery store, as it is often treated to prevent sprouting. This is just another compelling reason to grow your own!
There are two main types of garlic: hard-neck and soft-neck. For home gardens, especially in cooler climates, hard-neck garlic is often recommended as it is more resilient and generally easier to grow. If you’re interested in braiding garlic for storage, you might consider soft-neck varieties. Local nurseries are excellent resources for varieties that thrive in your specific area. Each type of garlic offers unique flavors and characteristics, so exploring different varieties can be part of the fun.
Once you begin growing your garlic, you can practice natural selection by saving the best cured bulbs from each harvest. These can then be divided into cloves for replanting in the fall. Over time, this method should lead to larger and healthier heads of garlic, perfectly adapted to your garden’s conditions.
Planting Garlic Cloves for a Successful Crop
For the best results, plant garlic cloves from October through November. Choose a period when the weather is mild, avoiding times of extreme heat or heavy frost if possible. However, even if fall is well underway and the ground is nearly frozen, don’t hesitate to plant – garlic is quite hardy.
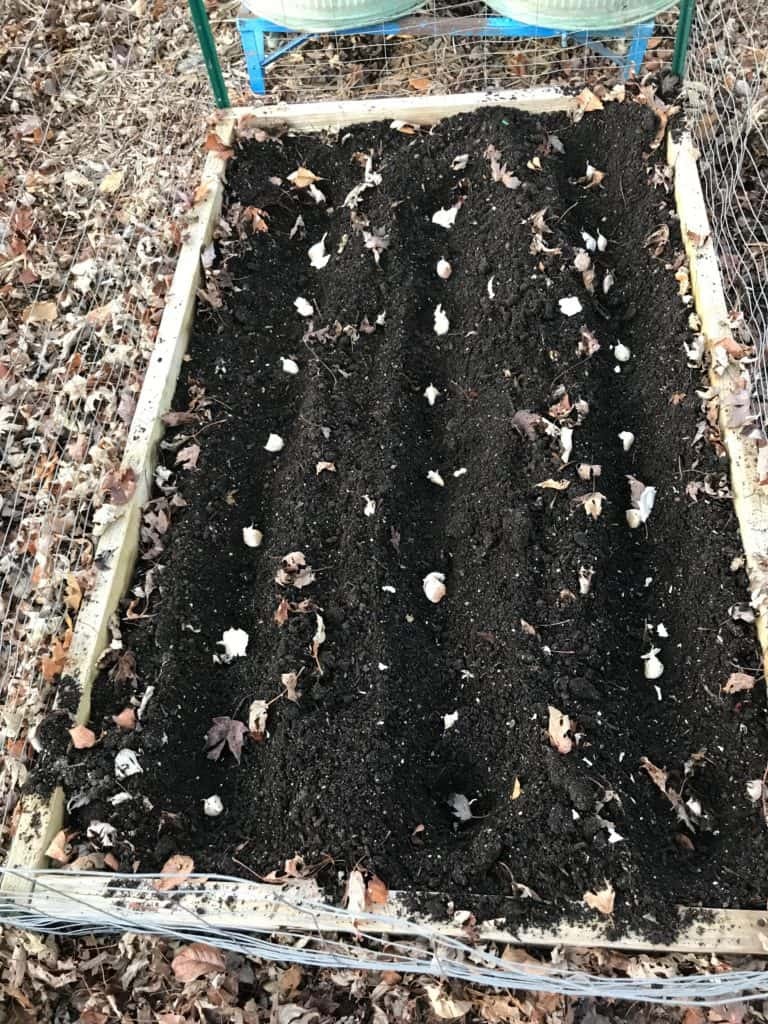
Raised beds are particularly advantageous for growing garlic because they offer excellent drainage. However, garlic also grows well directly in the ground, provided the soil is loose and healthy. To plant, separate the garlic head into individual cloves. Plant each clove 1 to 2 inches deep and space them 4 to 6 inches apart in a location that receives full sun. Ensure the clove is placed with the plump side down, where the roots will emerge, and the pointy side facing up. After planting, cover the cloves with soil and add a 6-inch layer of mulch, such as leaves or straw. This mulch helps to retain moisture, suppress weeds, and protect the soil over the winter.
Watering Your Garlic After Planting
After planting, it’s important to keep the soil evenly moist until the ground freezes. This consistent moisture is crucial for root development. Once spring arrives and shoots begin to emerge, you can reduce watering, only supplementing rainfall if conditions are particularly dry. Garlic is relatively drought-tolerant once established, and overwatering can actually be detrimental. Many gardeners find that garlic thrives with minimal intervention, making it a low-maintenance crop.
Spring Care for Growing Garlic
As temperatures consistently warm up in the spring, it’s time to remove the mulch layer from your garlic bed. You should soon see vibrant green shoots pushing up through the soil, signaling active growth.
Fertilizing Garlic Plants
Garlic is not a heavy feeder, and excessive fertilization can reduce bulb quality. Many gardeners find that a single application of compost is sufficient for the entire growing season. Adding compost to your garden beds once or twice a year provides enough nutrients for healthy garlic growth.
Understanding and Harvesting Garlic Scapes
As your garlic plants mature, they will produce curly stems known as scapes. These are the flower stalks of hard-neck garlic, and they appear as the plant tries to produce seeds. Removing scapes is important because it directs the plant’s energy towards bulb development rather than seed production, resulting in larger garlic bulbs.
Garlic scapes are not just a byproduct; they are a culinary delicacy. Often considered a gourmet item and expensive to purchase, fresh garlic scapes have a mild garlic flavor and can be used in a variety of dishes. Use them similarly to green onions in omelets, salads, stir-fries, and soups. Garlic scapes also freeze well, allowing you to enjoy their flavor long after the harvest season. Simply rinse, dry, chop, and freeze them for later use.
Harvesting Your Garlic Bulbs
Knowing when to harvest garlic is crucial. The ideal time to harvest is typically in mid-summer, often around mid-June in regions with similar climates. A key indicator is when the leaves of your garlic plants begin to turn brown and die back, with about half of the leaves browned.
To harvest, carefully loosen the soil around the bulbs and gently pull the entire plant from the ground, stem and all. If the garlic doesn’t pull out easily, using a garden spade can be helpful to lift them without damaging the bulbs.
Curing Garlic for Long-Term Storage
Curing is an essential step after harvesting garlic. It extends the shelf life of your garlic and enhances its flavor. To cure garlic, leave the stems and leaves intact. Choose a harvest time when several days of dry weather are forecasted. Place the garlic plants on a screen or rack that allows for good air circulation around all sides. An upturned compost sifter works well for this purpose. You can also easily construct a curing rack if needed.
Cure your garlic outdoors in a shaded, well-ventilated location like a screened porch or under an overhang for as long as possible. If rain is expected, move the garlic to a sheltered area. Animals generally leave curing garlic alone due to its strong aroma. However, if humidity or weather conditions are problematic, you can cure garlic indoors in a dry area.
Garlic is fully cured when the stems and leaves are completely dry, and the outer skin of the bulb becomes papery. Once cured, cut off the stems and leaves and compost them. Store your cured garlic in a cool, dark, and dry location.
With proper planting, care, and curing, you can enjoy your homegrown garlic for months to come. Use a garlic press or simply chop it with a knife to add fresh garlic flavor to your cooking. Repeat this process each year to ensure a continuous supply of delicious, homegrown garlic!