Sweet potatoes are a garden favorite for many, and for good reason. They are easy to grow, incredibly versatile in the kitchen, and packed with nutrients. Imagine the satisfaction of digging into the earth and unearthing your own homegrown sweet potatoes – fat, smooth nuggets of sweet goodness, ready for your favorite recipes. For generations, sweet potatoes have been a staple crop, offering both delicious flavor and a rewarding gardening experience. Whether you’re a seasoned gardener or just starting out, growing sweet potatoes can be a fun and fruitful endeavor.
Sweet Potato or Yam? Know the Difference
Before we delve into the specifics of growing, let’s clear up a common misconception: sweet potatoes are often confused with yams. While the terms are sometimes used interchangeably, especially in North America, they are botanically distinct. Sweet potatoes (Ipomoea batatas) belong to the morning glory family and are native to the American tropics. True yams, on the other hand, are native to Africa and Asia and come from a completely different plant family. Yams are rarely grown in home gardens in North America. So, when you’re planning to grow “sweet potatoes,” you’re indeed cultivating Ipomoea batatas.
Sweet potato varieties offer a delightful range in flesh color and texture. You’ll find options with orange, yellow, or even white flesh. Some varieties are known for their dry texture, while others are wonderfully moist. The most commonly found sweet potatoes are the moist, orange-fleshed types. Popular and reliable varieties like ‘Centennial’, ‘Jewell’, and ‘Porto Rico’ are all excellent choices for home gardeners, known for their orange flesh and consistent yields. ‘Centennial’, a personal favorite for many, matures in about 90 days and produces consistently well-shaped potatoes. ‘Jewell’ matures a bit later, around 100 days, and ‘Porto Rico’ also takes about 100 days but is a good option for smaller gardens as it has a bushier, less vining growth habit. While less common, white-fleshed varieties exist, but they often lack the characteristic sweet flavor and moist texture that most sweet potato lovers expect. Experimenting with different varieties can be part of the fun as you discover your personal favorites.
Getting Ready to Grow: Soil, Location, and Timing
Success in growing sweet potatoes starts with proper preparation, particularly when it comes to soil. Sweet potatoes thrive in moderately fertile, sandy loam soil. Well-draining soil is crucial; if the soil is too heavy or compacted, the potatoes can become stringy and misshapen as their root development is restricted. It’s a good practice to test your garden soil every few years to understand its nutrient levels and pH. Amend the soil as needed based on the test results, typically liming if the soil is too acidic. In general, for healthy garden soil, sweet potatoes don’t require excessive fertilization. A balanced fertilizer applied to your garden before planting will usually suffice. A general-purpose fertilizer like 12-12-12 or 15-15-15, containing equal parts nitrogen, phosphorus, and potassium, can be incorporated into the soil in late winter or early spring, ensuring nutrients are available when planting time arrives. Avoid side-dressing sweet potatoes with additional nitrogen during the growing season, as this can encourage excessive vine and leaf growth at the expense of potato development.
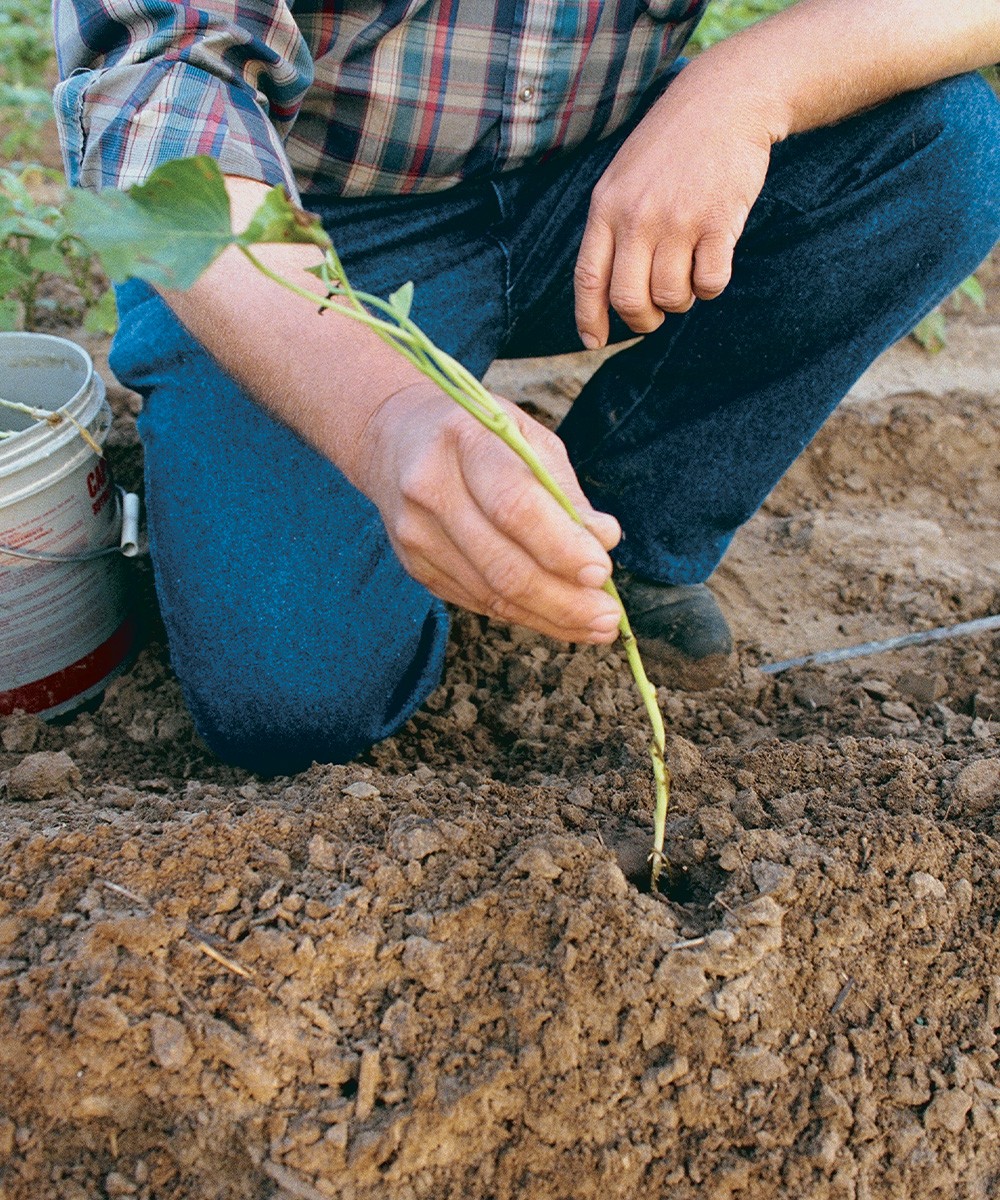
Planting sweet potato slips correctly is key to a successful harvest. Sink the sprout to about half its length to encourage strong root development.
Sweet potatoes flourish when grown on raised ridges, typically about 12 inches high. Creating ridges improves drainage and provides loose soil for the potatoes to develop uniformly. Use a garden plow or a hoe to create these ridges, spacing them about 36 to 40 inches apart. The loose, uncompacted soil within the ridges is ideal for sweet potato growth. Timing is also critical. Sweet potatoes need warm soil and weather to thrive. Wait until the soil temperature consistently reaches above 65°F and all danger of frost has passed before planting. This is usually a few weeks after the last expected spring frost.
Planting Sweet Potato Slips: Starting Right
Sweet potatoes are typically grown from sprouts called “slips,” rather than seeds. These slips are young plants grown from mature sweet potatoes. When you’re ready to plant, gently set the sweet potato slips into the prepared ridges, spacing them about 12 to 18 inches apart along the spine of the ridge. To create planting holes, a simple tool like a ½-inch wide metal rod works well. Make a hole, fill it with water to help settle the soil around the roots, and then insert the slip to about half its length. Firm the soil gently around the base of the slip after planting. Water the newly planted slips thoroughly. Consistent watering is important for the first week or so, until the roots establish themselves. Each healthy sweet potato plant should produce at least three or more potatoes, making even a small planting quite productive.
Caring for Your Sweet Potato Patch: Watering, Weeding, and Maintenance
Once planted, sweet potatoes are relatively low-maintenance. Initially, ensure they receive consistent watering to help them establish. After the first week or two, you can reduce watering frequency, but water deeply whenever the soil feels dry, especially during dry spells. As the plants mature and vine out, they become more drought-tolerant. It’s actually beneficial to reduce watering towards the end of the growing season, as this helps prevent the sweet potatoes from splitting as they mature.
Weed control is important, especially in the early stages of growth. Keep the area around the young plants free of weeds that can compete for sunlight, water, and nutrients. Once the sweet potato vines begin to spread, they will naturally shade out most weeds, reducing the need for manual weeding. As mentioned earlier, avoid fertilizing sweet potatoes with extra nitrogen during the growing season. Focus on maintaining consistent moisture and controlling weeds, and your sweet potatoes will thrive.
Harvesting Your Sweet Potato Bounty: Timing and Technique
Patience is key when it comes to harvesting sweet potatoes. The longer they remain in the ground, the sweeter they become. Some gardeners enjoy harvesting “baby baker” sweet potatoes, which are smaller and can be ready earlier. To check for size, you can carefully dig around a plant with your hand to feel for the potatoes. If they aren’t yet the size you want, simply recover them and allow them to continue growing. However, for the main harvest, it’s best to wait until shortly before the first expected frost in your area.
Before digging, it’s helpful to cut back the vines. If local regulations permit, burning the vines can help reduce the risk of disease buildup in your garden. Use a shovel or spading fork to carefully dig up the sweet potatoes. Work gently to avoid bruising or cutting the potatoes, as damage can lead to rot during storage. Dig a little ways from the main stem and lift upwards to loosen the soil and unearth the potatoes.
Harvesting sweet potatoes requires care to avoid damage. Clear the vines first for better access (left), then carefully dig and lift from underneath to prevent bruising (right).
Curing and Storing for Long-Term Enjoyment
Once harvested, sweet potatoes need to be cured and stored properly to maximize their sweetness and storage life. First, wash off any soil from the freshly dug potatoes using a garden hose. Allow them to dry thoroughly for several hours, ideally in a sunny, grassy area. After drying, place the sweet potatoes in shallow containers, ensuring good air circulation. Store them in a shed or garage where they will remain dry and well-ventilated. Cure the sweet potatoes for about 10 days at a warm temperature, ideally around 85°F with high humidity. This curing process converts starches to sugars, enhancing their sweetness, and also toughens their skins for better storage.
Washing freshly harvested sweet potatoes gently removes soil. Allow them to dry completely before curing to prevent rot and ensure good storage.
After curing, sweet potatoes should be stored in a cool, dry, and well-ventilated area. A temperature around 60°F is ideal. Store them in boxes or baskets, and handle them gently to prevent bruising. With proper curing and storage, sweet potatoes can last for eight to nine months, allowing you to enjoy your homegrown harvest throughout the year. For even longer storage, consider wrapping each potato individually in newspaper.
Wrapping each sweet potato in newspaper before storing helps extend their shelf life. Proper storage ensures you can enjoy your harvest for months.
Starting Your Own Sweet Potato Slips: A Cycle of Growth
To continue growing sweet potatoes year after year, you can easily start your own slips from saved potatoes. Sweet potatoes don’t have “eyes” like regular potatoes, but they will sprout from other areas. About six weeks before you need slips for planting in the spring, select some healthy sweet potatoes from your harvest and plant them about 2 inches deep in a box filled with sawdust or a mix of peat moss and soil. Keep the box in a warm place, around 75°F, and keep the planting medium slightly moist.
Starting your own sweet potato slips is an economical way to propagate your crop. Mature sweet potatoes sprout to produce slips for planting.
Each sweet potato will sprout multiple slender stems, the slips. Once these slips have several leaves and are about 6 inches long, they are ready to be gently pulled off from the potato at the soil surface and planted in your garden. If you’re not ready to plant immediately, you can keep the slips for a couple of weeks by keeping their roots moist. Alternatively, purchasing certified disease-free slips from reputable suppliers is a reliable method, especially if you are concerned about disease. Whether you grow your own slips or buy them, cultivating sweet potatoes is a rewarding experience that brings the taste of homegrown goodness to your table. Enjoy the process and the delicious harvest!