Understanding How To Launch Bios (Basic Input/Output System), or its more modern counterpart UEFI (Unified Extensible Firmware Interface), is a fundamental skill for any PC user. The BIOS/UEFI is the first software to run when you power on your computer, acting as the gatekeeper that initializes your hardware and sets the stage for your operating system to load. Whether you need to tweak hardware settings, overclock your CPU, configure boot order, or enable virtualization, accessing your BIOS is essential.
This guide provides a detailed walkthrough on different methods to launch BIOS on your computer, ensuring you can confidently access this crucial system firmware regardless of your operating system or PC age.
Method 1: Utilizing a BIOS Key During Startup
The most traditional method to enter BIOS involves pressing a specific key during the Power-On Self-Test (POST). POST is a quick diagnostic process your computer runs immediately after being powered on. The window to press this key is brief, often just a few seconds, requiring prompt action right after you hit the power button.
However, modern computers, especially those with SSDs, boot incredibly fast, making it challenging to press the BIOS key in time. For these speedy systems, you might find Method 2 more reliable.
Different manufacturers use different keys to access BIOS, which can sometimes be confusing. While the DEL (Delete) key is prevalent on desktop motherboards, laptops and ultrabooks can vary. For instance, ASUS often uses F2, while Acer might use F10.
If you’re unsure of the correct key for your system, keep an eye on the initial startup screen. Often, a brief message will flash, indicating which key to press to enter setup or BIOS. If you miss this message, don’t worry. You can systematically try common BIOS keys like the function keys (F1, F2, F10, F12), DEL, ESC, or Enter. It might take a few attempts to identify the correct key for your specific computer. From our research, DEL and F2 are the most frequently used BIOS keys.
Common BIOS Keys by Manufacturer
To simplify the process, here’s a table listing common BIOS keys for various PC brands. Keep in mind that depending on your specific model and its age, the key might differ.
| Manufacturer | BIOS Key(s) |
|---|---|
| ASRock | F2 or DEL |
| ASUS (PCs) | F2 |
| ASUS (Motherboards) | F2 or DEL |
| Acer | F2 or DEL |
| Dell | F2 or F12 |
| ECS | DEL |
| Gigabyte / Aorus | F2 or DEL |
| HP | F10 |
| Lenovo (Consumer Laptops) | F2 or Fn + F2 |
| Lenovo (Desktops) | F1 |
| Lenovo (ThinkPads) | Enter then F1 |
| MSI (Motherboards/PCs) | DEL |
| Microsoft Surface | Volume Up (Hold) |
| Origin PC | F2 |
| Samsung | F2 |
| Toshiba | F2 |
| Zotac | DEL |


Method 2: Accessing BIOS Through Windows Advanced Startup Options (Windows 11 & 10)
For modern, fast-booting computers, or in situations where pressing a BIOS key is ineffective, Windows 11 and Windows 10 offer a reliable alternative: the Advanced Startup menu. This method allows you to access UEFI firmware settings directly from within the operating system.
These steps are illustrated with Windows 11 screenshots, but the process is identical in Windows 10.
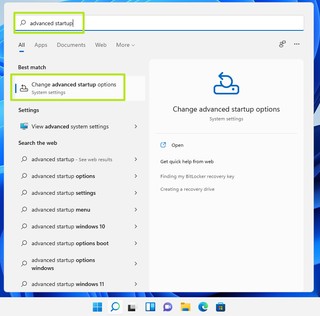
1. Navigate to Advanced Startup Settings: The quickest way to find this setting is to use the Windows search bar. Type “advanced startup” and select the “Change advanced startup options” system setting.
2. Initiate Restart into Advanced Startup: Under the “Advanced startup” section, click the “Restart now” button. Ensure you save any unsaved work before proceeding as your computer will restart immediately.
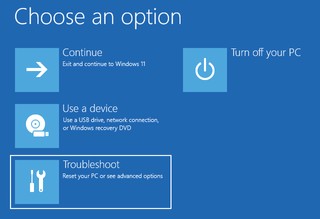
Your computer will reboot and enter the Windows Recovery Environment (WinRE), presenting you with a blue options menu.
3. Select Troubleshoot: In the Choose an option screen, click on “Troubleshoot”.
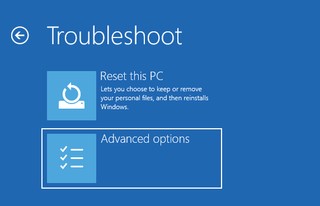
4. Go to Advanced Options: Within the Troubleshoot menu, select “Advanced options” to access further recovery and startup settings.
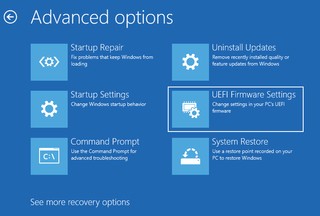
5. Choose UEFI Firmware Settings: Among the advanced options, you will find “UEFI Firmware Settings”. Click on this option to proceed to the BIOS/UEFI settings.
6. Confirm Restart to BIOS: Finally, click “Restart” to confirm your choice. Your computer will restart one more time, and this time it will boot directly into the BIOS/UEFI setup utility.
Image credit: Tom’s Hardware
Method 3: Using a Linux Command to Reboot into Firmware
If your system runs on a modern Linux distribution like Ubuntu, you can utilize a command-line instruction to reboot directly into your system’s firmware interface. This method offers a convenient way to access BIOS/UEFI without relying on startup keys or Windows menus.
Open your terminal and type the following command:
sudo systemctl reboot --firmwareEnter your administrator password when prompted. This command instructs the system to reboot and directly load into the UEFI firmware settings, bypassing the regular operating system boot process.
Troubleshooting: Accessing BIOS When Booting Issues Arise
In situations where your operating system fails to boot, or you’re unable to press the BIOS key in time, accessing BIOS might seem challenging. However, in many of these scenarios, the system itself will prompt you to enter BIOS.
If your computer cannot detect a bootable drive, it will often pause during startup, emit beeps, and display a message offering to enter “setup” – which refers to the BIOS menu.
More complex issues arise when the system POSTs too quickly to register key presses, and subsequently, the operating system attempts to boot but fails. This can happen due to a corrupted bootloader, leading to errors like the Windows blue screen of death (BSoD).
In such cases, you can attempt to force BIOS access using an emergency boot disk. This requires configuring your BIOS to boot from USB or having a USB drive set as a higher boot priority than internal storage.
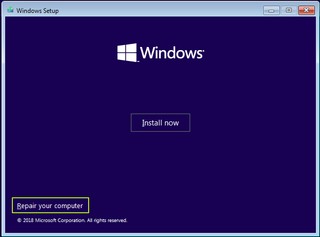
A Windows installation disk or USB drive can serve as an emergency boot disk. Boot from the USB drive, and when prompted with the installation options, choose “Repair your computer” instead of “Install now.” Then navigate through Troubleshoot -> UEFI Firmware Settings -> Restart, similar to Method 2, to access your BIOS settings.
As a last resort, if booting from an emergency disk is also not possible, you can try to induce a system error that prevents the computer from booting from its internal drives. This might trigger the BIOS to appear.
For desktop PCs, disconnecting the keyboard might prompt an error message during startup, potentially leading to BIOS access. Alternatively, on some systems, holding down multiple keys during startup could overload the keyboard buffer, causing an error and potentially offering BIOS entry. As a more drastic measure, disconnecting the primary internal storage drive might also force an error that allows BIOS access, but remember to reconnect it properly afterward.
Conclusion
Mastering how to launch BIOS is a valuable skill for any computer user, providing control over fundamental hardware settings and troubleshooting capabilities. Whether you prefer the traditional BIOS key method, the convenience of Windows Advanced Startup, or the command-line approach in Linux, this guide equips you with the knowledge to confidently access your system’s firmware. Remember to exercise caution when modifying BIOS settings, as incorrect changes can impact system stability and performance. Always consult your motherboard or computer manual for specific guidance and recommended settings.