Have you ever wondered about the secret to a truly perfect lasagna? It’s all in the layers! Knowing How To Layer Lasagna correctly is essential for achieving that ideal balance of flavors and textures in every bite. Many home cooks, even experienced ones, sometimes question the right order: noodles first, then sauce, or is it cheese before sauce? If you’ve ever been unsure, you’re in the right place.
This guide will walk you through the precise steps of how to layer lasagna, ensuring you get it right every time. We’ll break down each component and its placement, complete with visual aids to make the process crystal clear. Mastering the art of lasagna layering will elevate your cooking skills and impress your family and friends. Get ready to become a lasagna layering expert!
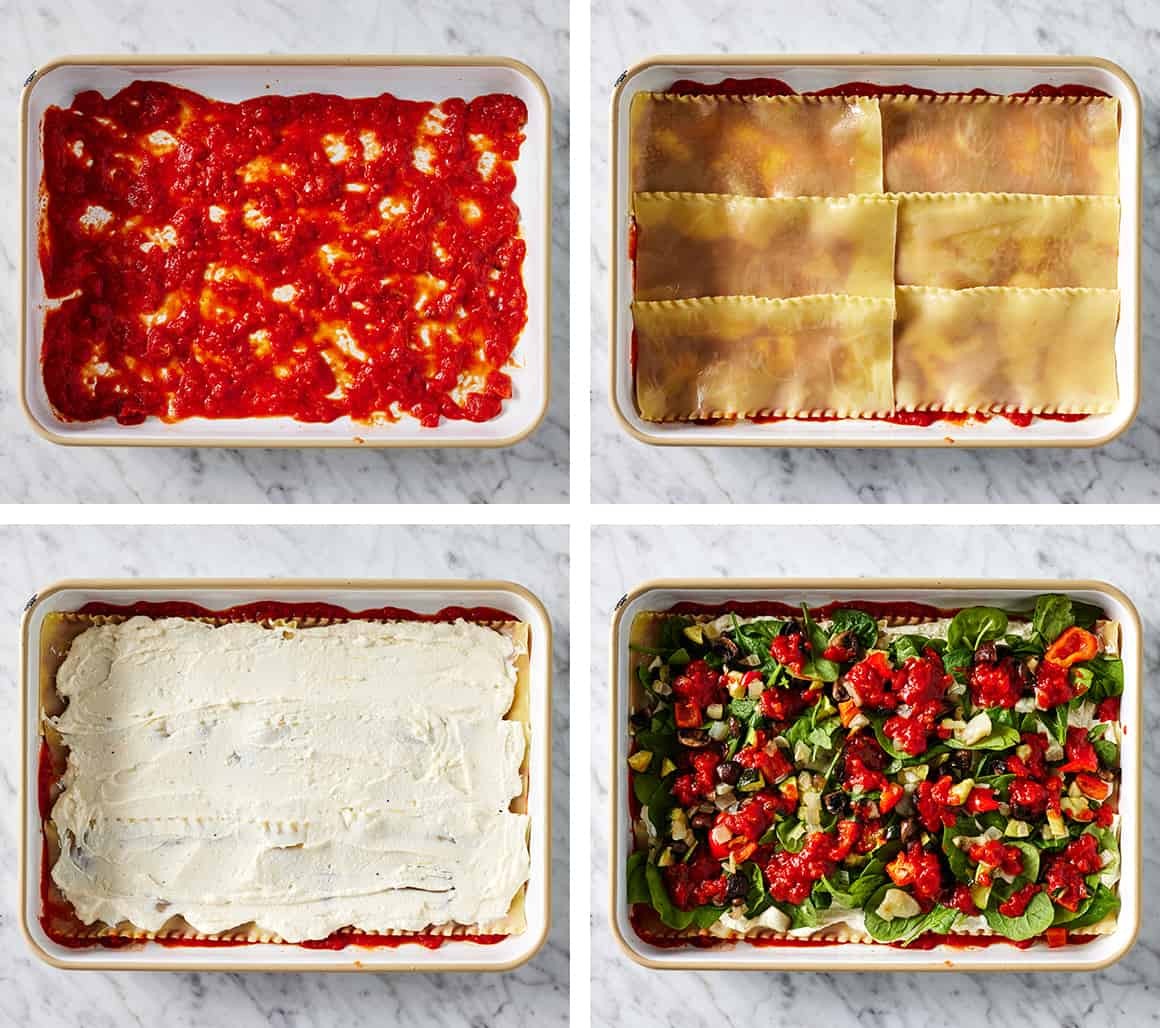
Starting Strong: The First Layer is Sauce
Whether you’re preparing a hearty meat lasagna or a vibrant vegetable lasagna, the foundation layer is always sauce. This is a crucial step in how to layer lasagna because it prevents the pasta sheets from sticking directly to the bottom of the baking dish. A sauce base acts as a buffer, ensuring your lasagna slices come out cleanly and are easy to serve.
Don’t overdo it with the sauce at this stage; a thin layer is all you need. For a standard 9×13 inch baking dish, about 1 cup of your favorite tomato sauce is usually sufficient to create that essential non-stick base.
Building the Middle: Layering Sequence
Once you’ve laid down your sauce foundation, it’s time to build the flavorful middle layers. Follow this precise sequence for how to layer lasagna in the most effective way:
- Lasagna Noodles: Place a layer of lasagna noodles directly over the sauce. Ensure they cover the sauce layer as much as possible, you may need to break some noodles to fit neatly.
- Ricotta Cheese (or Béchamel): Next, spread half of your ricotta cheese mixture (or béchamel sauce if your recipe calls for it) evenly over the noodles. Seasoning your ricotta with salt, pepper, and even garlic and lemon zest at this stage will enhance the overall flavor.
- Fillings (Optional): If you’re using additional fillings like roasted vegetables, cooked ground meat, or spinach, now is the time to add half of them. Distribute them uniformly over the ricotta.
- More Sauce: Finally, add another layer of sauce over the fillings. This layer helps to bind everything together and keeps the lasagna moist during baking.
Repeat this exact sequence one more time to create two complete middle layers. This ensures a balanced distribution of all ingredients throughout your lasagna.
The Grand Finale: The Top Layer
After completing the middle layers, it’s time for the final flourish in how to layer lasagna. Top the last sauce layer with a final layer of lasagna noodles.
Generously spread the remaining sauce over these noodles, ensuring they are fully covered. The crowning glory is the cheese! Sprinkle a generous and even layer of shredded cheese over the sauce. A mix of mozzarella and Parmesan cheese is classic and provides a wonderful melted texture and flavor. Remember, lasagna is all about those delicious layers!
Baking Your Masterpiece
Baking time and temperature are key to a perfectly cooked lasagna, but they can vary depending on your recipe and the type of noodles you use (no-boil or pre-cooked).
The general rule is to bake until the lasagna is heated through, any raw ingredients are fully cooked, and the cheese is melted, browned, and bubbly.
- For a vegetable lasagna with pre-cooked noodles, baking uncovered at 400°F (200°C) for about 30 minutes usually works well.
- If using no-boil noodles, covering the lasagna with foil and baking for 40-50 minutes, followed by uncovering to brown the cheese, is often recommended.
Always refer to your specific lasagna recipe for precise baking instructions.
Pro Tips for Perfect Lasagna Layering
- Season Every Layer: To maximize flavor, season each component as you layer. Enhance your tomato sauce with garlic, herbs like oregano and basil, or use a high-quality store-bought marinara. Don’t forget to season your ricotta mixture with at least salt and pepper.
- Rest Before Slicing: Patience is key! Let your lasagna rest at room temperature for about 20 minutes after baking. This resting period allows the lasagna to set, making it much easier to slice into neat, presentable pieces. Slicing too soon can result in a messy dish.
- Make-Ahead Magic: Lasagna is an excellent make-ahead dish. You can assemble it, cover it tightly with foil, and refrigerate it for up to a day or freeze it for up to 3 months. If frozen, thaw it in the refrigerator overnight before baking.
Ready to Layer Like a Pro?
Now that you’ve mastered how to layer lasagna, put your skills to the test! Try this layering technique with your favorite lasagna recipe. For inspiration, explore recipes like vegetable lasagna or eggplant lasagna to create your next layered masterpiece.
How To Layer Lasagna – Quick Guide
Rate this recipe: 5 stars from 4 votes
Prep Time: 20 minutes
Total Time: 20 minutes
Learn how to layer lasagna in the proper order with this guide! This method works for any lasagna variation. For a complete recipe, check out this vegetarian lasagna.
Ingredients:
- Extra-virgin olive oil
- Tomato sauce
- Lasagna noodles (no-boil or fully cooked)
- Ricotta cheese, seasoned with salt and pepper
- Desired fillings (e.g., roasted vegetables)
- Shredded cheese (mozzarella and Parmesan recommended)
Instructions:
- Lightly oil your baking dish.
- Spread a thin layer of sauce on the bottom.
- Layer noodles, then half the ricotta, half the fillings, and more sauce.
- Repeat the noodle, ricotta, fillings, sauce layers.
- Top with a final noodle layer, remaining sauce, and shredded cheese.
- For a full lasagna recipe, see the vegetable lasagna recipe.