If you crave the delightful taste of fresh sourdough bread, boasting a perfectly crisp, golden crust and a light, airy interior, then this recipe is tailored just for you. It stands out as one of the most straightforward homemade sourdough bread recipes available, yet it compromises nothing on quality. Requiring only about 25 minutes of active preparation and sidestepping complex techniques like autolyse or preferment, it’s an accessible entry point for aspiring sourdough bakers. Below, you’ll find comprehensive guidance to navigate each step of the process, ensuring your sourdough journey is both successful and enjoyable. 🍞🍞🍞
⭐️⭐️⭐️⭐️⭐️ Review:
“Absolutely the best sourdough recipe EVER! I have been baking bread for years (sourdough included,) and things were many times hit or miss. Not with your recipe. You have nailed it. I thank you!” — Rosemary Patterson
This guide will illuminate How To Make incredibly simple sourdough bread. Eschewing both autolyse and preferment, this recipe streamlines the process, allowing the dough to come together in under five minutes of hands-on time.
For those who find sourdough bread baking intimidating, this recipe, along with this sourdough focaccia recipe, are excellent starting points. Their simplicity and exceptional flavor profile make them ideal for beginners. Other fantastic beginner-friendly bread options include this overnight refrigerator focaccia or my mother’s simple peasant bread recipe, both requiring minimal effort yet delivering outstanding results.
This post is thoughtfully structured into the following sections to guide you through every aspect of making sourdough bread:
Understanding Sourdough Bread: What Makes it Special?
Sourdough bread distinguishes itself as a bread variety that undergoes natural leavening. This means its rise is achieved through the action of a sourdough starter, a vibrant culture of wild yeasts and beneficial bacteria, rather than relying on commercial yeast or chemical leavening agents such as baking powder or baking soda. This natural fermentation process not only gives sourdough its characteristic tangy flavor but also contributes to its unique texture and digestibility.
What is a Sourdough Starter? The Heart of Your Bread
A sourdough starter is essentially a living culture, a fermented blend of flour and water teeming with wild yeasts and lactobacilli bacteria. When kept healthy and active through regular feeding, this starter becomes the powerhouse that makes your sourdough bread rise. It’s the foundational ingredient that imparts sourdough’s signature flavor and texture.
You can embark on the journey to make a sourdough starter from scratch in about a week. Creating your own starter is particularly recommended if you’re in a warm environment, like during summer or a warm fall. While building a starter from the ground up is incredibly rewarding, guaranteeing a strong and vigorous starter from the outset, purchasing a starter offers significant advantages. Opting to buy a starter means you can confidently begin baking immediately, knowing you have a robust culture ready to leaven your bread.
Here are three reputable online sources where you can purchase reasonably priced, high-quality sourdough starters:
(Note: Please insert specific online sources here as per original article if available and relevant for English speaking audience.)
How to Feed Your Sourdough Starter: Keeping it Alive and Active
Maintaining a sourdough starter is akin to caring for a pet, albeit a very low-maintenance one. To keep your starter alive, it needs to be fed. For basic survival, feeding is required only every two to three weeks. However, if you’re an avid baker and plan to bake frequently, your starter will need more regular feedings to remain active and ready for bread making.
When I’m not baking regularly, I store my starter in the refrigerator within a vessel with a lid, as pictured above. In this state, it can remain untouched for 2-3 weeks or even longer. To prepare it for baking, or to “wake it up,” I prefer to feed it twice before use. Typically, I’ll take it out of the fridge after dinner and perform the first feeding. This involves discarding most of the starter and then replenishing it with equal parts by weight of flour and water. For a detailed guide on activating, feeding, and maintaining your starter, please refer to this comprehensive post.
I repeat this feeding process the following morning – again, discarding most of the starter and replenishing it with equal parts flour and water. By midday, or when the starter has visibly doubled in volume and is bubbly, it’s ready to be used for baking.
For storing your starter, the best practice is to feed it, allow it to rise until it nearly doubles, then cover it and refrigerate. It can then be stored in the fridge for 2 to 3 weeks until your next baking session.
Readiness Check: How to Tell if Your Starter is Ready for Baking
A key indicator of a ready-to-use starter is its activity level. If your starter reliably doubles (or even triples!) in volume within 4 to 8 hours after feeding, it’s primed and ready for baking. Ideally, you should use your starter within this 4 to 8-hour window, precisely when it has reached its peak rise. To easily monitor this, every time I feed my starter, I place a rubber band around its container to mark the initial height. This simple trick makes it easy to see when it has doubled in volume and is therefore ready to be incorporated into your sourdough recipe.
If your starter isn’t doubling within 4 to 8 hours post-feeding, it needs a bit of strengthening. This is easily achieved by feeding it more frequently for a few days. Each feeding should involve discarding a significant portion of the starter – don’t be shy about discarding a lot – and then replenishing it with fresh, equal parts by weight of flour and water. Repeating this twice a day for several days will significantly boost your starter’s vigor, getting it into optimal shape for baking.
Essential Equipment: Tools You’ll Need to Make Sourdough
To embark on your sourdough baking adventure, you’ll need a few key pieces of equipment. While some are essential, others are highly recommended for making the process smoother and achieving the best results.
Minimal Equipment List:
- Sourdough Starter: An active and bubbly sourdough starter is non-negotiable (refer to the section above).
- Flour: Bread flour is highly recommended for its higher protein content, which contributes to better gluten development. King Arthur Flour is a popular and reliable choice.
- Salt: Essential for flavor and gluten development regulation in bread making.
- Water: Use warm water to kickstart the dough making process.
Highly Recommended Equipment:
- Digital Kitchen Scale: Precision is key in sourdough baking, especially when measuring flour and water ratios. A digital scale ensures accuracy and consistent results.
- Dutch Oven: A Dutch oven is crucial for baking sourdough bread with a crisp crust and soft interior. It traps steam during the initial baking phase, mimicking a professional oven environment.
- Mixing Bowl: A large bowl to comfortably mix your dough and allow for rising.
- Straight-Sided Container: For bulk fermentation, a straight-sided container makes it easier to accurately gauge the dough’s rise.
- Bench Scraper: Helpful for handling sticky dough, shaping, and cleaning your work surface.
- Proofing Basket (Banneton): While optional, a banneton aids in shaping and supports the dough during its final proof, contributing to a beautifully shaped loaf.
- Parchment Paper: For easy transfer of dough to and from the Dutch oven and to prevent sticking.
- Lame or Sharp Knife: For scoring the dough before baking, allowing for controlled expansion and artistic crust patterns.
Choosing the Best Dutch Oven for Sourdough Bread Baking
For sourdough baking, a Dutch oven is invaluable. I personally love and recommend the Lodge Pre-Seasoned Cast Iron Double Dutch Oven. It’s a fantastic all-around option that provides excellent heat retention and distribution, crucial for a perfectly baked sourdough loaf. The Lodge Dutch oven is also remarkably affordable, offering great value for its performance.
If you aspire to bake batards, baguettes, or other oblong-shaped loaves, I highly recommend considering the Challenger Bread Pan. Although a more significant investment, its design is specifically tailored for bread baking. The handle placement simplifies lid removal and closure, and it consistently produces loaves with beautifully crisp crusts.
How to Make Sourdough Bread: A Simple 5-Step Process
Making sourdough bread, while seemingly complex, can be broken down into five manageable steps. Each of these steps is crucial to the final outcome and will be detailed further in the following sections.
- Mixing the Dough: This initial step involves combining water, your active sourdough starter, salt, and flour in a bowl. Stir these ingredients until they just come together to form a shaggy, sticky dough ball.
- Bulk Fermentation (First Rise): Bulk fermentation is the first rise of your sourdough dough. During the first two hours of this phase, you will perform a series of stretches and folds. These stretches and folds are essential for developing the dough’s strength and elasticity, which are key to a good sourdough structure.
- Shaping and Bench Rest: This step marks the end of bulk fermentation. You’ll gently shape the dough into your desired form, allow it to rest briefly on the counter (bench rest), and then perform a final shaping before proofing.
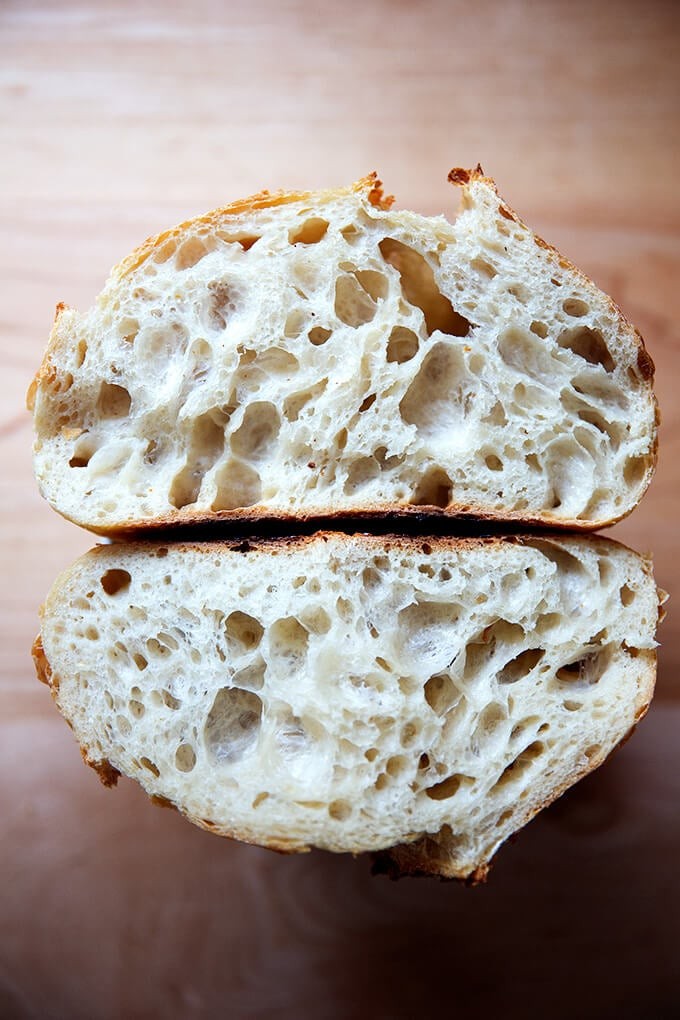
- Proofing the Dough (Second Rise): In this recipe, we utilize a cold proof in the refrigerator. Ideally, the dough proofs in the fridge for 24 to 48 hours. This extended cold proof is vital for flavor development and the creation of sourdough’s signature open crumb. While a longer proof is preferred, even a shorter period can yield good results.
- Scoring and Baking: After the cold proof, the dough is ready for baking. You’ll carefully turn the dough out onto a piece of parchment paper, score the top surface with a lame or sharp knife to control expansion, and then transfer it into a preheated Dutch oven for baking.
What Sets This Sourdough Bread Recipe Apart? Key Differences
This sourdough bread recipe distinguishes itself from many others through three primary simplifications, making it exceptionally beginner-friendly without sacrificing quality:
-
No Autolyse: Many sourdough recipes incorporate an autolyse step, where flour and water are mixed and allowed to rest before adding salt and starter. While autolyse can enhance dough extensibility, I’ve found that it doesn’t significantly impact the final texture in this simple recipe. Moreover, omitting this step streamlines the process, making it less cumbersome for home bakers. Autolyse aims to hydrate the flour fully and initiate gluten development before fermentation, potentially leading to a more open crumb in some recipes. However, for simplicity and excellent results, this recipe skips it.
-
50% Volume Increase for Bulk Fermentation: Traditional yeast-leavened bread recipes often call for doubling the dough volume during the first rise. However, in sourdough baking, allowing the dough to double can often lead to over-fermentation, especially for beginners. This recipe advises stopping bulk fermentation when the dough has increased by approximately 50-75% in volume. This adjustment results in better oven spring and a more controlled rise in the final loaf. Monitoring volume increase is crucial in sourdough baking, and recognizing a 50% increase is a key technique in this recipe.
-
Extended Cold Proof: After bulk fermentation and shaping, this recipe utilizes a long, cold proof in the refrigerator, ideally for 24 to 48 hours. This extended cold proof is a game-changer for developing a light, airy crumb and enhancing the sourdough’s flavor complexity. The cold proof slows down fermentation, allowing for flavor development and improved dough structure. While a shorter cold proof (12 hours or less) is possible, it will result in a denser crumb. Crucially, after the cold proof, the dough is baked directly from the fridge—no need for a room temperature proof, simplifying the baking schedule.
Simple Sourdough Bread Recipe: A Detailed Step-by-Step Guide
Let’s dive into the detailed steps of how to make this simple sourdough bread. Follow each step carefully for the best results.
Step 1: Mixing the Dough
Begin by pouring 375 grams of warm water into a large mixing bowl.
Add 50 to 100 grams of your active sourdough starter to the water.
Stir the water and starter together until they are somewhat combined. Then, add 11 grams of salt to the mixture.
Finally, add 500 grams of bread flour to the bowl.
Mix all the ingredients together until just combined. The dough will be shaggy and slightly sticky. Ensure there are no dry flour patches.
Step 2: Bulk Fermentation (First Rise)
Transfer the dough to a straight-sided container. This type of container will help you accurately monitor the dough’s rise. Cover the container and let the dough rest for 30 minutes. This initial rest period is known as the “autolyse” in some baking methods, but here it simply allows the flour to fully hydrate.
After the 30-minute rest, perform a set of stretches and folds. To do this, gently grab one side of the dough, stretch it upwards, and fold it over onto the center of the dough. Rotate the container 90 degrees and repeat this stretch and fold. Do this for a total of 4 stretches and folds, rotating the container each time.
If time permits, perform four sets of stretches and folds in total, every 30 minutes for the first 2 hours of bulk fermentation. You’ll notice the dough becoming smoother, stronger, and more elastic with each set of folds. The image below demonstrates the dough after the 4th set of stretches and folds.
After completing the 4th set of stretches and folds, cover the container again and set it aside at room temperature to continue bulk fermentation until it has increased in volume by approximately 50%.
How long should bulk fermentation take?
The duration of bulk fermentation is not fixed and depends primarily on the strength and activity of your sourdough starter and the ambient temperature of your kitchen. Instead of strictly following a time period, rely on visual cues.
While the video referenced in the original article shows dough nearly doubling (100% increase), experience has shown that a 50% increase in volume is often optimal for this recipe, leading to better results. Experimentation may be needed to find the ideal rise for your specific starter and kitchen conditions. You might find a 75% increase works best, or even that it’s too much. Sourdough baking is a journey of learning and adapting based on your own baking experiences.
The image below illustrates dough that has increased in volume by 50%. This is the target rise for best results in this recipe.
Step 3: Shaping and Bench Rest
Once the dough has completed bulk fermentation and increased by about 50% in volume, gently turn it out onto a lightly floured work surface.
Shape the dough gently into a round or batard shape. If shaping a round, pull the edges of the dough inwards and tuck them underneath to create tension on the surface.
Let the shaped dough rest, uncovered, on the work surface for 20-40 minutes. This is the bench rest, which allows the gluten to relax, making final shaping easier.
While the dough is resting, prepare a bowl or banneton for proofing. Line it with a flour sack towel and dust generously with rice flour. Rice flour is preferred as it prevents sticking better than wheat flour and doesn’t burn as easily during baking.
Step 4: Proofing (Cold Proof in Refrigerator)
After the bench rest, gently reshape the round dough. Place it seam-side up in the prepared proofing bowl or banneton.
Cover the dough and transfer it to the refrigerator for a cold proof. Proof in the fridge for a minimum of 12 hours, ideally between 24 to 48 hours. A longer cold proof enhances flavor and creates a more open crumb structure.
Step 5: Scoring and Baking
When you’re ready to bake, remove the proofing bowl from the refrigerator. Preheat your oven, with your Dutch oven inside, to 450°F (230°C). Preheat for at least 30 minutes to ensure the Dutch oven is thoroughly heated.
Carefully turn the dough out of the proofing bowl onto a piece of parchment paper.
Score the top of the dough with a lame or sharp knife. Scoring allows the bread to expand predictably during baking and creates beautiful crust patterns. A simple “X” or a single slash works well.
Using the parchment paper as handles, carefully transfer the scored dough into the preheated Dutch oven.
Cover the Dutch oven with its lid and bake for 30 minutes at 450°F (230°C). After 30 minutes, remove the lid, reduce the oven temperature to 400°F (200°C), and continue baking for another 15-20 minutes, or until the crust is deeply golden brown and the internal temperature reaches around 200-210°F (93-99°C). For an extra crispy bottom crust, you can remove the loaf from the Dutch oven for the last 5 minutes of baking and place it directly on the oven rack.
Remove the baked sourdough loaf from the oven and carefully transfer it to a wire rack to cool completely. Allow the bread to cool for at least one hour before slicing and serving. This cooling period is crucial for the internal structure to set and for optimal flavor and texture.
You’ll need a good, sharp serrated knife to slice through the crusty sourdough loaf. This knife or this one are excellent choices for slicing sourdough.
Top Sourdough Bread Baking Tip: Embrace the Refrigerator
The refrigerator is your best ally in sourdough baking. Learn to use it to your advantage.
A common mistake for beginners is over-fermenting the dough during bulk fermentation. Dough mixed in the evening might rise excessively overnight, becoming a sticky, unmanageable mess by morning.
To avoid over-fermentation, utilize your refrigerator strategically. After completing the four sets of stretches and folds, you can place your dough in the refrigerator at any point. If you need to pause the process or go to bed, simply refrigerate the dough. The next day, remove it from the fridge and allow it to continue bulk fermenting at room temperature until it reaches approximately a 50% increase in volume.
For accurately monitoring volume increase, especially in sourdough, using a straight-sided vessel is highly recommended. Options like this 4-qt Cambro container or this BPA-free alternative make it straightforward to judge the 50% rise, eliminating guesswork often associated with rounded bowls.
Troubleshooting Common Sourdough Issues
If you’ve encountered difficulties in your sourdough baking attempts, the problems likely stem from one of these four areas:
- Weak Starter or Using Starter Past Its Prime: A starter that isn’t sufficiently active or hasn’t reached its peak activity won’t effectively leaven your dough.
- Excessive Hydration: Using too much water relative to the flour can result in overly sticky and difficult-to-handle dough.
- Over-Fermentation: Allowing the bulk fermentation (first rise) to proceed for too long is a common issue leading to weak dough structure.
- High Percentage of Whole Grains: Using too much whole wheat flour, rye flour, or freshly milled flour can sometimes make sourdough baking more challenging, especially for beginners, due to their different gluten development properties.
For detailed solutions and further insights into these common issues, refer to this helpful post: Why is my sourdough so sticky? 4 Common Mistakes. It offers valuable fixes and answers to frequently asked questions about sourdough baking.
Essential Sourdough Resources
(Please insert relevant and helpful sourdough resources for English speaking audience here, like websites, books, or online communities.)
Explore More Sourdough Bread Recipes
(Please insert links to other relevant sourdough bread recipes on how.edu.vn or other reputable sites if available.)
Sourdough Bread Baking Schedule: Planning Your Bake
For those new to sourdough, the timing of the entire process can seem daunting. You might wonder, “How can I bake sourdough without staying up all night?”
This is where understanding and utilizing a flexible schedule becomes essential. As emphasized earlier, your refrigerator is invaluable for managing sourdough baking timelines. If you don’t have time to complete bulk fermentation after your stretches and folds, simply refrigerate the dough and resume the process when convenient.
Here’s a sample sourdough baking schedule that you can adapt to fit your lifestyle:
Wednesday Evening: Refresh your starter. If stored in the fridge, take it out and feed it by discarding most and replenishing with equal parts flour and water.
Thursday Morning: Feed your starter again, following the same discard and replenish method to ensure it’s active and bubbly for baking.
Thursday Afternoon: Mix your sourdough dough and begin bulk fermentation. In the evening, once bulk fermentation is complete (dough has risen about 50%), shape the dough and place it in the refrigerator for its cold proof. (Note: If bulk fermentation isn’t finished by evening, refrigerate the dough to slow down fermentation and continue the process the next day).
Friday Evening or Saturday Morning: Bake your sourdough. No need to bring the dough to room temperature before baking. Directly remove it from the fridge, score, and bake!
Still Stumped by Sourdough?
(Consider adding a call to action here, if relevant for how.edu.vn, like a link to a free sourdough e-course or further resources.)
Print Recipe
Recipe Description
Inspired by The Clever Carrot
For visual learners, watch the step-by-step video guide here: Simple Sourdough Bread or find it embedded within the post above.
Troubleshooting Tip: If your dough is consistently too sticky, revisit this resource: Why is my sourdough so sticky? The 4 common mistakes.
Recipe Notes:
- Active Starter is Key: Ensure you are using a bubbly, active sourdough starter.
- Digital Scale Recommended: For consistent and accurate results in bread baking, a digital scale is highly recommended.
- Dutch Oven Options: The Dutch Oven is a premium choice, but the Dutch oven is also a reliable and more budget-friendly option.
- Flour Sack Towels: Flour sack towels are excellent for proofing as they prevent sticking.
- Rice Flour for Dusting: Rice flour is ideal for dusting proofing baskets because it doesn’t burn easily.
- Essential Equipment Guide: Find a comprehensive list of sourdough essentials here: Essential Equipment For Sourdough Bread Baking
- Hydration Level: This recipe uses a high-hydration dough. Feel free to experiment with up to 380 grams of water for a more hydrated dough.
- Salt Type: Both kosher salt (Diamond Crystal brand recommended) and fine sea salt (Baleine Fine brand recommended) work well. Use 12 grams regardless of type.
- Shaping for Crumb: For a more open crumb, try shaping your dough into a batard (oblong) shape. Watch this video for shaping guidance. This recipe describes a shape, rest, then shape again method, but you can often skip the pre-shape for simplicity.
- Adding Flavors: To add ingredients like cheese, herbs, or jalapeños, incorporate them before the third set of stretches and folds. Consider adding an extra set of folds to ensure even distribution.
Starter Amount Notes:
- Adjust starter amount based on your kitchen temperature. In colder kitchens, 100g (1/2 cup) starter is recommended. In warmer, humid environments or for overnight rises, 50g (1/4 cup) may suffice.
- Using 100g starter may speed up fermentation, so monitor your dough’s rise visually (50% volume increase) rather than strictly by time.
- A straight-sided vessel is highly recommended for easy monitoring of dough volume increase during bulk fermentation.
Ingredients
- 50 – 100 g (1⁄4 – 1/2 cup) bubbly, active sourdough starter (100g recommended, see notes)
- 375 g (1 1/2 cups + 1 tbsp) warm water, or up to 380g (see notes)
- 500 g (4 cups + 2 tbsp) bread flour
- 9 to 12 g (1.5 – 2.5 teaspoons) fine sea salt (12g recommended, see notes)
Instructions
- Mix the Dough: In a large bowl, whisk together the starter and warm water. Add the bread flour and salt. Mix until just combined into a shaggy dough, using your hand if needed to ensure no dry flour remains. Cover and let rest for 30 minutes.
- Stretch and Fold: After 30 minutes, perform stretch and folds: grab a section of dough, stretch it upwards, and fold it over the center. Rotate the bowl and repeat. Do 4-5 folds total. Rest for 30 minutes and repeat. For best results, do this a total of 4 times over 2 hours. Even one set of folds will benefit the dough.
- Bulk Fermentation (First Rise): Cover the bowl and let rise at room temperature for 8-10 hours at 70°F (21°C), or less in warmer environments. Dough is ready when increased by 50% volume, with surface bubbles, and jiggles when moved. Visual cues are more important than time. Use a straight-sided vessel for easy monitoring.
- Shape: Gently turn dough onto a lightly floured surface. Shape into a round by folding edges to the center, creating surface tension.
- Rest (Bench Rest): Let dough rest seam-side up for 30 minutes. Prepare a bowl or proofing basket lined with a floured towel (rice flour preferred).
- Proof (Second Rise): Reshape dough gently and place seam-up in the lined bowl. Cover and refrigerate for 12-48 hours (24 hours preferred for best flavor and crumb). For longer proofs, use a loosely tied plastic bag to prevent drying.
- Preheat Oven & Dutch Oven: Place Dutch oven in oven and preheat to 450°F (230°C) for at least 30 minutes. Cut parchment paper to fit Dutch oven.
- Score: Place parchment over dough, invert bowl to release dough onto parchment. Score dough top with a knife or lame in desired pattern.
- Bake: Use parchment to transfer dough to preheated Dutch oven. Cover and bake at 450°F (230°C) for 30 minutes. Remove lid, reduce oven to 400°F (200°C), and bake 15-20 minutes more until deeply golden and internal temp reaches 200-210°F (93-99°C). For crispier bottom, bake directly on rack last 5 mins. Cool on wire rack for 1 hour before slicing.
- Storage: Store loaf up to 3 days at room temperature in airtight bag or container. Freezes well.
Recipe Notes
-
Recipe adapted from Artisan Sourdough Made Simple with modifications:
- Increased salt to 12g.
- 4 sets of stretch and folds in first 2 hours for dough strength.
- Cold proof for at least 24 hours for better crumb.
- Preheating Dutch oven for crisper crust.
-
Prep Time: 18 hours
-
Cook Time: 45 minutes
-
Category: Bread
-
Method: Oven
-
Cuisine: American
