Unleash your creativity and personalize your messages, photos, and notes by learning how to make stickers directly on your iPhone. With just a few taps in the Photos app, you can transform subjects from your favorite photos and Live Photos into fun, expressive stickers. This guide will walk you through the simple steps to create both static and animated stickers, adding a unique touch to your digital communications.
Creating Static Stickers from Photos
Turning a regular photo into a sticker is a breeze. Follow these steps to get started:
-
Open the Photos App: Launch the Photos app on your iPhone and navigate to the photo you want to use for your sticker.
-
Select Your Photo: Tap on the chosen photo to view it in full screen. Ensure the subject you want to turn into a sticker is clearly visible.
-
Touch and Hold the Subject: This is where the magic happens. Gently touch and hold the main subject of the photo. After a brief moment, you’ll see a white outline appear around the subject, indicating it’s been selected. Release your finger.
-
Tap “Add Sticker”: A menu will pop up above the selected subject. Tap the “Add Sticker” option.
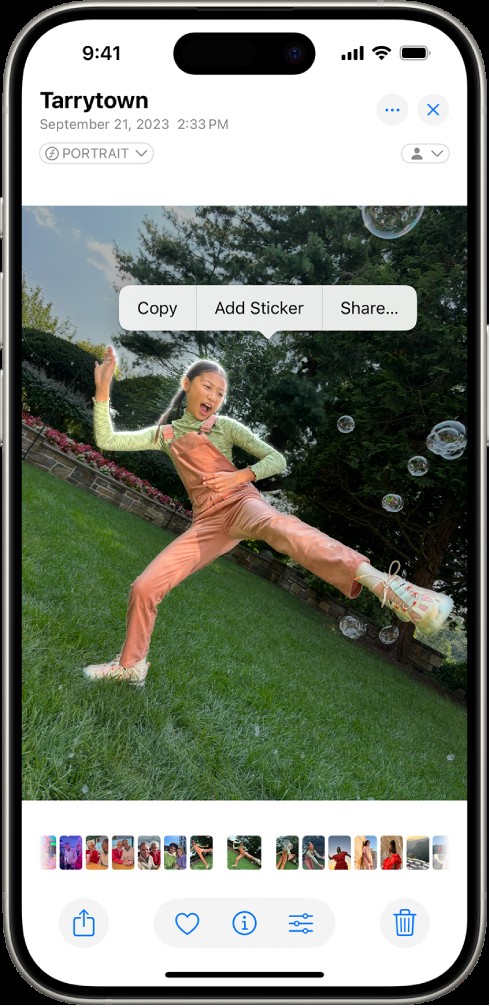 The Photos app displaying a photo of a person, with the subject selected and the "Add Sticker" option highlighted in the menu.
 -
Access Your Sticker: Your newly created sticker is now saved in your stickers menu. You can access this menu anytime you use the iPhone onscreen keyboard in apps like Messages, Mail, or when using Markup tools in Photos or Files.
Enhance Your Stickers with Effects
Want to add a bit more flair to your static stickers? iPhone offers several visual effects:
-
Add Effects: After tapping “Add Sticker,” you’ll see an “Add Effect” option. Tap it to explore available effects.
-
Choose an Effect: Select from options like “Outline,” which adds a crisp border; “Comic,” for a cartoonish look; or “Puffy,” to give your sticker a raised, 3D appearance. Experiment to find the perfect style for your sticker.
Creating Animated Stickers from Live Photos
Take your stickers to the next level by using Live Photos to create animated stickers. Here’s how:
-
Go to Your Live Photos: Open the Photos app and select a Live Photo that captures movement you want to animate in your sticker.
-
Open in Full Screen: Tap the Live Photo to view it in full screen mode.
-
Touch, Hold, and Slide Up: Touch and hold the moving subject within the Live Photo. This time, instead of just releasing, continue sliding your finger upwards until you see a ghosted, duplicate image of the subject appear beneath your finger. Then, release. This slide-up gesture is key to creating animated stickers.
-
Tap “Add Sticker”: Just like with static photos, tap “Add Sticker” in the menu that appears.
-
Animated Sticker Created: Your animated sticker is now ready and waiting in your stickers menu. Look for the subtle animation when you use it!
Add Effects to Animated Stickers Too
You can also apply effects like Outline, Comic, or Puffy to your animated stickers, just as you do with static stickers, to further customize them.
Managing and Deleting Your Stickers
Over time, you might want to manage your sticker collection, perhaps to remove some. Here’s how to delete stickers:
-
Open a Photo and Enter Edit Mode: In the Photos app, open any photo and tap “Edit” at the top right.
-
Access Markup: Tap the Markup button, which looks like a pen icon . Then, tap the “Add” button, which is a circle with a plus sign .
-
Go to Stickers: In the Add menu, tap “Add Sticker.” This will open your sticker menu.
-
Delete a Sticker: Touch and hold the sticker you wish to delete. After a moment, a “Remove” option will appear. Tap “Remove” to delete the sticker from your collection.
Your stickers are conveniently synced across your Apple devices via iCloud. This means any stickers you create on your iPhone will also be available on your iPad, Mac, and Apple Vision Pro, as long as you are logged in with the same Apple ID.
Start personalizing your digital world today by creating your own unique stickers on your iPhone! They are a fun and engaging way to express yourself and add a personal touch to your communications.