Coffee. The magical elixir that kickstarts our mornings, fuels our afternoons, and sometimes even pulls us through late nights. Whether you’re a seasoned coffee aficionado or just beginning your journey into the world of caffeine, understanding How To Make Coffee properly is key to unlocking that perfect cup. This guide will walk you through various brewing methods, from the simplest drip coffee to more sophisticated pour-over techniques, ensuring you can confidently brew coffee that suits your taste and lifestyle.
We’ve all been there, staring wistfully at the coffee maker, wishing it would magically brew itself. While we can’t offer a self-brewing coffee machine (yet!), we can provide you with the knowledge to master every type of coffee brewing method. Forget instant coffee – it’s time to delve into the rich, nuanced world of home-brewed coffee.
Understanding Coffee Beans and Grinds
Before we dive into brewing methods, let’s talk about the foundation of great coffee: the beans. The quality of your coffee beans and how freshly they are ground significantly impacts the final taste. For the most flavorful cup, grinding your beans right before brewing is highly recommended.
There are two main types of coffee grinders: blade grinders and burr grinders. While blade grinders are more affordable and widely available, burr grinders are preferred by coffee enthusiasts. Why? Burr grinders crush coffee beans uniformly, resulting in a consistent grind size. Blade grinders, on the other hand, chop the beans unevenly, leading to inconsistent extraction and potentially diminishing the coffee’s flavor. If you’re serious about taste, investing in a burr grinder is a worthwhile upgrade.
Alt text: Fresh coffee beans being ground in a professional burr grinder, demonstrating the first step in making flavorful coffee.
Grind size is crucial and varies depending on the brewing method. As Cary Wong, a coffee educator at Partners Coffee, explains, “The shorter the contact time with water, the finer the grounds should be. For longer contact time with water, you’ll want coarser grounds.” Espresso, brewed in seconds, requires a very fine grind. Drip coffee and French press, with a contact time of around 5 minutes, need medium-coarse grounds. Cold brew, steeping for 12-24 hours, demands very coarse grounds.
Exploring Different Coffee Brewing Methods
There’s a whole universe of coffee brewing methods out there, each offering a unique flavor profile and experience. Finding your favorite is a journey of exploration and personal preference. While expert recommendations for grind size, water temperature, and coffee-to-water ratios are valuable starting points, don’t be afraid to experiment and adjust to your own taste. The most important thing is to enjoy the process and the resulting cup of coffee!
Let’s explore some popular brewing methods in detail:
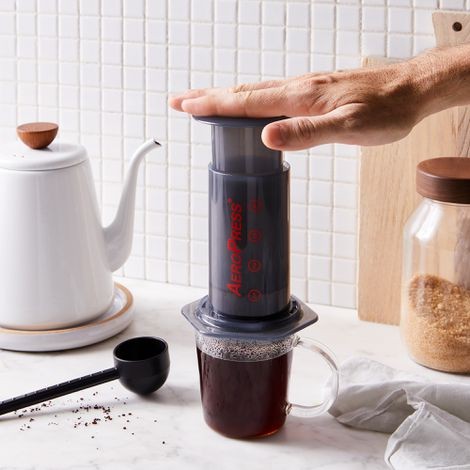
AeroPress
What Is It?
The AeroPress is a compact, handheld coffee maker that produces a concentrated, espresso-like coffee. While not technically espresso, it delivers a strong, rich brew that many consider a great substitute. It’s known for its versatility and ability to produce a smooth, less bitter cup compared to some other methods. Don’t underestimate its size; the AeroPress packs a punch in flavor.
How to Make It
For AeroPress coffee, using fine-ground or espresso-ground beans is recommended.
- Prepare the AeroPress: Place a paper filter into the filter cap and twist it onto the chamber.
- Add Coffee Grounds: Use one rounded scoop (about 3 tablespoons or 14 grams) of fine-ground coffee into the chamber. Level the grounds by gently shaking the AeroPress.
- Add Hot Water: Slowly pour hot water over the grounds. AeroPress recommends 175℉ (80°C) water for dark roasts and 185℉ (85°C) for medium roasts.
- Stir: Stir the water and grounds for about 10 seconds.
- Plunge: Insert the plunger and press down gently and steadily. Stop when you feel resistance, indicating full extraction.
- Serve: Enjoy your concentrated AeroPress coffee “espresso-style” or dilute with hot water to create an Americano.
Why AeroPress?
The AeroPress is a favorite among coffee lovers for its portability, ease of cleaning, and ability to brew exceptional coffee quickly. As Cary Wong notes, “It’s great for camping and is easy to clean.” If you value a clean, flavorful cup of coffee on the go, the AeroPress is an excellent choice.
Alt text: Step-by-step guide on using a Chemex coffee maker for pour-over brewing, emphasizing the elegant design and pour-over technique.
Chemex
What Is It?
The Chemex is a beautifully designed, hourglass-shaped pour-over coffee maker. It’s more than just a coffee maker; it’s a design icon. Chemex brewers use special, thicker paper filters that result in a remarkably clean and sediment-free cup of coffee, highlighting the delicate and complex flavors of your beans. Chemex is synonymous with elegant pour-over coffee.
How to Make It
A general guideline for Chemex brewing is a 1:17 coffee-to-water ratio. For a 2-cup brew, use 30 grams of coffee and 510 grams of hot water.
- Prepare the Filter: Fold a Chemex filter and place it into the top of the Chemex brewer. One side will be triple-layered; position this over the spout.
- Rinse the Filter: Pour hot water over the filter to rinse out any paper taste and preheat the brewer. Discard the rinse water.
- Add Coffee Grounds: Add medium-coarse ground coffee to the wet filter.
- Bloom: Slowly pour a small amount of hot water over the grounds in a circular motion, just enough to saturate them. Allow the coffee to “bloom” for about 30-45 seconds. This allows gases to escape and enhances flavor extraction.
- Pour Over: After the bloom, continue pouring hot water slowly and steadily in a circular motion, ensuring all grounds are evenly saturated.
- Brew and Enjoy: Let the water filter through completely. Remove the filter and enjoy your clean, flavorful Chemex coffee.
Why Chemex?
If you appreciate nuanced flavors and enjoy making coffee as a ritual, the Chemex is ideal. “Chemex or pour over coffee creates more complex flavors than other methods,” says Wong. It’s perfect for brewing larger batches of pour-over coffee and is a stylish addition to any kitchen.
Alt text: Cold brew coffee steeping overnight in a glass mason jar, illustrating the slow extraction process for a smooth, low-acid coffee concentrate.
Cold Brew
What Is It?
Cold brew coffee is a type of iced coffee made by steeping coffee grounds in cold water for an extended period, typically 12-24 hours. This slow extraction process results in a coffee concentrate that is significantly less acidic and bitter than traditionally brewed hot coffee. Cold brew is perfect for those who prefer a smoother, naturally sweet iced coffee.
How to Make It
For cold brew, you’ll need coarsely ground coffee and cold water. A common ratio is 3/4 cup of coarsely ground beans for every 4 cups of cold water.
- Combine Coffee and Water: In a large mason jar or pitcher, combine coarsely ground coffee and cold water. Stir well to ensure all grounds are saturated.
- Steep: Seal the container and let it steep at room temperature or in the refrigerator for 12-24 hours. The longer it steeps, the stronger the concentrate will be.
- Filter: After steeping, line a fine-mesh sieve with cheesecloth or a paper filter and place it over a pitcher or bowl.
- Strain: Pour the coffee concentrate through the sieve, pressing gently on the grounds to extract all the liquid. Discard the used grounds.
- Dilute and Serve: Dilute the coffee concentrate with water or milk to your desired strength. Serve over ice and store any remaining concentrate in the refrigerator for up to 5 days.
Why Cold Brew?
Cold brew is the go-to method for a less acidic, naturally sweet iced coffee. It eliminates the bitterness often associated with iced coffee made from hot-brewed coffee. While it requires more time and coffee grounds, the result is a refreshing and smooth coffee concentrate perfect for hot days.
Alt text: Standard automatic drip coffee maker in operation, highlighting its convenience and ease of use for everyday coffee brewing.
Drip Coffee
What Is It?
Drip coffee, also known as automatic drip coffee, is the most common and convenient method for brewing coffee at home. Using an electric drip coffee maker, hot water is automatically poured over coffee grounds, filtering into a carafe below. It’s the workhorse of the coffee world – reliable, efficient, and perfect for brewing larger quantities. While often overlooked by coffee snobs, drip coffee is a dependable way to get your caffeine fix.
How to Make It
For drip coffee, medium-coarse grounds are generally recommended.
- Fill Water Reservoir: Fill the water reservoir of your drip coffee maker with the desired amount of cold, filtered water.
- Add Coffee Grounds: Place a paper filter in the filter basket and add medium-coarse ground coffee. A general guideline is 1-2 tablespoons of coffee per 6 ounces of water, but adjust to your taste.
- Brew: Turn on the coffee maker. The machine will heat the water and automatically drip it over the grounds, brewing coffee into the carafe.
- Serve and Enjoy: Once brewing is complete, pour yourself a cup and enjoy your classic drip coffee.
Why Drip Coffee?
Drip coffee is praised for its simplicity, speed, and affordability. It’s perfect for busy mornings and brewing coffee for multiple people. While it may not extract the most nuanced flavors, it delivers a consistent and satisfying cup of coffee with minimal effort.
Alt text: French press coffee maker with the plunger being pressed down, demonstrating the immersion brewing process for a full-bodied coffee.
French Press
What Is It?
The French press, also known as a cafetière, is an immersion brewing method. Coarse coffee grounds are steeped directly in hot water, and then filtered by pressing a mesh plunger down. This method extracts more coffee oils and sediment compared to paper filters, resulting in a full-bodied, richer cup of coffee. If you prefer a coffee with more texture and a bolder flavor, the French press is your method.
How to Make It
For French press, coarse grounds are essential.
- Preheat French Press: Preheat your French press by rinsing it with hot water and then discarding the water.
- Add Coffee Grounds: Add coarse-ground coffee to the French press. A common ratio is 1:15 coffee to water. For 1-2 cups, use 34 grams of coffee and 500 grams of 200℉ (93°C) water.
- Bloom: Pour a small amount of hot water over the grounds, just enough to saturate them, and let it bloom for about 30 seconds.
- Add Remaining Water: Pour the remaining hot water into the French press.
- Steep: Set a timer for 4 minutes. Let the coffee steep undisturbed.
- Press: Slowly and steadily press the plunger down.
- Serve Immediately: Pour and serve the coffee immediately to prevent over-extraction and bitterness.
Why French Press?
The French press is loved for its simplicity and the rich, full-bodied coffee it produces. It’s relatively hands-on but straightforward, and it doesn’t require paper filters. If you enjoy coffee with more body and coffee oils, the French press is an excellent choice.
Alt text: Hario V60 pour-over dripper in use, showing the cone-shaped design and pour-over process for brewing single cups of coffee.
Hario V60
What Is It?
The Hario V60 is a cone-shaped pour-over dripper designed for brewing single cups of coffee. It’s favored by coffee enthusiasts for its ability to produce a clean, bright, and nuanced cup of coffee. The V60’s design, with its spiral ribs and large single hole, promotes even extraction and allows for precise control over the brewing process. For those who enjoy the ritual of pour-over and appreciate clarity in their coffee, the V60 is a top choice.
How to Make It
For Hario V60 pour-over, medium-fine grounds are generally recommended.
- Heat Water and Preheat V60: Heat water to 200-210℉ (93-99°C). Place a V60 paper filter in the dripper and rinse with hot water to remove paper taste and preheat the dripper and your mug or server below. Discard the rinse water.
- Add Coffee Grounds: Add medium-fine ground coffee to the wet filter. For one cup, use about 3 tablespoons (20 grams) of coffee.
- Bloom: Slowly pour a small amount of hot water over the grounds to saturate them and let it bloom for about 30 seconds.
- Pour Over: Continue pouring hot water slowly in a circular motion, starting from the center and moving outwards, ensuring all grounds are evenly saturated. Maintain a consistent water level throughout the brewing process.
- Brew Time: Aim for a total brew time of around 3 minutes.
- Enjoy: Remove the V60 dripper and enjoy your freshly brewed pour-over coffee.
Why Pour Over with V60?
The Hario V60 allows for a high degree of control over the pour-over brewing process, resulting in a clean, flavorful, and aromatic cup of coffee. It’s perfect for those who enjoy the hands-on approach of pour-over brewing and want to explore the subtle nuances of different coffee beans.
Alt text: Moccamaster coffee maker, highlighting its design and functionality for brewing high-quality pour-over style coffee automatically.
Moccamaster
What Is It?
The Moccamaster is an automatic drip coffee maker engineered to replicate the quality of pour-over coffee. Unlike standard drip machines, the Moccamaster features precise temperature control and a copper heating element to ensure water reaches the ideal brewing temperature. It brews coffee quickly and maintains optimal temperature without burning, resulting in a consistently excellent cup. For those seeking convenience without sacrificing coffee quality, the Moccamaster is a premium choice.
How to Make It
Making coffee with a Moccamaster is similar to using a drip coffee maker.
- Fill Water Reservoir: Fill the water reservoir with the desired amount of fresh, filtered water.
- Add Coffee Grounds: Place a paper filter in the brew basket and add medium-coarse ground coffee. Moccamaster recommends 73 grams of coffee for 5 cups of water, but adjust to your preference.
- Brew: Turn the Moccamaster on. It will automatically heat the water and brew coffee into the carafe.
- Enjoy: In about 5-6 minutes, your coffee will be ready to serve.
Why Moccamaster?
The Moccamaster bridges the gap between convenience and quality. It offers the ease of an automatic drip coffee maker while delivering a flavorful, pour-over style cup of coffee. If you value both convenience and exceptional coffee taste, and are willing to invest a bit more, the Moccamaster is an excellent upgrade from standard drip machines.
Conclusion: Brewing Your Perfect Cup
Learning how to make coffee is a rewarding journey. From understanding grind sizes to exploring different brewing methods, each step contributes to the final cup. Whether you prefer the convenience of drip coffee, the richness of French press, the clarity of Chemex, or the portability of AeroPress, there’s a brewing method for every preference and lifestyle.
Experiment with these techniques, adjust ratios to your taste, and most importantly, enjoy the process of brewing and savoring your perfect cup of coffee. Happy brewing!