Slime has taken the world by storm! This gooey, stretchy, and oh-so-satisfying substance is a favorite among kids and adults alike. If you’re looking for a fun, engaging activity that doubles as a mini science experiment, making slime at home is the perfect solution. Plus, it’s surprisingly easy and only requires a few common household ingredients. Get ready to dive into the wonderful world of homemade slime and learn exactly How To Make Slime with this simple guide!
What You’ll Need to Make Slime
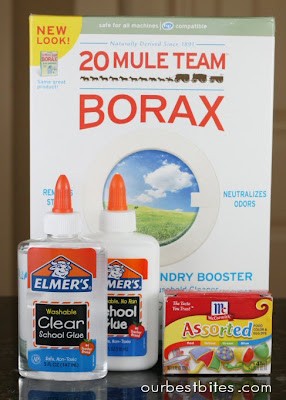
Before we get started, let’s gather all the necessary ingredients and supplies. This recipe is based on the classic borax slime, known for its perfect slime consistency. Here’s what you’ll need:
- Borax Powder: 1 teaspoon. This is the activator that will transform your glue mixture into slime.
- Water (Divided): 1 ½ cups. You’ll need to divide this into two portions.
- Elmer’s Glue: ½ cup (approximately 4 oz). You can use clear glue for a translucent slime or white glue for a more opaque version.
- Food Coloring (Optional): A few drops. Choose your favorite color to personalize your slime!
- Mixing Bowls: You’ll need two bowls – one for the borax solution and one for the glue mixture.
- Spoon or Stirring Utensil: For mixing the ingredients.
- Measuring Cups and Spoons: To accurately measure ingredients.
- Airtight Container or Ziplock Bag: For storing your slime to keep it fresh and gooey.
Step-by-Step Guide: How to Make Borax Slime
Now that you have everything ready, let’s get to the fun part – making the slime! Follow these simple steps to create your own batch of stretchy, squishy slime.
Step 1: Prepare the Borax Solution
The first step is to create the borax activator solution. In one of your mixing bowls, combine 1 teaspoon of borax powder with 1 cup of water. Stir the mixture thoroughly until the borax powder is completely dissolved. This might take a minute or two. Set this borax solution aside.
Step 2: Mix the Glue and Water
In your second mixing bowl, pour in ½ cup (4 oz) of Elmer’s glue. Add ½ cup of water to the glue. Stir these two ingredients together until they are well combined and you have a smooth, milky mixture.
Step 3: Add Food Coloring (Optional)
If you want to add color to your slime, now is the time! Add a few drops of food coloring to the glue and water mixture. Stir until the color is evenly distributed throughout the mixture and you achieve your desired shade. Green is a classic slime color, but feel free to get creative!
Step 4: Combine the Mixtures and Knead
This is where the magic happens! Slowly pour the borax solution you prepared earlier into the glue mixture. You’ll immediately notice solids starting to form – this is the slime coming together!
Stir the mixture for a few moments with your spoon. Then, get your hands in there! Start kneading the slime to bring it together. It will feel wet and sticky at first, but don’t worry. Just keep kneading!
As you knead, the slime will become less sticky and more firm. Continue kneading until you have a smooth, non-sticky blob of slime. Pour out any excess liquid that remains in the bowl.
Keep playing with your slime! The more you knead and stretch it, the better the texture will become. If it’s still too sticky, continue kneading. If it’s too firm, you might have added too much borax solution. For your next batch, try adding a little less borax.
Tips for Perfect Slime Every Time
- Supervise Children: While slime making is a fun activity for kids, adult supervision is recommended, especially when handling borax. Ensure children understand that slime is not for consumption.
- Adjust Borax Solution Carefully: Adding too much borax solution can make your slime too hard and rubbery. Add it slowly and knead as you go to achieve the perfect consistency.
- Storage is Key: Store your slime in an airtight container or ziplock bag when not in use. This will prevent it from drying out and keep it gooey for longer.
- Experiment with Glue Types: Try using clear glue for a transparent slime or white glue for a classic opaque slime. Both work wonderfully!
- Get Creative with Add-ins: Once you master the basic recipe, you can experiment with adding glitter, beads, or even essential oils for scented slime.
Making slime is not just a fun activity; it’s also a great way to explore science with kids. They can witness firsthand how ingredients combine to create something new with different properties. So gather your supplies and get ready for hours of squishy, stretchy fun learning how to make slime!