Homemade sushi is a fantastic way to enjoy restaurant-quality food without the hefty price tag. Making sushi at home is not only significantly cheaper, but it’s also a fun and rewarding culinary experience. Imagine crafting your perfect sushi roll, filled with all your favorite fresh ingredients, tailored exactly to your taste. This guide will show you just how easy and enjoyable it is to make your own delicious sushi rolls in your kitchen.
While it’s true that professional sushi chefs spend years honing their skills to perfect sushi rice and master the art of cutting raw fish, creating delicious and satisfying homemade sushi is absolutely achievable for home cooks. Don’t expect Michelin-star quality on your first attempt, but do expect a fun, affordable, and tasty meal.
The real advantage of homemade sushi lies in its value and the fun you’ll have making it. For the cost of a single restaurant sushi meal, you can create a sushi feast at home for a fraction of the price. Plus, the process of making sushi is a wonderful activity to share with friends or family, turning dinner into a collaborative and enjoyable event.
My husband and I discovered the joy of homemade sushi years ago on Valentine’s Day. Seeking a cozy and intimate alternative to crowded restaurants, we decided to make sushi together. It quickly became an annual tradition, and our love for homemade sushi grew so much that we now enjoy it more than just once a year.
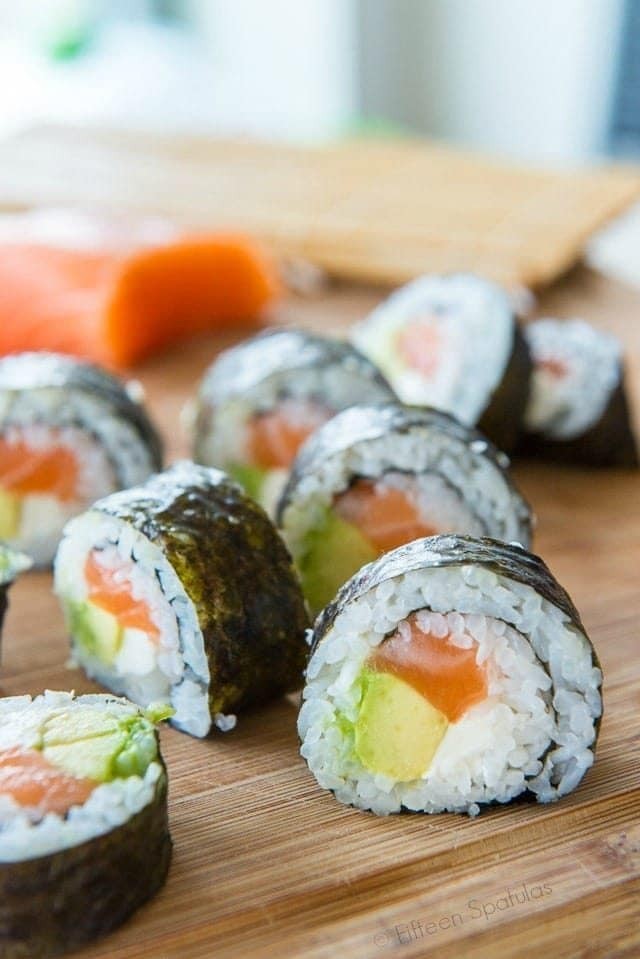
While we are lucky enough to have access to sushi-grade fish, particularly our favorite, raw salmon, don’t let the lack of it deter you. There are countless delicious sushi variations you can make at home without raw fish. Shrimp tempura rolls are always a hit, California rolls with real or imitation crab are classic choices, and vegetarian sushi rolls are incredibly versatile and flavorful. Philadelphia rolls, with smoked salmon, cream cheese, avocado, and cucumber, are another popular and easy-to-make option.
These types of sushi rolls are often referred to as “maki rolls,” which simply means any roll where ingredients, whether it’s raw seafood, cooked seafood, or vegetables, are combined with vinegar-seasoned rice and nori seaweed. The possibilities for fillings are truly endless, and the most exciting part is getting creative and designing your own signature sushi rolls.
If you’re looking to explore beyond traditional sushi, consider trying Korean Kim Bap. It shares similarities with sushi but typically excludes raw fish, offering a different yet equally delicious rolled rice experience.
Choosing the Right Seaweed for Sushi
To begin your sushi-making adventure, selecting the correct type of seaweed is crucial. The ideal seaweed for sushi rolling, often labeled as “nori,” is thicker and more robust, perfect for holding the roll’s shape. Avoid thinner, flimsier seaweed sheets, which are better suited for snacking. Always check the packaging to ensure the seaweed is specifically designed for sushi making.
If you observe that your nori sheets have a shinier side and a duller side, position the shiny side facing down on your rolling surface. This will ensure the shiny side is on the outside of your finished roll, giving it a more appealing appearance.
Next, spread a thin, even layer of prepared sushi rice over the nori sheet. Gently flatten the rice using a rice paddle, being careful not to smash or compress it too much. Remember to spread the rice evenly to the edges of the nori sheet for a well-filled roll. For detailed instructions on making perfect sushi rice, refer to our dedicated post on How To Make Sushi rice in a rice cooker.
As detailed in the sushi rice post, short-grain white rice is highly recommended for sushi. Its stickier texture compared to long-grain rice is essential for holding the sushi rolls together. The rice is seasoned with sushi vinegar, which contains a balanced blend of salt and sugar, adding a signature flavor to sushi rice. Sesame seeds can also be added for extra flavor and texture, if desired.
For optimal handling and spreading, ensure the sushi rice is slightly warm or at room temperature. Planning the timing of your rice preparation is important to ensure it’s ready when you’re ready to assemble your sushi.
Determining the Right Amount of Fish for Sushi
For a recent sushi-making session, I used a beautiful half-pound piece of salmon. This quantity of salmon provided enough fish for approximately 6 sushi rolls, with a little extra for snacking. Even at a seemingly high price of $28 per pound, spending $14 for this amount of high-quality fish is incredibly cost-effective, especially when compared to restaurant prices.
Step-by-Step Guide: How to Cut Raw Fish for Sushi
Here’s a simple method for cutting salmon for sushi rolls at home. Begin by slicing straight down through the salmon fillet. Then, cut each of these pieces in half lengthwise through the center to create slender strips. Using a sharp knife is essential for clean, even cuts. Aim for smooth, gliding strokes rather than sawing motions to maintain the fish’s texture and appearance.
Once your fish and other ingredients are prepared, arrange your desired fillings on top of the sushi rice layer on the nori. For this roll, I’m using salmon, avocado, and cream cheese – a nod to my favorite Philadelphia-style rolls. Making sushi at home is all about customizing the ingredients to your personal preferences, so feel free to get creative with your fillings!
To roll the sushi tightly and neatly, a bamboo sushi rolling mat is invaluable. These mats are relatively inexpensive and can be found for under $2 online or at Asian markets. While you can attempt to use parchment paper or plastic wrap as substitutes, a bamboo mat provides the necessary grip and firmness for creating well-shaped, compact rolls that hold together beautifully. If you plan to make sushi even occasionally, investing in a bamboo mat is highly recommended.
After rolling, use your sharpest knife to slice the sushi roll into bite-sized pieces. A serrated knife isn’t necessary; a sharp, non-serrated knife works perfectly well. For the cleanest cuts, ensure your knife is extremely sharp.
Having a small bowl of cold water or a damp towel nearby is also helpful. You can lightly dampen your fingertips between rolls to prevent the rice from sticking to your hands, making the rolling process smoother and less messy.
What to Serve with Your Homemade Sushi
Your homemade sushi rolls are now ready to be enjoyed! Serve them with classic sushi accompaniments like soy sauce, pickled ginger (gari), and wasabi paste, allowing everyone to customize their sushi to their liking.
To complement your sushi night, consider serving other Japanese-inspired dishes. Honey Walnut Shrimp or Seared Scallops would make excellent appetizers or side dishes for a complete and special seafood dinner at home. Enjoy the delightful experience of making and eating your own homemade sushi!
Recipe Tips and FAQs for Perfect Sushi
Can you keep sushi overnight?
It is strongly discouraged to keep sushi, especially those containing raw fish, overnight. Raw fish is susceptible to bacterial growth, increasing the risk of foodborne illness. Sushi is best enjoyed fresh. If you find you have leftover ingredients, it’s safer to enjoy the remaining fish as sashimi (thinly sliced raw fish) and discard the rice and other components. Refrigerated rice becomes hard and dry and doesn’t reheat well, further diminishing the quality of leftover sushi.
Can you make sushi without fish?
Absolutely! Vegetarian sushi is incredibly popular and delicious. Avocado, cucumbers, and carrots are excellent and common fillings for vegetarian sushi rolls. Explore online for a wealth of creative and flavorful vegetarian sushi ideas.
How to make easy rice cooker sushi rice:
While mastering sushi rice is a skill that professional chefs refine over years, a rice cooker offers a convenient and easy method for home cooks. For a simplified approach to making sushi rice, refer to our detailed guide on how to make sushi rice in a rice cooker.
Did you enjoy making this sushi recipe? Please consider leaving a 5-star rating in the recipe card below and sharing your experience in the comments section further down the page. You can also follow me on Facebook, Instagram, or Pinterest for more recipe inspiration!
Homemade Sushi Recipe
Servings: 6 rolls
Prep Time: 15 minutes
Total Time: 15 minutes
Homemade Sushi is so much more affordable than restaurant sushi and incredibly fun to make! This recipe makes it easy to create delicious sushi rolls right in your own kitchen.
Print Recipe Pin Recipe
Ingredients
- 6 sheets sushi seaweed (nori)
- 1 batch prepared sushi rice
- 1/2 lb sashimi-grade raw salmon or your choice of sashimi-grade fish
- 4 oz cream cheese, sliced into strips
- 1 avocado, sliced
- Soy sauce, for serving
Instructions
- Place a sheet of nori on a bamboo sushi mat. Spread an even layer of prepared sushi rice over the nori, smoothing gently with a rice paddle or wet fingertips.
- Arrange strips of salmon, cream cheese, and avocado on top of the rice.
- Using the bamboo mat, tightly roll the sushi from one edge to the other.
- Using a very sharp knife, slice the roll into 6-8 bite-sized pieces.
- Serve immediately with soy sauce, pickled ginger, and wasabi, if desired.
Recipe Notes
Storing Leftovers: It is not recommended to store leftover sushi, especially if it contains raw fish. For food safety and best quality, consume immediately.
Freezing: Freezing sushi is not recommended as it will negatively impact the texture and flavor.
Nutrition
Calories: 190kcal, Carbohydrates: 11g, Protein: 10g, Fat: 12g, Saturated Fat: 5g, Cholesterol: 40mg, Sodium: 92mg, Fiber: 2g, Sugar: 1g
Nutritional information is an estimate and for informational purposes only.
Course: Main Course
Cuisine: Japanese
Author: Fifteen Spatulas