Mapping a network drive is a useful technique for creating a direct link to shared folders on your network, such as those hosted on a Network Attached Storage (NAS) device or another computer. This allows for quick and easy access to your files as if they were stored directly on your computer. This guide will explain How To Map A Network Drive on various versions of Windows operating systems, including Windows 10, Windows 8, Windows 7, Vista, and XP.
Mapping a Network Drive on Windows 10 and Windows 8
Windows 10 and Windows 8 offer a streamlined approach to mapping network drives. Follow these steps to establish a connection to your shared network folder:
- Begin by clicking the Start button, typically located in the bottom-left corner of your screen.
- In the search bar that appears, type “This PC“. From the search results, select “This PC” to open File Explorer.
- Once File Explorer is open, locate the “Computer” tab in the ribbon at the top of the window and click on it. In the Computer tab, find and click the “Map network drive” option. This will open the “Map Network Drive” window.
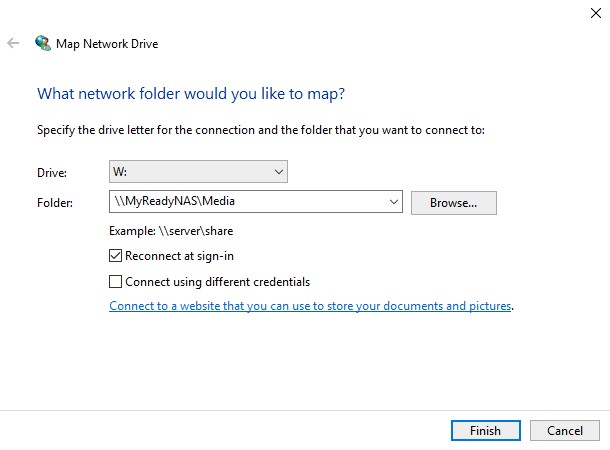
- In the “Map Network Drive” window, you’ll need to choose a drive letter. Select an available letter from the “Drive” dropdown list. This letter will represent your mapped network drive in File Explorer.
- Next, in the “Folder” box, you need to specify the network path to the shared folder you wish to map. The path should be in the format
\hostnamesharename, wherehostnameis either the name or the IP address of the network device hosting the share, andsharenameis the exact name of the shared folder. Alternatively, you can click the “Browse” button to navigate your network and visually select the folder you want to map. - After entering the path or browsing to the folder, click the “Finish” button to complete the mapping process.
Once you have completed these steps, your newly mapped network drive will be accessible under “This PC” in File Explorer, allowing you to easily access the shared files and folders.
Mapping a Network Drive on Windows 7 and Windows Vista
The process for mapping a network drive in Windows 7 and Windows Vista is very similar to Windows 10 and 8. Here’s how to do it:
- Click on the Start button, then navigate to and click on “Computer” in the Start Menu. This will open Windows Explorer.
- In Windows Explorer, find and click on “Map network drive” in the toolbar. This action will open the “Map Network Drive” window.
- In the “Map Network Drive” window, select an available drive letter from the “Drive” dropdown menu.
- In the “Folder” field, enter the network path to the shared network folder. Remember to use the format
\hostnamesharename. You can also use the “Browse” button to locate and select the desired shared folder on your network. - Click the “Finish” button to establish the network drive mapping.
Your mapped drive will now appear under “Computer” in Windows Explorer, providing you with direct access to the shared network resources.
Mapping a Network Drive on Windows XP
Even on the older Windows XP operating system, mapping a network drive is a straightforward process:
- Click the Start button, located on the bottom left of your screen.
- Right-click on the “My Computer” icon in the Start Menu, and from the context menu, select “Map Network Drive“. This will open the “Map Network Drive” dialog box.
- Choose an available drive letter from the “Drive” dropdown list.
- In the “Folder” box, type the path to the shared network folder using the
\hostnamesharenameformat. Alternatively, use the “Browse” button to find the network share you want to map. - Click the “Finish” button to complete the process.
Following these steps will make your network drive accessible under “My Computer” in Windows XP, simplifying access to your shared network files.
In conclusion, mapping a network drive is a convenient way to access shared network resources across various Windows operating systems. By following these simple steps for your specific version of Windows, you can easily create a direct link to your important network folders, enhancing your file management and accessibility.