If you’re captivated by the delicate beauty of flowers and looking for a way to preserve their fleeting charm, pressing flowers is a wonderful craft to explore. Like many, I have cherished memories of pressing flowers with my mother as a child, and it’s a tradition that continues to bring joy. Whether you’re a seasoned crafter or just starting out, learning How To Press Flowers opens up a world of creative possibilities, from stunning wall art to personalized cards and unique jewelry.
Since travel has been limited, I’ve gathered flowers straight from my garden to demonstrate these techniques. Feel free to use any flowers or leaves you have available – or perhaps this is the perfect excuse to treat yourself to a beautiful bouquet! In this guide, I’ll walk you through four effective methods for pressing flowers, ensuring you can find the perfect technique to suit your time, resources, and desired outcome.
Choosing the Best Flowers for Pressing
The foundation of any successful pressed flower project lies in selecting the right blooms at their peak. Choosing the right flowers and picking them at the optimal time is crucial for vibrant and long-lasting pressed flowers.
Expert Tips for Selecting, Picking, and Preparing Your Flowers
To ensure the best results when pressing flowers, consider these expert tips:
- Select flowers near full bloom: Opt for flowers that are just about to reach their full bloom. Avoid flowers with blemishes, bruises, or brown spots, as these imperfections will become more pronounced once pressed.
- Harvest in the morning: The best time to pick flowers for pressing is in the morning after the dew has evaporated. This is when flowers have the least amount of moisture, reducing the risk of mold and promoting faster drying.
- Ensure flowers are completely dry: Never press wet or damp flowers. Excess moisture can lead to mold growth and discoloration. Allow any surface moisture to evaporate before pressing.
- Keep bouquets hydrated until pressing: If you’re using cut flowers from a bouquet, keep them fresh in water until you are ready to press them. Remember to cut stems at an angle, use flower food, change the water daily, and remove any leaves that fall below the waterline to maintain freshness.
- Consider separating layered petals: For large, multi-petaled flowers like roses or carnations, consider carefully separating the petals before pressing. This will help them dry more evenly and prevent them from becoming too thick. You can then reconstruct the flower later when using them in your projects.
If you’re interested in preserving the three-dimensional shape of flowers, you might want to explore other preservation techniques. Check out my guide on how to dry flowers for alternative methods.
Top Flower Types for Flat Pressing
Through years of experience, I’ve discovered that some flowers are simply better suited for pressing than others. While experimentation is part of the fun, certain types consistently yield excellent results.
The best flowers to press are generally those with naturally flat faces and single layers of petals. These include:
- Single petal flowers: Pansies, violas, daisies, cosmos, zinnias, petunias, and impatiens are excellent choices.
- Small blossoms from flowering shrubs: Plumbago, lilac, and hydrangea florets press beautifully.
- Delicate blooms: Vincas, delphinium, and even individual rose petals work well.
- Leaves and foliage: Don’t forget interesting leaves and foliage to add texture and variety to your pressed flower creations.
For bulkier, spherical flowers like peonies, ranunculus, or very thick roses, pressing the entire flower can be challenging. Consider drying these whole using silica gel or separating the petals for pressing instead. For thicker flowers like roses, you can also try cutting the flower in half vertically before pressing to reduce bulk.
Important Note: Avoid pressing flowers with very fleshy, water-rich petals such as begonias or portulaca. These are highly prone to mold and may scorch or become mushy during the pressing process.
Method 1: Pressing Flowers in a Book – The Classic Technique
Pressing flowers in a book is a time-honored, simple, and effective method that has been used for generations. It’s a wonderfully accessible technique, especially if you have time and patience.
Supplies You’ll Need:
- A heavy, sturdy book: Think phone books (if you can still find one!), dictionaries, encyclopedias, or any large, weighty tome. Avoid using valuable or sentimental books as there’s a slight chance of moisture damage.
- Absorbent paper: You’ll need paper to wick away moisture and protect the book pages. Excellent options include parchment paper, printer paper, thin cardboard, newspaper (black and white print only to avoid ink transfer), coffee filters, or specialized blotting paper. Avoid paper towels as they have texture that can imprint on the flowers.
- Weight: You’ll need additional weight to ensure consistent pressure. Bricks, heavy weights, or stacks of more books work perfectly.
Step-by-Step Guide:
Step 1: Prepare Your Flowers
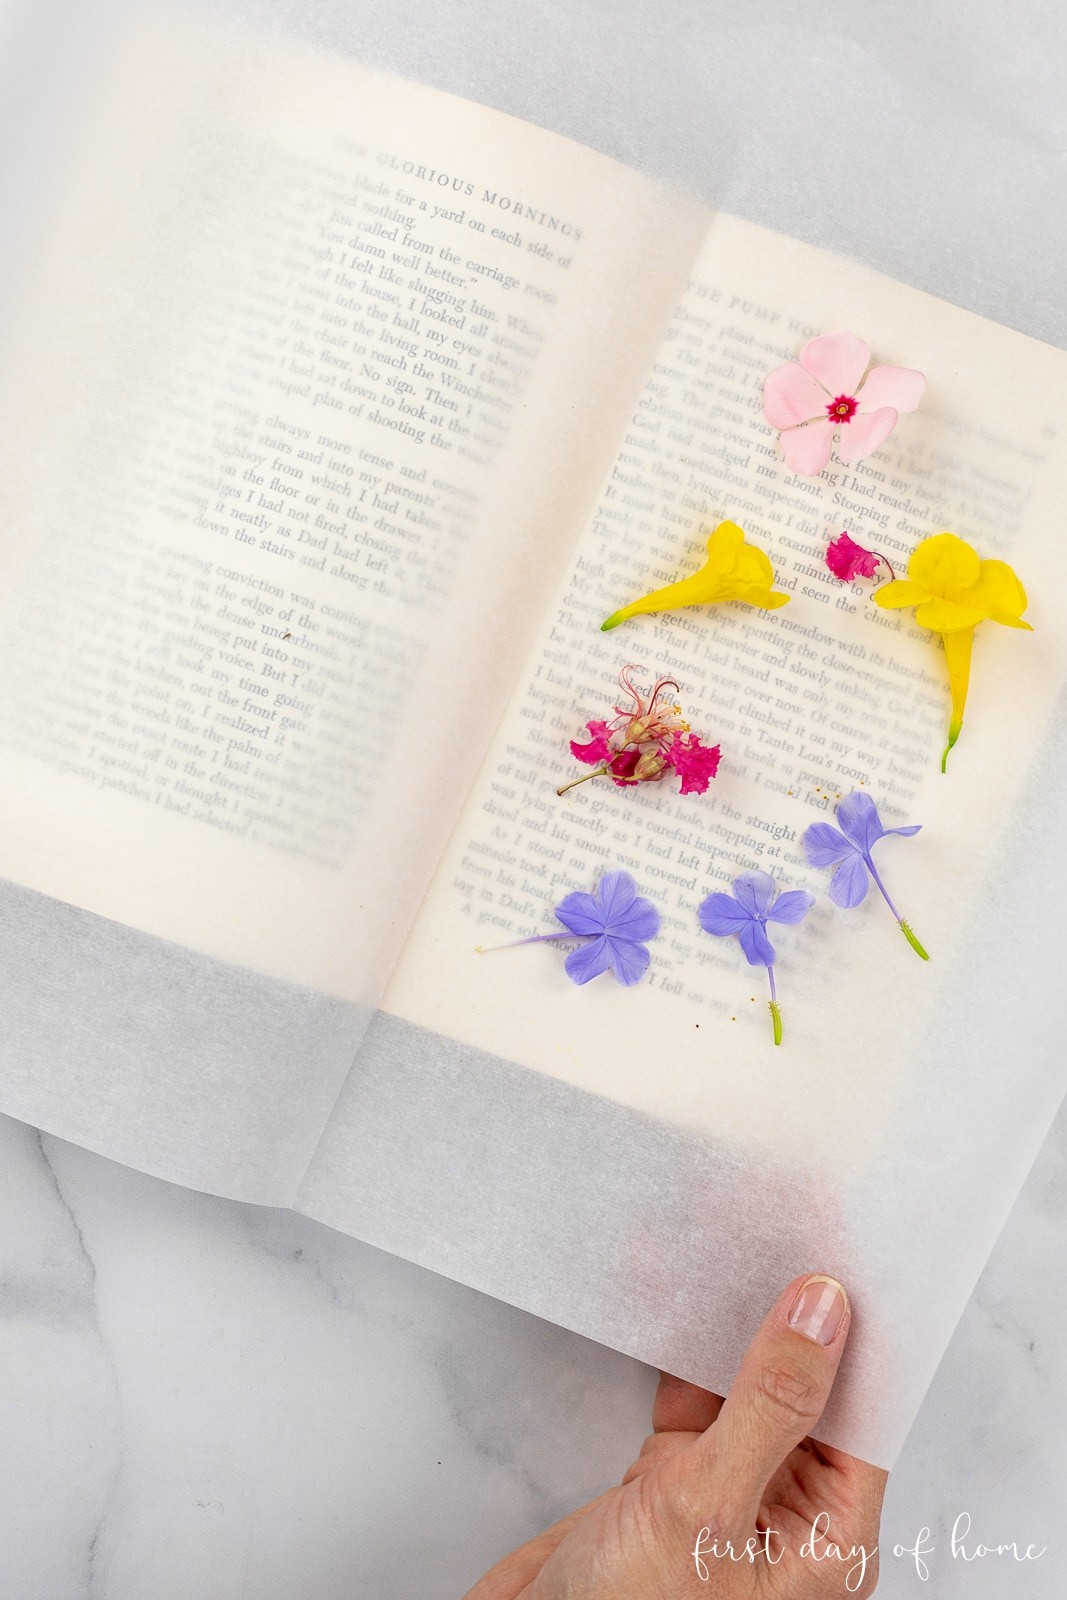
Begin by preparing your chosen flowers. Remove any unwanted leaves and stems, leaving just the flower head and a short stem if desired. If you are pressing layered flowers, gently separate the petals as needed. Arrange your flowers on a sheet of parchment paper, ensuring they don’t overlap and leaving about 3/4 inch of space between each bloom. It’s best to press flowers of similar thickness together for even drying.
Step 2: Cover and Close the Book
Place another sheet of parchment paper on top of the flowers, creating a paper sandwich. Carefully flatten each flower face to achieve the desired pressed shape. A helpful tip is to fold a single sheet of parchment paper in half, creating a pouch to encase the flowers, rather than using two separate sheets.
Next, carefully place the parchment paper with the flowers inside your chosen heavy book. Close the book gently, ensuring the flowers remain in place. Finally, place a heavy weight on top of the book to apply consistent pressure. You can use bricks, weights, or stack more heavy books on top.
Step 3: Drying Time – Patience is Key
Alt Text: A collection of beautifully book-pressed flowers, including pansies and other small blooms, displayed on parchment paper after two and a half weeks of drying, showcasing their paper-thin texture and preserved colors.
The drying time for book-pressed flowers depends largely on the thickness of the petals and the humidity levels in your environment. Generally, allow for a drying period of 2 to 4 weeks. Thinner petals may dry in as little as two weeks, while thicker flowers will require closer to four weeks.
While some guides recommend changing the absorbent paper every few days to speed up drying, I’ve found that parchment paper is effective enough to absorb moisture without needing frequent changes.
Once the drying time is complete, carefully open the book and gently remove your pressed flowers. Book-pressed flowers can be quite delicate. I highly recommend using nylon tweezers designed for pressed flowers to handle them without causing tears or damage. These will help you lift and manipulate your delicate specimens with care.
Method 2: Using a Homemade Wooden Flower Press – Even Pressure for Perfect Results
Similar to the book pressing method, using a wooden flower press, whether homemade or store-bought, provides excellent results. A wooden press offers the advantage of applying more even pressure across the flowers, and you can even personalize your homemade press to match your crafting style!
Supplies for a DIY Wooden Press:
- Two pieces of wood: You’ll need two pieces of plywood or MDF, approximately 12×12 inches each, or you can purchase a pre-made wooden flower press.
- Cardboard: Cut two pieces of cardboard to fit within the dimensions of your wood pieces, leaving space around the corners for bolts.
- Blotting paper or parchment paper: Use absorbent paper to protect the flowers and cardboard.
- Bolts and wingnuts (for DIY press): You’ll need four bolts and wingnuts to create pressure if you’re making your own press.
Steps to Use a Wooden Flower Press:
Step 1: Prepare Your Wooden Press (DIY)
If you’re making your own press, start by drilling holes in each corner of both pieces of wood, about an inch from the edges. Ensure the holes align perfectly when the two pieces of wood are stacked together and are sized to fit your bolts.
Step 2: Layer Flowers in the Press
Cut your cardboard pieces to fit inside the wood, working around the pre-drilled holes. Place a piece of blotting paper or parchment paper on top of one piece of cardboard. Arrange your flowers on this paper, leaving space between each bloom. Cover the flowers with another sheet of blotting paper, then top with the second piece of cardboard. This creates a layered stack: wood, cardboard, paper, flowers, paper, cardboard, wood.
Step 3: Assemble and Tighten the Press
Place the second piece of wood on top of the stack, aligning the corner holes. Insert the bolts through the holes in all layers and secure them with wingnuts. Tighten the wingnuts evenly, applying firm and consistent pressure across the press. Avoid over-tightening, which could damage delicate flowers.
Allow the flowers to dry in the press for 2-4 weeks, similar to the book pressing method. The wooden press offers more evenly distributed pressure compared to books and eliminates any risk of damaging your books.
Shop Wooden Flower Presses
[Link to purchase wooden flower presses online]
Method 3: Microwave Flower Pressing – Speed and Convenience
For those who are short on time and eager to see quick results, microwave flower pressing is a game-changer! This method significantly accelerates the drying process, allowing you to have pressed flowers ready in mere minutes.
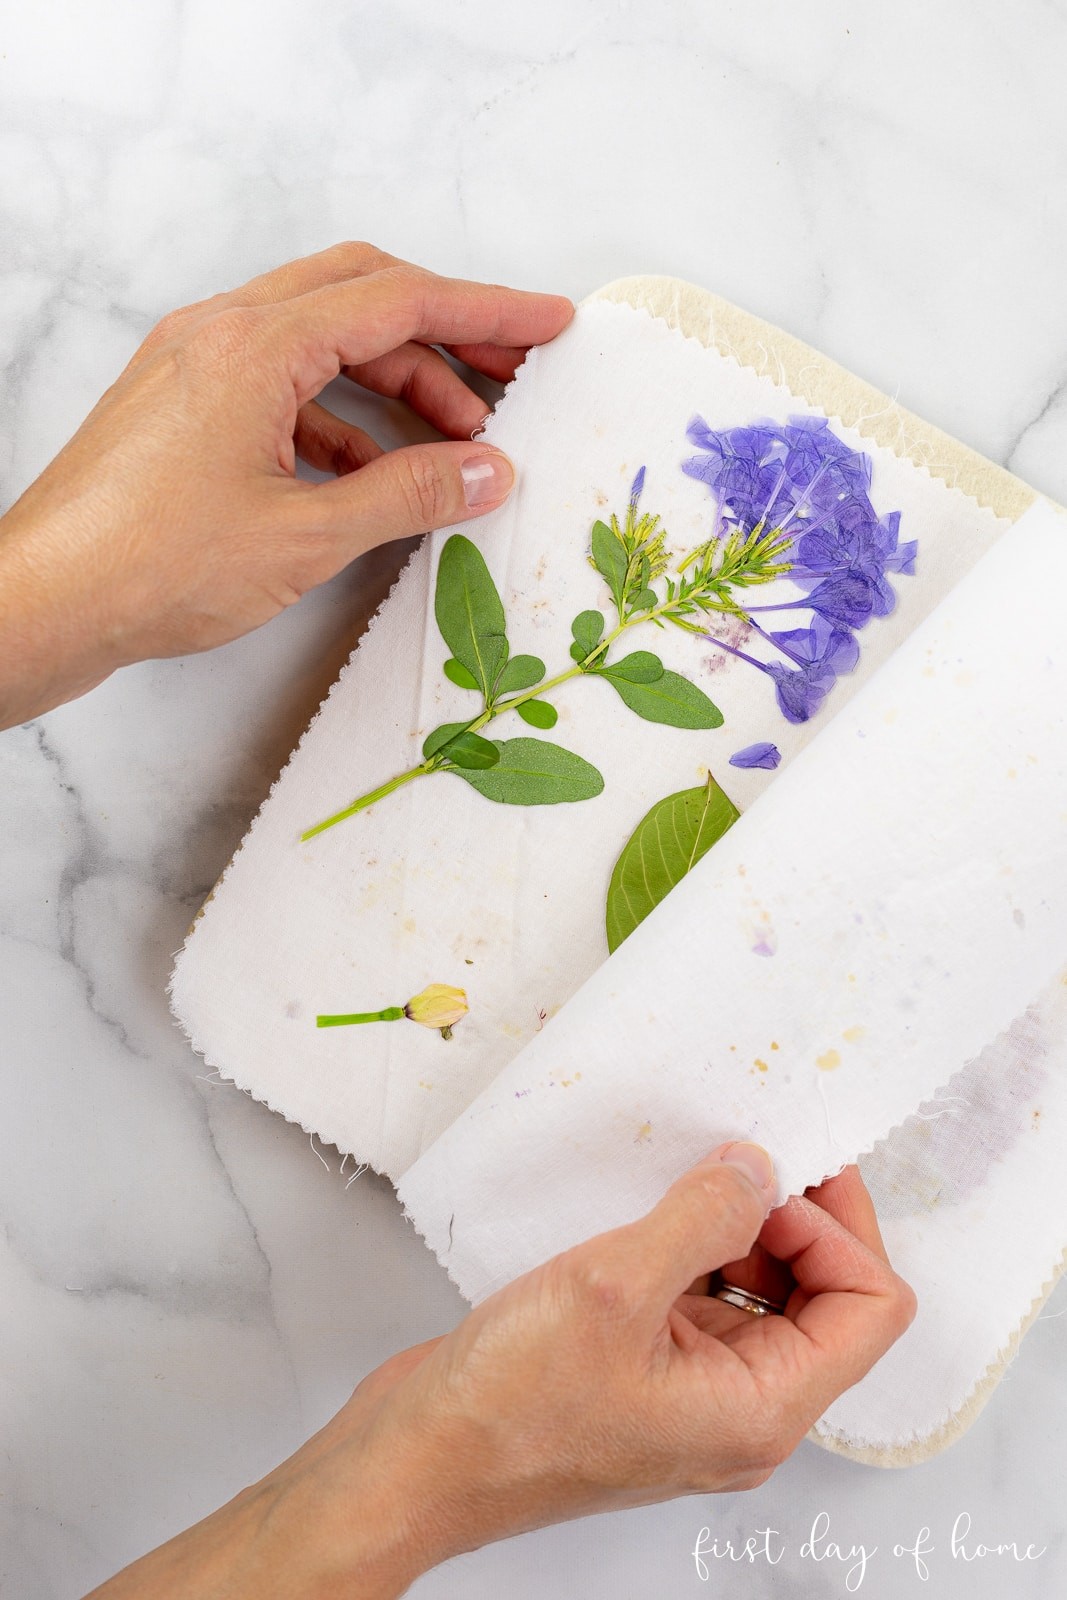
For microwave pressing, I highly recommend using a specialized microwave flower press like the Microfleur Max. I’ve written extensively about using microwave presses and the Microfleur in my detailed tutorial on DIY pressed flower art. Visit that post for a comprehensive guide to using the Microfleur.
Alt Text: Close-up view of hands carefully placing colorful garden flowers inside the fabric layers of a Microfleur microwave flower press, preparing them for quick pressing.
Get an Exclusive Discount!
Get 10% off your entire order of Microfleur products with code FIRSTDAYOFHOME. Limit one per customer.
Supplies for Microwave Pressing:
- Microwave flower press: A dedicated microwave flower press, such as the Microfleur.
- Tweezers (optional): Helpful for handling delicate flowers.
Microwave Pressing Steps:
Step 1: Arrange Flowers in the Press
Open your microwave flower press and arrange your flowers on the inner fabric liner. Position them in a single layer, ensuring they don’t overlap. Group flowers of similar types and thicknesses together for even drying.
Step 2: Initial Microwave Burst
Close the microwave press according to the manufacturer’s instructions. Place the press in your microwave and heat it for an initial “burst.” I typically start with 25 seconds for the Microfleur, but always refer to your press’s instructions.
Step 3: Continue Microwaving in Short Bursts
After the initial burst, continue microwaving in short, 10-second bursts. Between each burst, open the microwave door and allow the press to air out for a few seconds to release moisture and prevent scorching or browning. Repeat these 10-second bursts, checking the flowers after each interval, until they feel paper-thin and completely dry to the touch.
Note: Be cautious when microwaving succulents or very fleshy flowers, as they are more prone to scorching due to their high water content.
Once dried, carefully remove the pressed flowers from the press. Petals may sometimes stick to the fabric liner. Gently stretch the fabric in opposite directions or use nylon tweezers to help release the flowers without tearing them.
Microwave Book Pressing (Alternative): You can also use a book in the microwave for pressing, but exercise extreme caution! Ensure there are absolutely no metal elements (staples, metallic ink) on the book cover or pages, as these can cause sparks and fire hazards in the microwave.
Method 4: Ironing Flowers – A Quick but Less Refined Method
Using a household iron is another method to quickly dry flowers using heat. While it’s the fastest of the four methods, I find that the results are often not as high quality compared to book, wooden press, or microwave pressing. However, ironing can be a useful option when you need pressed flowers urgently and don’t have access to a microwave press or the time for traditional methods.
Supplies for Iron Pressing:
- Iron: A standard household iron.
- Parchment paper or absorbent paper: Similar to the book press method.
- Hard surface and thin towel: A sturdy ironing surface with a thin towel for padding.
Ironing Steps:
Step 1: Prepare Flowers and Paper
Place your flowers between two sheets of parchment paper or other absorbent paper. Arrange them in a single layer, ensuring they don’t overlap.
Step 2: Iron with Low Heat
Ensure your iron is set to a low heat setting and that the steam setting is turned OFF. Place the paper-encased flowers on your ironing surface. Iron over the top sheet of parchment paper for approximately 15-30 seconds at a time. Lift the iron and allow the flowers to cool briefly between presses to prevent scorching.
Continue ironing in short intervals until the flowers feel mostly dry. You can then choose to finish the drying process by placing them in a book or wooden press for a day or two to ensure they are completely flat and dry.
As you can see in the image, ironing can sometimes result in wrinkles in the parchment paper, which can transfer to the pressed flowers, creating slight ripples in the petals.
Alt Text: Side-by-side comparison of a vibrant, fresh plumeria blossom and a plumeria blossom pressed using an iron, highlighting the subtle differences in color and shape retention.
Which Flower Pressing Method is Best? – Method Comparison
To help you decide which method is right for you, here’s a quick comparison chart outlining the pros and cons of each technique:
| Method | Pros | Cons | Best For |
|---|---|---|---|
| Book Press | Simple, readily available materials, excellent color and texture retention | Slow drying time (2-4 weeks), requires patience, pressure may be uneven | Achieving high-quality pressed flowers with excellent color preservation |
| Wooden Press | Even pressure distribution, good color and texture retention, reusable | Slower drying time (2-4 weeks), requires a press (DIY or purchased) | Consistent, high-quality results, and for those who enjoy DIY projects |
| Microwave Press | Fastest method (minutes), convenient, good color retention | Requires a microwave press, slight learning curve, can scorch if overheated | Quick results, time-sensitive projects, and modern crafters |
| Iron Press | Very fast (seconds), readily available iron | Lowest quality results, potential for wrinkles and less defined flowers | Urgent projects, quick crafts, and less critical applications |

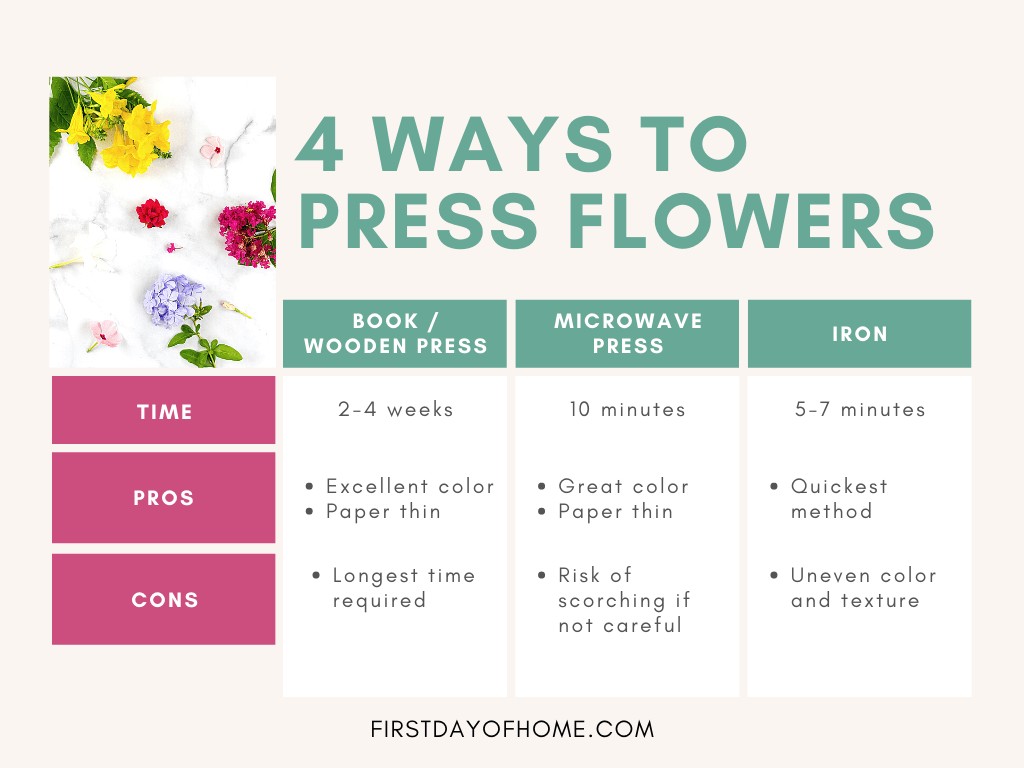
In my experience, the book press method consistently yields the best results in terms of preserving flower color and texture. However, the microwave flower press is a close second and undeniably wins in terms of convenience and speed. I would only recommend ironing as a last resort when you need pressed flowers immediately and the quality is not paramount, perhaps for a quick kids’ craft.
If you’re looking for another method to preserve flowers while maintaining more of their three-dimensional shape, consider drying flowers with silica gel. This technique is particularly effective for preserving the texture and form of blossoms.
Pin it for Later!
[Link to Pinterest pin for “How to Press Flowers”]
What to Create with Your Dried Flowers
Once you’ve mastered the art of pressing flowers, a world of creative possibilities opens up! Pressed flowers can be used to add a touch of natural beauty and personal sentiment to countless projects. Consider preserving flowers from special occasions like weddings, vacations, or memorial services to create lasting keepsakes.
Here are just a few ideas to get you started:
- Pressed flower art: Create stunning framed botanical art, collages, and wall hangings.
- Personalized cards and stationery: Embellish greeting cards, invitations, and thank-you notes with delicate pressed flower accents.
- Bookmarks: Laminate pressed flowers to create beautiful and unique bookmarks.
- Jewelry: Embed pressed flowers in resin to make pendants, earrings, and other jewelry pieces.
- Home décor accents: Decorate candles, coasters, trays, and other home décor items with pressed flowers.
- Wedding décor: Incorporate pressed flowers into wedding table numbers, place cards, and favors. I have a tutorial on making wedding table numbers with pressed flowers for inspiration.
- Wall art: Create stunning pressed flower wall art using a spray painting technique for a modern twist.
In my upcoming posts, I’ll be sharing more fun and creative ideas for using dried flowers in a variety of projects, from jewelry to decorative shadow boxes. Stay tuned for more inspiration!
How to Press Flowers Four Ways – Quick Guide
Author: firstdayofhome.com
Learn how to press flowers using four different methods – book press, wooden press, microwave press, and iron press. Discover the best flower pressing technique for your next creative project!
Rating: 5/5 (from 18 votes)
Print Recipe Pin Recipe Rate Recipe
Prep Time: 10 minutes
Active Time: 20 minutes
Total Time: 30 minutes
Project Type: Floral
Cost (US$): $10
Yield: 1 (Varies depending on flower quantity)
Equipment
- Heavy books (for book press)
- Wooden flower press or materials for DIY press
- Microwave flower press
- Iron
Supplies
Book Press Method
- Fresh flowers
- Heavy book
- Parchment paper or absorbent paper
DIY Wooden Press Method
- 2 x 12×12 inch plywood or MDF boards (or store-bought wooden press)
- Cardboard (2 pieces cut to fit wood)
- Parchment paper or blotting paper
- 4 bolts and wingnuts (for DIY press)
Microwave Flower Press Method
- Microfleur Flower Press
- Tweezers (optional)
Ironing Method
- Standard iron
- Parchment paper or absorbent paper
Instructions
Book Press Method
- Arrange flowers on parchment paper, and place another sheet on top.
- Close book and place a heavy object on top for pressure.
- Wait 2-4 weeks for flowers to dry completely.
DIY Wooden Press Method
- Drill holes in corners of wood (for DIY press) or use a store-bought press.
- Arrange flowers between parchment paper and cardboard layers.
- Sandwich flowers between wood pieces, tighten bolts and nuts.
- Wait 2-4 weeks for flowers to dry completely.
Microwave Flower Press Method
- Place flowers on the inner lining of the microwave press.
- Microwave for an initial burst (approx. 25 seconds or per instructions).
- Continue microwaving in 10-second intervals, releasing moisture between bursts.
- Gently remove dried flowers.
Ironing Method
- Place flowers between parchment paper.
- Turn off steam setting, iron on low heat in 15-30 second intervals.
- Let flowers cool between presses.
Notes
Each method offers different trade-offs between time and pressed flower quality. Book and wooden press methods offer the best quality for preserving texture and color, closely followed by the microwave method for convenience and quality. Microwaving is my preferred method for craft projects, resin jewelry, and pressed flower art due to its balance of speed and quality.
Tried this project? Tag @firstdayofhome or use #firstdayofhome!
You Might Also Like…
[