In today’s digital world, capturing what’s on your screen is a fundamental skill. Whether you need to share an error message with tech support, show off your high score in a game, or create visual aids for a presentation, knowing How To Print Screen On Windows is essential. This guide will walk you through everything you need to know about taking screenshots on your Windows computer, from the basics of the Print Screen key to different methods for capturing exactly what you need.
Understanding the Print Screen Key and How It Works
The cornerstone of screen capturing in Windows is the Print Screen key, often abbreviated as PrtScr, PrntScrn, or similar variations on keyboards. This key, in combination with other keys, allows you to take snapshots of your screen. When you press the Print Screen key, Windows captures an image of your screen and temporarily stores it on your clipboard. Think of the clipboard as a temporary storage space for data you copy or cut.
From there, you can “paste” this screenshot into various applications to save, edit, or share it. Windows offers flexibility in what you can capture, allowing you to grab:
- The entire screen: Captures everything visible on your monitor(s).
- All active windows: Captures all windows that are currently open and running.
- The current active window: Captures only the window you are currently working in.
Locating the Print Screen Key on Your Keyboard
Before you can start taking screenshots, you need to find the Print Screen key. Its location can vary slightly depending on whether you are using a desktop or laptop computer.
Desktop Keyboards:
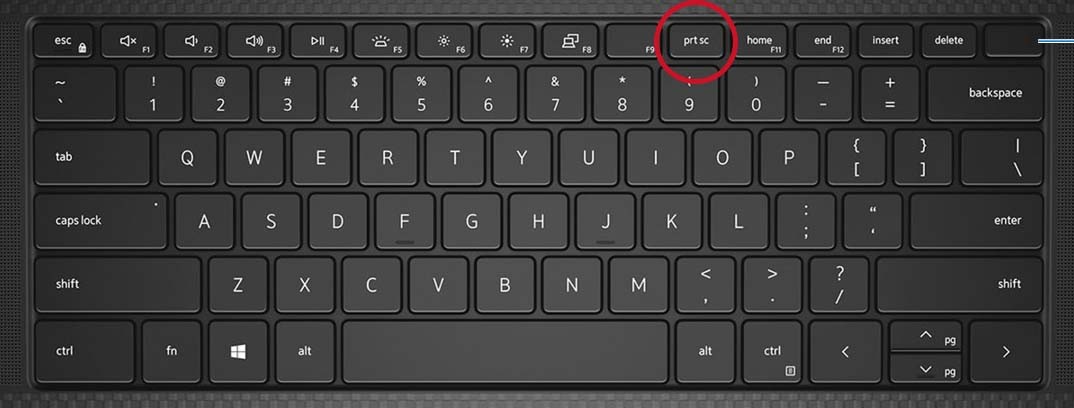
On most desktop keyboards, the Print Screen key is typically located in the upper right corner, often near the function keys (F12, Scroll Lock, Pause Break). Look for labels like Print Screen, PrtScrn, PrntScr, PrtScn, PrtScr, or PrtSc. For simplicity, we will use PrtScr throughout this guide to refer to all these variations.
Laptop Keyboards:
Laptop keyboards sometimes have a more compact layout. The Print Screen key is often found within the Function Key row (F1 to F12). You might need to press the Fn (Function) key along with the designated Function key (often F10 or Insert) to activate the Print Screen function.
Some laptops feature capacitive Function Key rows which are illuminated and can switch functions. On these keyboards, you might need to press the Fn key first to illuminate the Function keys and then locate the PrtScr key function, often shared with another key. Consult your laptop’s user manual for specific instructions if you are unsure.
Note: If your laptop keyboard lacks a dedicated Print Screen key, you can usually perform the Print Screen function by pressing and holding Fn + Insert keys together.
Figure 1: Print Screen key location on a Dell desktop keyboard
Figure 2: Print Screen key on a Dell laptop keyboard
Figure 3: Capacitive function keys on a laptop
Step-by-Step Guide: How to Print Screen on Windows 10 and Windows 11
The Print Screen function works similarly in both Windows 10 and Windows 11. Here’s how to use it to capture different parts of your screen:
1. Capture the Entire Screen
To capture a screenshot of your entire screen, including all monitors if you have multiple displays, use the following method:
-
Press the Windows logo key + PrtScr key simultaneously.
For tablets without a physical keyboard:
-
Press the Windows logo button + the volume down button together.
When you use these combinations, your screen might briefly dim, indicating that a screenshot has been taken. The screenshot is automatically saved as a file in the Screenshots folder, located within your Pictures library. This is the quickest way to save a full-screen capture directly to your files.
2. Capture All Active Windows
If you want to capture all currently open windows without saving directly to a file, follow these steps:
-
Simply press the PrtScr key.
This action will copy a screenshot of all your active windows to the clipboard. You won’t see any visual confirmation, but the screenshot is now ready to be pasted.
3. Capture a Single Active Window
To capture only the specific window you are currently working in, ensure that window is active (selected) and then:
-
Press the Alt + PrtScr keys together.
This combination captures only the active window and copies it to the clipboard. This is useful when you want to focus on a particular application or window and exclude other elements on your screen.
Accessing and Using Your Screenshots
Once you’ve captured a screenshot using any of the methods above (except for the Windows key + PrtScr method which saves directly to file), it’s on your clipboard and ready to be used. To access and utilize your screenshot, you need to paste it into an application.
Pasting Screenshots into Applications
To use your captured screenshot, you need to paste it into an application that supports images. Common applications for this include:
-
Image editors: Microsoft Paint (comes pre-installed with Windows), Paint 3D, Adobe Photoshop, GIMP, and online image editors. These are ideal for editing, annotating, cropping, or saving your screenshots in various image formats (like JPG, PNG).
-
Document processors: Microsoft Word, Google Docs, etc. Useful for inserting screenshots into reports, guides, or other documents.
-
Email clients: Gmail, Outlook, etc. For quickly sharing screenshots in emails.
-
Messaging apps: Slack, Microsoft Teams, etc. For instant communication with visuals.
To paste your screenshot, open your chosen application and then:
-
Use the Ctrl + V keyboard shortcut (or right-click and select “Paste”).
The screenshot from your clipboard will appear in the application window. From there, you can edit, save, or share it as needed.
Beyond Print Screen: Exploring the Snipping Tool
While the Print Screen key is a quick and easy way to capture your screen, Windows also offers a more powerful built-in tool called the Snipping Tool. The Snipping Tool provides more advanced options, such as capturing free-form selections, window selections, rectangular selections, and full-screen captures with delays. It also offers basic annotation features. For more complex screen capture needs, exploring the Snipping Tool is highly recommended. You can find the Snipping Tool by searching for it in your Windows Start Menu.
By mastering the Print Screen key and understanding its various functions, you can efficiently capture and share information from your Windows computer. Whether you need a quick full-screen grab or a focused capture of a single window, Windows provides the tools you need right at your fingertips.