Have you ever been captivated by a melody and wondered how it’s written down? Perhaps you’re eager to play your favorite songs or understand the language of music. Learning How To Read Sheet Music is the key to unlocking a deeper understanding and enjoyment of music. It might seem daunting at first, but with a step-by-step approach, you’ll be deciphering musical notation in no time!
Just like written language uses letters and words to convey ideas, sheet music uses symbols to represent musical sounds. These symbols have been developed over centuries to precisely communicate the pitch, rhythm, tempo, and expression of a musical piece. Think of musical notes as the alphabet of music, measures as musical words, and phrases as musical sentences. Learning to read sheet music opens up a vast library of musical knowledge and empowers you to explore and create music like never before.
This guide will walk you through the essential steps of reading sheet music. With consistent practice and dedication, you’ll be well on your way to playing music from written notation. Let’s dive in and discover the fascinating world of sheet music!
Step 1: Decoding the Basic Symbols of Musical Notation
Musical notation is built upon a foundation of fundamental symbols. The most crucial of these are the staff, clefs, and notes. These three elements are the bedrock of all sheet music, and understanding them is the first step in learning to read music.
The Staff: The Musical Grid
The staff is the set of five horizontal lines and four spaces between them. These lines and spaces are the grid upon which musical notes are placed. Each line and space corresponds to a specific musical pitch, represented by a letter from A to G. The sequence of notes ascends alphabetically up the staff.
Clefs: Designating Pitch Range
Clefs are symbols placed at the very beginning of the staff. They act as a key, telling you which range of pitches the staff is currently representing. The two most common clefs are the treble clef and the bass clef.
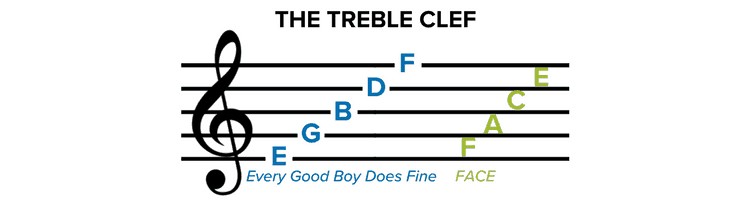
Treble Clef: For Higher Pitches
The treble clef, easily recognized by its decorative, swirling shape often resembling a stylized “G”, is used to notate higher musical registers. Its other name, the G clef, comes from the fact that the inner loop of the symbol encircles the second line from the bottom of the staff, designating that line as the note G above middle C. Instruments with higher pitches, like the flute, violin, guitar, and saxophone, typically use the treble clef. The higher notes on a piano are also written in the treble clef.
To easily remember the notes on the lines of the treble clef, use the mnemonic Every Good Boy Does Fine. For the spaces, remember the word FACE – they spell it out from bottom to top!
Bass Clef: For Lower Pitches
The bass clef, also known as the F clef, is used for lower registers of music. The curved line and two dots of the bass clef symbol pinpoint the fourth line from the bottom of the staff as F below middle C – the line passing between the two dots is the “F” line. Instruments that play lower pitches, such as the bass guitar, cello, trombone, and tuba, use the bass clef. The lower notes on a piano are also notated in the bass clef.
A helpful mnemonic for the lines of the bass clef is Good Boys Do Fine Always. For the spaces, remember All Cows Eat Grass.
Notes: Representing Pitch and Duration on the Staff
Notes are the oval-shaped symbols placed on the staff. Their position on the lines and spaces indicates the pitch (how high or low the sound is), and their shape indicates the duration (how long the sound should last). Each note consists of up to three parts: the note head, the stem, and the flag.
The note head is the oval part of the note and is always present. It can be filled in (black) or open (white). The position of the note head on the staff (line or space) determines the specific pitch to be played. Sometimes, notes need to be written higher or lower than the staff. In these cases, ledger lines are used – short lines added above or below the staff to extend its range.
The stem is a vertical line attached to the note head. It extends upwards on the right side of the note head or downwards on the left side. The direction of the stem doesn’t change the note’s pitch or duration, but it helps to make the sheet music visually clearer and more organized. Generally, notes on or above the middle line of the staff have downward stems, and notes below the middle line have upward stems.
The flag is a curved stroke extending from the stem. Flags indicate shorter note durations. A single flag, multiple flags, or beams (connecting multiple notes) are used to represent notes of shorter values.
Note Values: How Long to Hold Each Note
The appearance of the note head (filled or open) and the presence of stems and flags determine a note’s value, or how long it should be played.
- Whole Note: Represented by an open note head without a stem. It has the longest duration, typically four beats in 4/4 time.
- Half Note: Represented by an open note head with a stem. It is half the duration of a whole note, typically two beats in 4/4 time.
- Quarter Note: Represented by a filled note head with a stem. It is half the duration of a half note, typically one beat in 4/4 time.
- Eighth Note: Represented by a filled note head with a stem and one flag, or beamed together with other eighth notes. It is half the duration of a quarter note, typically half a beat in 4/4 time.
- Sixteenth Note: Represented by a filled note head with a stem and two flags, or beamed together with other sixteenth notes. It is half the duration of an eighth note, typically a quarter of a beat in 4/4 time.
Dots and ties are also used to modify note durations. A dot placed after a note head increases its duration by half of its original value. For example, a dotted half note is equal to a half note plus a quarter note. A tie is a curved line connecting two or more notes of the same pitch, indicating that they should be played as a single note with a duration equal to the sum of the tied notes. Ties are often used to sustain notes across bar lines.
Rests: Silence in Music
Just as notes represent sounds, rests represent silence in music. Each note value has a corresponding rest symbol indicating a period of silence of the same duration.
- Whole Rest: Represented by a filled rectangle hanging below the fourth line of the staff.
- Half Rest: Represented by a filled rectangle sitting on top of the middle line of the staff.
- Quarter Rest: Represented by a squiggly symbol.
- Eighth Rest: Represented by a symbol resembling a “7” with a flag.
- Sixteenth Rest: Represented by a symbol similar to an eighth rest but with two flags.
Understanding rests is just as important as understanding notes, as they are essential for creating rhythm and musical phrasing.
Step 2: Grasping Rhythm and Meter
Rhythm is the heartbeat of music, and understanding how it’s notated is crucial for reading sheet music. Meter is the pattern of strong and weak beats that organize music in time. In sheet music, meter is indicated by the time signature.
Time Signature: The Meter of Music
The time signature is a symbol resembling a fraction placed at the beginning of the staff, right after the clef and key signature. It consists of two numbers, one above the other.
- The top number indicates how many beats are in each measure or bar. Measures are segments of music separated by vertical lines called bar lines.
- The bottom number indicates which note value receives one beat.
For example, a time signature of 4/4 (also known as “common time,” often represented by a “C” symbol) means there are four beats in each measure, and the quarter note gets one beat. You would count this as “1, 2, 3, 4” within each measure.
Another common time signature is 3/4, meaning there are three beats per measure, and the quarter note gets one beat. This time signature is often used for waltzes. You would count this as “1, 2, 3” in each measure.
Time signatures dictate the rhythmic feel of a piece of music. Understanding the time signature is essential for playing music with the correct rhythm and feel.
Tempo: The Speed of Music
Tempo indicates the speed at which a piece of music should be played. It is usually indicated at the beginning of a piece of sheet music, often above the staff. Tempo can be indicated in beats per minute (BPM) or using Italian terms.
- BPM (Beats Per Minute): A tempo marking of 60 BPM means 60 beats should occur in one minute, or one beat per second. A tempo of 120 BPM is twice as fast, with two beats per second.
- Italian Tempo Markings: Composers often use Italian words to indicate tempo. Common examples include:
- Largo: Very slow
- Adagio: Slow
- Andante: Moderately slow, walking pace
- Moderato: Moderate tempo
- Allegro: Fast, cheerful
- Vivace: Lively, fast
- Presto: Very fast
Musicians often use a metronome to practice and maintain a consistent tempo. Metronomes produce a steady beat at a specified BPM, helping musicians develop their sense of timing.
Step 3: Playing Melodies and Understanding Pitch
Once you understand notes, rhythm, and meter, you can start to play melodies. A melody is a sequence of notes arranged in a musically satisfying way. Melodies are built from scales and keys.
Scales: The Building Blocks of Melodies
A scale is a series of notes arranged in ascending or descending order, typically within an octave. The C major scale is a fundamental scale to learn. It consists of the notes C, D, E, F, G, A, B, and C. An octave is the interval between two notes with the same letter name, one being twice the frequency of the other (e.g., from C to the next higher C).
The C major scale uses only the white keys on a piano. Each note in the C major scale corresponds to a white key. As you move up the staff and to the right on a keyboard, the pitch of the notes becomes higher.
Whole steps and half steps are the intervals between notes. In the C major scale, most intervals are whole steps, except between E and F and between B and C, which are half steps. The pattern of whole and half steps is what defines a major scale: Whole-Whole-Half-Whole-Whole-Whole-Half.
Sharps, Flats, and Naturals: Modifying Pitch
To create a wider range of melodies and harmonies, music uses semitones, or half steps. Sharps (♯) and flats (♭) are symbols used to alter the pitch of a note by a semitone.
- Sharp (♯): Raises the pitch of a note by a semitone.
- Flat (♭): Lowers the pitch of a note by a semitone.
- Natural (♮): Cancels a previous sharp or flat, restoring the note to its original pitch.
A natural symbol (♮) is used to cancel a sharp or flat. If a sharp or flat is indicated in the key signature or placed before a note, it applies to all subsequent occurrences of that note within the same measure, unless canceled by a natural symbol.
Key Signatures: Establishing the Key of a Piece
The key signature is a set of sharps or flats placed at the beginning of the staff, between the clef and the time signature. The key signature indicates the key of the music, which is the tonal center or home note of the piece. The key signature tells you which notes are consistently sharp or flat throughout the piece, eliminating the need to write sharps or flats before every affected note.
For example, a key signature with no sharps or flats indicates the key of C major (or A minor). A key signature with one sharp (F♯) indicates the key of G major (or E minor).
Learning to recognize key signatures is essential for quickly understanding the tonal context of a piece of music.
Step 4: Resources to Help You Learn
Learning to read sheet music is a journey that requires practice and patience. Fortunately, there are many free resources available to help you on your musical path.
To get started, download a free arrangement of a simple tune like “Mary Had a Little Lamb.” Many websites offer free sheet music for beginners. Explore beginner sheet music collections to find pieces that match your skill level and musical interests. You can even find simplified arrangements of popular songs like the Star Wars Theme, “Let It Go” from ‘Frozen’, and “Hallelujah” by Leonard Cohen, which are excellent for practice.
Consider using a keyboard note guide to help you visualize the notes on a piano keyboard. You can download and print a Keyboard Note Guide that you can place behind the keys of your piano or keyboard. This visual aid can be especially helpful in the beginning stages of learning.
Mobile apps like the free Musicnotes app can also be invaluable tools. These apps provide access to sheet music, playback features, and learning resources. As you progress, your sheet music library will grow, and music apps can help you keep everything organized and accessible.
If you have any questions or need further guidance, don’t hesitate to seek help from music teachers, online communities, or educational resources. Learning to read sheet music is a rewarding endeavor that opens up a lifetime of musical exploration and enjoyment. Embrace the journey, practice regularly, and most importantly, have fun making music!