Your iPhone is more than just a smartphone; it’s a powerful portable recording device right in your pocket. Whether you need to capture personal reminders, record important lectures, or lay down musical ideas, your iPhone is equipped to handle it all. With the built-in Voice Memos app, recording and even fine-tuning your audio is straightforward. Let’s explore how to effectively use your iPhone to record high-quality audio.
You can leverage the iPhone’s internal microphone, connect a compatible headset, or even use an external microphone for enhanced recording capabilities. The Voice Memos app is designed for ease of use and efficiency, ensuring you can capture audio whenever and wherever you need to.
And with iCloud integration, your recordings are automatically synced across your Apple devices – iPhone, iPad, and Mac – as long as you’re logged into the same Apple ID. This seamless synchronization ensures you always have access to your audio notes and recordings, no matter which device you’re using.
Making a Basic Audio Recording on iPhone
The simplest way to start recording audio on your iPhone is by using the Voice Memos app. Here’s how to get started:
-
Locate the Voice Memos App: On your iPhone, find the Voice Memos app. It’s usually located in the Utilities folder on your home screen.
Quick Tip: For quicker access, you can move the Voice Memos app icon from the Utilities folder directly to your Home Screen. This makes it even easier to start recording whenever inspiration strikes.
-
Start Recording: Open the Voice Memos app and tap the red Record button, which is prominently displayed at the bottom of the screen. This action immediately starts your audio recording.
To optimize the recording level, adjust the distance between the microphone and the sound source. Moving closer will increase the volume, while moving farther away will decrease it. Experiment to find the best distance for clear audio capture.
-
Stop Recording: Once you’ve captured the audio you need, tap the Stop button (which replaces the Record button during recording). This will end the recording session.
Your newly recorded audio file is automatically saved. By default, it’s named “New Recording” or uses your current location name if Location Services is enabled. You can easily rename your recording for better organization: simply tap on the recording, then tap on the default name, and type in your desired new name.
To further refine your recording, Voice Memos offers editing tools. You can trim unwanted sections, replace parts of the recording, or resume recording to add more content. For detailed editing instructions, refer to the guide on editing or deleting recordings in Voice Memos.
Privacy Note: Keep an eye on the orange dot that appears at the top of your iPhone screen while recording. This is a privacy indicator confirming that your microphone is currently active and in use by the Voice Memos app.
Recording in Stereo on iPhone for Enhanced Audio
For richer, more immersive audio recordings, especially useful for music or environments with varied sound sources, the Voice Memos app supports stereo recording. Here’s how to enable it:
- Access Voice Memos Settings: Open the Settings app on your iPhone. Scroll down and tap on Voice Memos within the list of apps.
- Enable Stereo Recording: In the Voice Memos settings, find the Stereo Recording option and toggle the switch to turn it on.
With Stereo Recording activated, Voice Memos utilizes multiple microphones on your iPhone to capture audio with distinct left and right channels. When listening back with headphones, you’ll notice a more spatial and detailed sound experience, as different sounds are captured by different microphones and directed to the appropriate ear. While the audio quality is enhanced, the visual waveform display in the app remains the same.
Device Compatibility Note: Stereo recording capability is not available on all iPhone models. Check your iPhone specifications to confirm if your device supports stereo audio recording in Voice Memos.
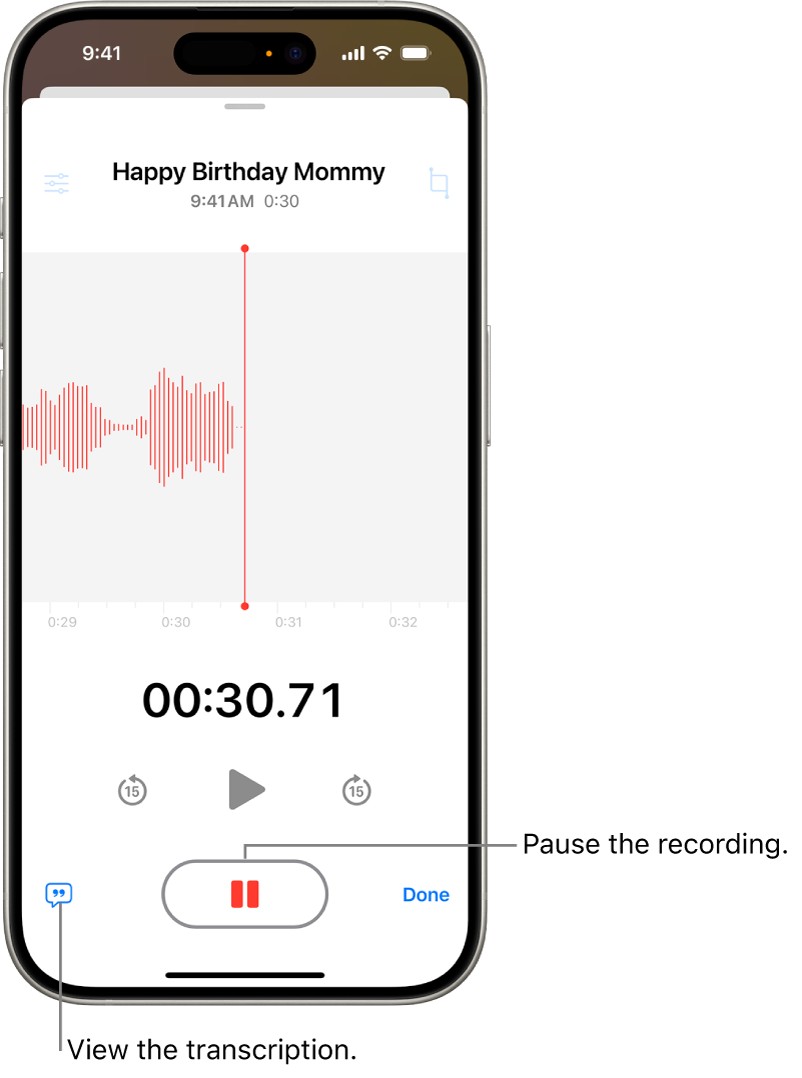
Utilizing Advanced Recording Features: Pause and Resume
Voice Memos offers advanced features that allow for more flexible recording sessions. One key feature is the ability to pause and resume recordings, ideal for breaking up long recordings or skipping interruptions.
- Start an Advanced Recording: Open the Voice Memos app and tap the Record button to begin your recording as usual.
- Pause and Resume: During recording, tap the Pause button (which appears in place of the Record button). This will temporarily halt the recording. To continue, tap Resume. You can pause and resume as many times as needed during a single recording session.
- Review and Save: To review your recorded audio before finalizing, tap the Play button. You can drag the playhead across the waveform to choose a specific starting point for playback. Once you are satisfied, tap Done to save the complete recording.
Just like basic recordings, advanced recordings are saved with a default name, which you can customize. They are also subject to iCloud syncing if enabled.
Muting Start and Stop Tones for Silent Recording
In situations where silence is crucial, such as recording meetings or subtle sounds, you might want to mute the start and stop tones of the Voice Memos app. While there isn’t a direct setting to disable these tones, a simple workaround is to use the volume buttons during recording:
- Start Recording: Open Voice Memos and begin your recording.
- Mute Tones: Immediately after tapping record, use the Volume Down button on your iPhone to reduce the volume to zero. This will mute the start and stop tones without affecting the recording level of the audio being captured by the microphone.
This method ensures your recording starts and stops silently, avoiding any unwanted beeps in your audio file.
Using Other Apps While Recording with Voice Memos
Multitasking is a breeze on iPhone, and you can even use other apps while Voice Memos is actively recording in the background. This is perfect for taking notes during a lecture or referring to documents while recording thoughts.
- Begin Recording: Start your recording in the Voice Memos app.
- Navigate to Other Apps: While recording, swipe up from the bottom of the screen to return to the Home Screen and open any other app you need to use. As long as the other app does not play audio, Voice Memos will continue recording uninterrupted in the background.
If another app starts playing audio, Voice Memos will automatically stop recording to prevent audio conflicts.
On supported iPhone models, you’ll see a dynamic indicator in the Dynamic Island at the top of your screen, showing that Voice Memos is recording. Tapping on the Dynamic Island expands it, allowing you to quickly return to the Voice Memos app or manage your recording.
By utilizing these features, you can maximize the functionality of the Voice Memos app on your iPhone for various recording needs. Whether it’s simple voice notes or more complex audio capture, your iPhone is a capable and convenient recording tool.
Remember, recordings made with the built-in microphone are mono by default, unless you’ve enabled Stereo Recording in settings. For professional-grade stereo recordings, consider using an external stereo microphone designed for iPhone, looking for the “Made for iPhone” or “Works with iPhone” certification for guaranteed compatibility.
Further Resources:
- How to Play a Recording in Voice Memos on iPhone
- How to View a Voice Memos Transcription on iPhone