Screen recording on your iPhone is a remarkably useful feature, whether you’re creating tutorials, capturing gameplay, or simply sharing something interesting on your screen. Since iOS 11, Apple has integrated a native screen recorder, making it incredibly convenient for all users. However, ensuring you capture audio along with your screen recording, and troubleshooting any potential sound issues, is key to a successful recording. This guide will walk you through everything you need to know about how to record your screen on iPhone, focusing on capturing audio and resolving common problems.
Using the Built-in Screen Recorder on iPhone
The most straightforward way to record your iPhone screen is by using the built-in screen recording feature. It’s easily accessible and offers a quick solution for most screen capture needs.
Accessing the Control Center
Before you can start recording, you need to ensure the Screen Recording control is added to your Control Center. Here’s how:
- Open the Settings app.
- Tap on Control Center.
- Scroll down to More Controls.
- Find Screen Recording in the list and tap the “+” button next to it to add it to your Included Controls.
Now, the Screen Recording icon (a circle within a circle) will be accessible in your Control Center.
Starting a Screen Recording
With the Screen Recording control added, initiating a recording is simple:
- Open Control Center by swiping down from the top-right corner of your screen (on iPhones with Face ID) or swiping up from the bottom of the screen (on iPhones with a Home button).
- Tap the Screen Recording icon. A three-second countdown will appear on the icon before recording begins.
Everything you do on your screen will now be recorded. A red status bar or icon at the top of your screen indicates that recording is in progress.
Enabling Microphone Audio for Screen Recordings
To record your voice or external sounds along with the screen, you need to enable the microphone audio feature. Here’s how to do it before or during a recording:
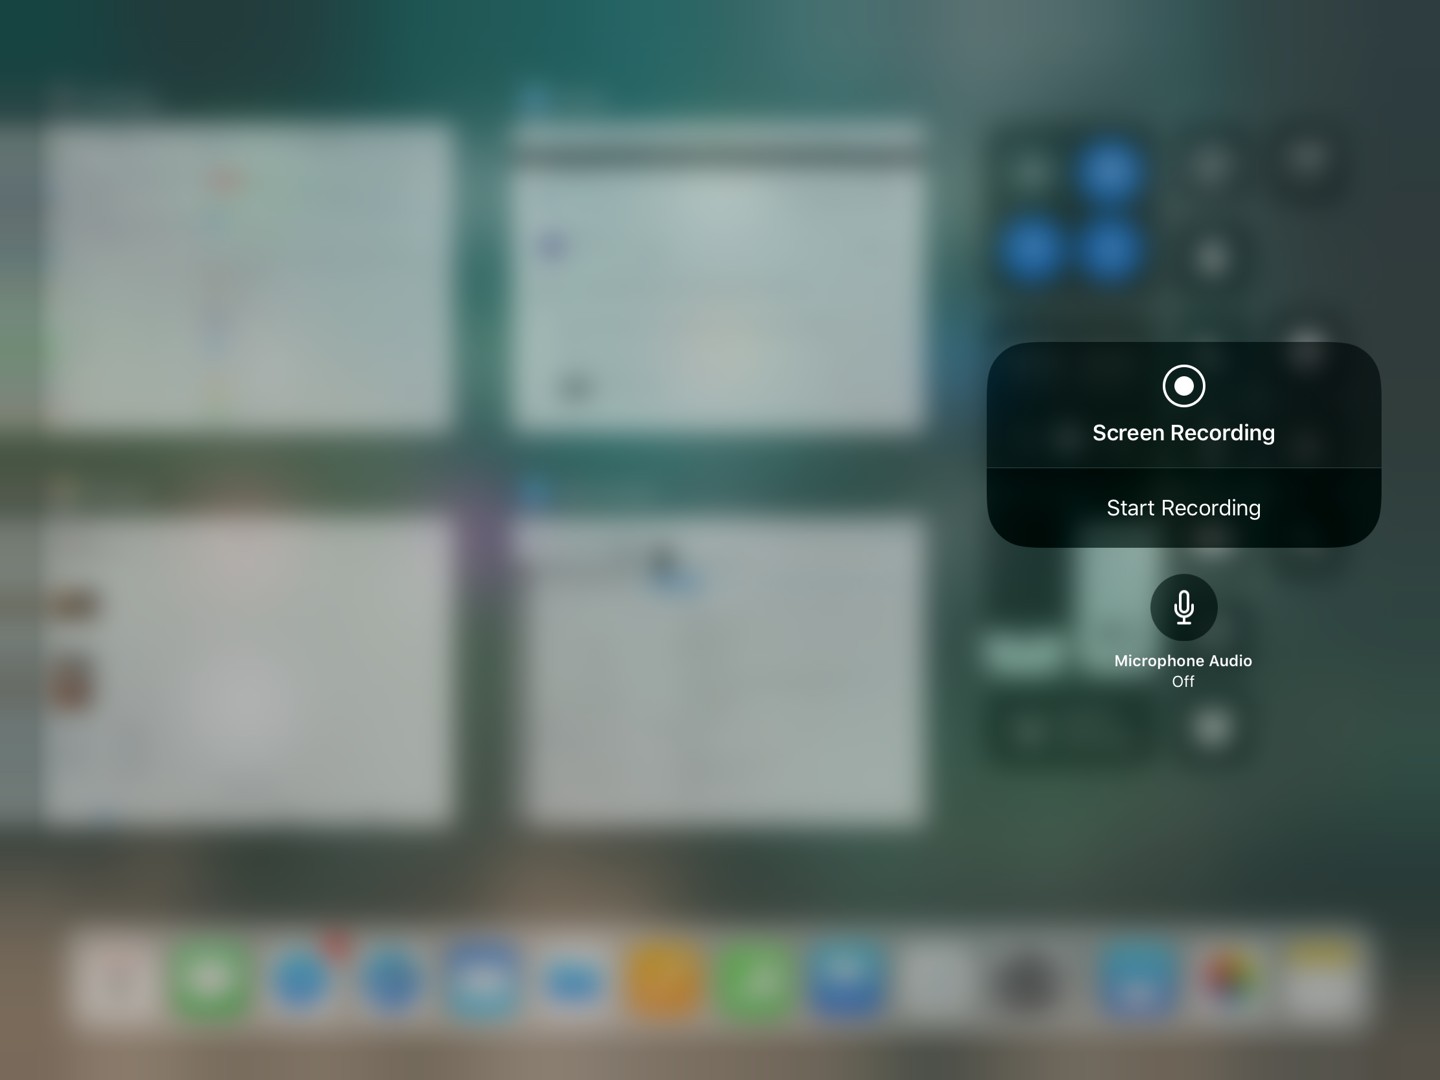
- Before starting: Long press (or 3D Touch if your iPhone supports it) on the Screen Recording icon in the Control Center. This will bring up a menu.
- Toggle Microphone Audio: In the menu, you’ll see a Microphone Audio option at the bottom. Tap this icon to turn the microphone ON. When it’s ON, the icon will typically appear red or highlighted.
Now, when you start screen recording, it will capture both the screen activity and audio from your microphone.
Stopping a Screen Recording
To stop recording your screen:
- Tap the red status bar or icon at the top of your screen.
- Tap Stop in the confirmation prompt.
Alternatively, you can also stop recording from the Control Center by tapping the Screen Recording icon again.
Your screen recording will be automatically saved to the Photos app.
Troubleshooting Audio Issues in iPhone Screen Recordings
While the built-in screen recorder is generally reliable, users sometimes encounter audio issues. Here are some common problems and how to troubleshoot them:
Microphone Not Working During Screen Recording
If you’ve enabled microphone audio but still find no sound in your recording, consider these steps:
- Check Microphone Permissions: Ensure that apps you are recording (if specific to an app) have microphone permissions enabled in Settings > Privacy > Microphone.
- Restart Microphone Toggle: Toggle the Microphone Audio option off and on again in the Control Center menu before starting a new recording.
- Physical Obstructions: Make sure nothing is physically blocking your iPhone’s microphone (like a case or finger).
- Restart Your iPhone: A simple restart can often resolve temporary software glitches. Turn your iPhone off and then on again.
No Sound After Posting Screen Recording Videos
Some users report that while the screen recording with audio plays correctly in their Photos app, the audio disappears when the video is shared on platforms like Facebook or when edited in apps like iMovie.
- Compatibility Issues: Sometimes, the issue might be with the platform or app where you are sharing or editing. Try playing the video on different devices or platforms to see if the audio is present.
- iMovie Glitches: As some users have noted, there might be occasional glitches with iMovie stripping audio from screen recordings. A workaround suggested by users is to export the video to a different app (like Files, or another video editing app), re-render or save it, and then import it back into iMovie.
- Sharing Methods: Test different sharing methods. For example, if audio is lost when posting to Facebook, try sharing via email or another messaging app to see if the issue persists.
Internal Audio Not Being Recorded
It’s important to note that the built-in iPhone screen recorder is primarily designed to record external audio via the microphone and the screen content. Recording internal audio (like game sounds or music directly from apps) using the built-in recorder is not officially supported and can be inconsistent. For capturing internal audio, you might need to consider third-party applications that offer this specific functionality, though iOS restrictions can limit this.
Temporary Bugs and Software Updates
Some audio issues might be related to temporary bugs in the iOS software. Users have reported that restarting their iPhone sometimes fixes audio recording for the first screen recording attempt after a restart but fails for subsequent recordings without another restart.
- Software Updates: Ensure your iPhone is running the latest version of iOS. Software updates often include bug fixes that can resolve screen recording issues. Check for updates in Settings > General > Software Update.
- Patience and Persistence: If you suspect a bug, try recording again after a while, or after restarting your device. Sometimes, temporary glitches resolve themselves.
Exploring Alternative Screen Recording Apps
If you need more advanced features, or if you are consistently facing issues with the built-in recorder, several third-party screen recording apps are available on the App Store. Some popular alternatives include:
- ApowerREC: As mentioned by some users, ApowerREC is a free app that offers screen recording with potentially more features or stability in certain situations.
- Go Record: This app provides screen recording along with video editing capabilities.
- Record it!!: Another app focused on screen recording with straightforward functionality.
When choosing a third-party app, consider factors like:
- Ease of Use: Is the app intuitive and easy to navigate?
- Features: Does it offer features beyond basic recording, like editing, annotations, or internal audio capture?
- Reviews and Ratings: What do other users say about its performance and reliability?
- Cost: Is it free, or does it require a purchase or subscription?
Conclusion
Recording your iPhone screen is a powerful tool readily available at your fingertips. By understanding how to use the built-in screen recorder effectively, especially the microphone audio feature, and knowing how to troubleshoot common audio issues, you can create clear and informative screen recordings for various purposes. If you encounter persistent problems or need more advanced features, exploring third-party apps can provide alternative solutions. Always ensure your software is updated and consider restarting your device as a first step in resolving any unexpected issues.