Car scratches are an unfortunate reality for vehicle owners. Whether it’s a minor brush against a bush or a more noticeable key mark, scratches can detract from your car’s appearance and value. Fortunately, removing scratches, from light surface blemishes to deeper gouges, is often achievable at home with the right techniques and products. This guide will walk you through various methods to effectively remove scratches from your car, enhancing its look and protecting its paintwork.
Understanding Car Scratches and When to Act
Before diving into scratch removal, it’s crucial to understand the different types of scratches and assess the damage. Car paint typically consists of several layers: clear coat, base coat (color), primer, and the metal body. Most minor scratches only affect the clear coat, the outermost protective layer. Deeper scratches can penetrate to the base coat or even the primer, requiring more intensive repair methods.
A simple test to determine scratch depth is the fingernail test. Gently run your fingernail across the scratch. If your nail doesn’t catch, the scratch is likely only in the clear coat and can often be buffed out. If your nail catches, the scratch is deeper and may require more aggressive techniques like sanding or filling.
Essential Tools and Products for Scratch Removal
Having the right tools and products is essential for effective scratch removal. Here’s a list of items you’ll likely need:
- Car Wash Soap and Water: For cleaning the area before and after scratch removal.
- Microfiber Cloths: Soft cloths for washing, drying, applying products, and buffing.
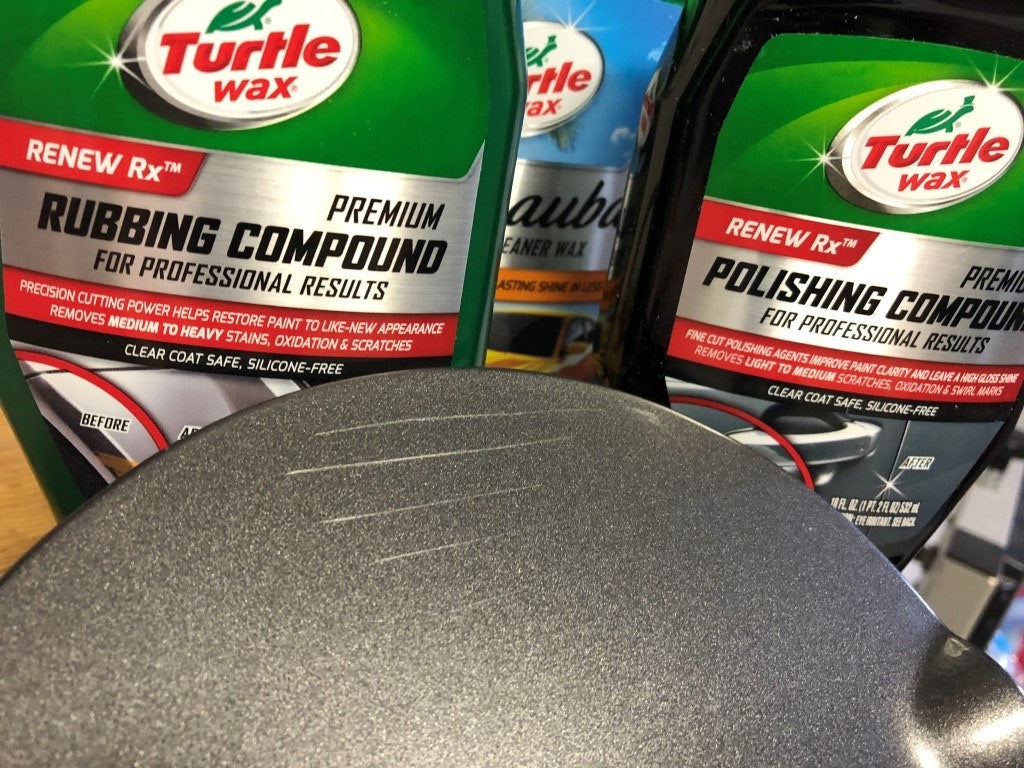
- Polishing Compound: A mildly abrasive paste designed to remove light scratches and swirl marks from the clear coat.
- Rubbing Compound: A more abrasive compound used for deeper clear coat scratches and paint defects. Use with caution as it can remove more material.
- Scratch Remover: Specialized products formulated for scratch removal, often containing a blend of polishing agents.
- Wax or Paint Sealant: To protect the paint and enhance shine after scratch removal.
- Applicator Pads: Foam or microfiber pads for applying compounds and waxes.
- Spray Bottle with Water: For wet sanding (if necessary).
- Sandpaper (Various Grits): For deeper scratches, you may need fine-grit sandpaper (2000-3000 grit) for wet sanding.
- Detailing Clay Bar (Optional): To remove contaminants before polishing.
- Machine Polisher (Optional): For faster and more effective removal of moderate scratches. A Dual Action (DA) polisher is recommended for beginners.
- Touch-Up Paint (For Deep Scratches): To fill in scratches that have reached the base coat or primer.
Step-by-Step Guide to Removing Light Scratches
For minor scratches that are only in the clear coat, polishing compounds are usually sufficient. Here’s how to remove light scratches:
-
Wash and Dry the Area: Thoroughly clean the scratched area and the surrounding paint with car wash soap and water. Rinse well and dry with a microfiber cloth. This removes dirt and debris that could further scratch the paint during polishing.
-
Apply Polishing Compound: Apply a small amount of polishing compound to a clean applicator pad.
-
Rub the Compound into the Scratch: Using firm, even pressure, rub the polishing compound into the scratch in a circular or back-and-forth motion. Work in a small area at a time.
-
Buff the Area: After working the compound for a minute or two, use a clean microfiber cloth to buff away the residue. Use a circular or back-and-forth motion and moderate pressure.
-
Inspect and Repeat: Examine the scratch. If it’s still visible, repeat steps 2-4. For light scratches, a few applications may be needed.
-
Apply Wax or Sealant: Once the scratch is removed, apply a coat of wax or paint sealant to protect the polished area and enhance shine.
Removing Moderate Scratches with Machine Polishing
For slightly deeper or more widespread scratches, a machine polisher can significantly improve results. A Dual Action (DA) polisher is safer for beginners and provides more consistent results than hand polishing.
-
Prepare the Area: Wash and dry the car as described in the light scratch removal section. You may also consider using a detailing clay bar to remove any embedded contaminants before polishing.
-
Apply Polishing Compound to Polishing Pad: Attach a polishing pad to your DA polisher and apply a few drops of polishing compound to the pad. Follow the product instructions for pad and compound compatibility.
-
Polish the Scratched Area: Turn on the polisher at a low to medium speed and gently move it over the scratched area, overlapping each pass. Apply moderate pressure and keep the pad flat on the surface. Work in small sections.
-
Wipe Away Residue and Inspect: After polishing for a few passes, turn off the polisher and wipe away the compound residue with a clean microfiber cloth. Inspect the scratch removal progress.
-
Repeat if Necessary or Step Up to Rubbing Compound: If the scratch is still visible, repeat polishing with more passes or consider using a slightly more aggressive polishing compound. For moderate scratches, you might need to start with rubbing compound and then refine with polishing compound.
-
Finish with Wax or Sealant: After removing the scratches, protect the paint with a coat of wax or sealant.
Repairing Deep Scratches: Sanding and Filling
Deep scratches that penetrate the clear coat and reach the base coat or primer require a more involved process, potentially including wet sanding and touch-up paint or filler.
-
Clean and Assess the Scratch: Thoroughly clean the area and assess the depth. If the scratch is very deep and wide, consider using a scratch filler like Bondo for automotive paint. For narrower but deep scratches, touch-up paint might be sufficient.
-
Wet Sanding (Optional for Deeper Clear Coat Scratches): For deep clear coat scratches that rubbing compound alone cannot remove, careful wet sanding can level the clear coat. Soak fine-grit sandpaper (2500-3000 grit) in water with a drop of car soap for a few minutes. Lightly sand the scratched area in straight, overlapping strokes, keeping the surface wet. Only sand enough to level the scratch; avoid sanding too much clear coat.
-
Apply Rubbing Compound: After wet sanding (or if sanding is not needed), apply rubbing compound to a foam applicator pad or polishing pad on a DA polisher. Work the rubbing compound into the sanded or scratched area using firm pressure. This will remove sanding marks and further level the paint.
-
Refine with Polishing Compound: After using rubbing compound, switch to polishing compound to refine the finish and restore gloss. Use a clean polishing pad and apply polishing compound as described in the machine polishing section.
-
Touch-Up Paint or Filler (For Base Coat/Primer Scratches): If the scratch has reached the base coat or primer, you’ll need to apply touch-up paint or filler. Clean the scratch thoroughly and apply thin layers of touch-up paint using a fine brush, allowing each layer to dry completely. For deeper, wider scratches, apply a thin layer of automotive scratch filler, following product instructions.
-
Level Touch-Up Paint/Filler (If Necessary): Once the touch-up paint or filler is dry, it may be slightly raised above the surrounding paint. Carefully wet sand the touch-up area with very fine-grit sandpaper (3000 grit or higher) to level it with the surrounding paint.
-
Polish and Wax: After sanding the touch-up area, use polishing compound to restore shine and remove sanding marks. Finally, apply wax or sealant to protect the repaired area.
Tips for Preventing Car Scratches
Prevention is always better than cure. Here are some tips to minimize car scratches:
- Wash Your Car Properly: Use the two-bucket method and quality car wash soap to avoid swirl marks and scratches during washing.
- Dry with Soft Microfiber Towels: Use clean, soft microfiber towels to dry your car to prevent scratching.
- Wax or Seal Your Car Regularly: Waxing or sealing creates a protective layer that helps prevent scratches and swirl marks.
- Park Carefully: Avoid parking too close to bushes, shopping carts, or other vehicles that could scratch your car.
- Be Mindful of Road Debris: Avoid driving too closely behind other vehicles, especially on gravel or unpaved roads, to minimize stone chips and scratches.
Conclusion
Removing scratches from your car can significantly improve its appearance and maintain its value. By understanding the type of scratch and using the appropriate techniques and products, you can effectively tackle most scratches at home. For light scratches, polishing compounds are often sufficient, while moderate scratches may require machine polishing. Deeper scratches may necessitate wet sanding and touch-up paint or filler. With patience and care, you can restore your car’s paintwork and keep it looking its best.