For those transitioning from Windows or new to the macOS environment, the concept of a “right click” might seem a bit different. On a Mac, what you’re likely referring to is known as a secondary click or Control-click. This action is essential for accessing shortcut menus, also known as contextual menus, which provide quick actions and options relevant to the item you click on. Whether it’s files, folders, icons, or even just the desktop, understanding how to right click is fundamental to efficient Mac usage.
Utilizing Control-Click for Secondary Actions
The most universal method to perform a right click on a Mac involves using the Control key. This technique, often called Control-click, is straightforward and works across all Macs, regardless of whether you are using a mouse or a trackpad.
To Control-click, simply press and hold the Control (Ctrl) key located at the bottom left of your keyboard. While holding down the Control key, click on the item you wish to access the shortcut menu for using your mouse or trackpad. Upon clicking, a contextual menu will appear, offering a range of actions specific to the item you clicked.
Tip: For users with a Magic Keyboard that includes Touch ID and a Numeric Keypad (USB-C), there’s an even quicker way. Locate the Contextual Menu key — it’s situated below the F13 key. Pressing this key instantly opens the shortcut menu, providing an alternative to Control-click.
Configuring Your Mouse for Right Click Functionality
If you prefer a more traditional right-click experience using a mouse, macOS allows you to configure your mouse settings to enable this. This eliminates the need to use the Control key every time you want to access a secondary click menu.
Here’s how to set up right click on your mouse:
- Navigate to System Settings. Click on the Apple menu in the top-left corner of your screen and select System Settings.
- Access Mouse settings. In the System Settings window, find and click on Mouse in the sidebar. You might need to scroll down to locate it.
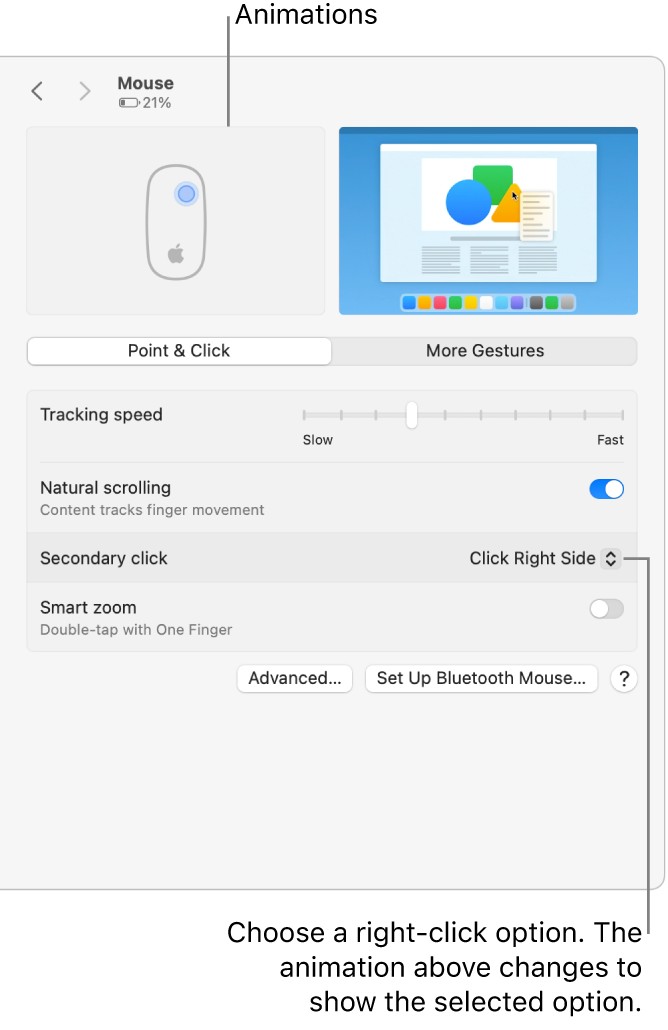
- Choose Secondary Click Option. Look for the “Secondary click” pop-up menu. Click on this menu to reveal the options.
- Select your preferred click side. You can choose between “Click on Right Side” or “Click on Left Side” based on your comfort and preference. Selecting “Click on Right Side” will designate the right side of your mouse as the secondary click, effectively mimicking a traditional right click.
Setting Up Your Trackpad for Easy Secondary Clicking
For MacBook users or those using an external Magic Trackpad, macOS offers trackpad settings that allow for intuitive right-clicking without needing the Control key. You can customize your trackpad to perform a secondary click using either a two-finger click or a bottom corner click.
Follow these steps to configure trackpad right click:
- Open System Settings. Go to the Apple menu and select System Settings.
- Go to Trackpad settings. In the System Settings sidebar, click on Trackpad. You may need to scroll down to find it.
- Configure Secondary Click. Find the “Secondary click” pop-up menu and click it.
- Choose your trackpad click style. You can select from options like “Click with Two Fingers” or “Click in bottom right corner” (or bottom left corner, depending on your setup). “Click with Two Fingers” is a popular and intuitive choice for many users.
By customizing these settings, you can streamline your workflow and make interacting with your Mac even more efficient. Whether you opt for Control-click, configure your mouse, or personalize your trackpad settings, macOS provides flexible options to ensure you can easily access secondary click menus whenever you need them.
See also: View and customize mouse or trackpad gestures on Mac, Use keyboard function keys on Mac, If keyboard shortcuts don’t work on Mac