In today’s fast-paced world, the need to digitize documents quickly and efficiently is more important than ever. Fortunately, your iPhone comes equipped with powerful built-in tools that make scanning documents a breeze. No need for bulky scanners or complicated software! This guide will show you exactly how to scan documents directly on your iPhone using two convenient methods: the Notes app and the Files app. Let’s get started and turn your iPhone into a portable scanner.
Scanning Documents Using the Notes App
The Notes app on your iPhone is not just for jotting down quick thoughts; it’s also a surprisingly effective document scanner. Here’s how to use it:
Step-by-Step Guide to Scanning in Notes
-
Open Notes and Start a New Note: Launch the Notes app on your iPhone. You can scan a document into an existing note or create a new one specifically for your scanned document.
-
Access the Scan Function: Within your chosen note, look for the Attachment button (it looks like a plus sign within a circle, often located above the keyboard). Tap this button, and a menu will appear. From this menu, select Scan Documents.
Alt text: The Scan Documents icon within the attachment menu in the iPhone Notes app, used to initiate document scanning.
-
Position Your Document: Place the document you want to scan on a flat surface in a well-lit area. Hold your iPhone directly above the document, ensuring it’s within the camera’s view.
-
Capture the Scan: Depending on your settings, your iPhone may automatically scan the document in Auto mode. If not, or if you prefer manual control, tap the Shutter button (the white circle at the bottom) or press one of the Volume buttons to capture the scan.
-
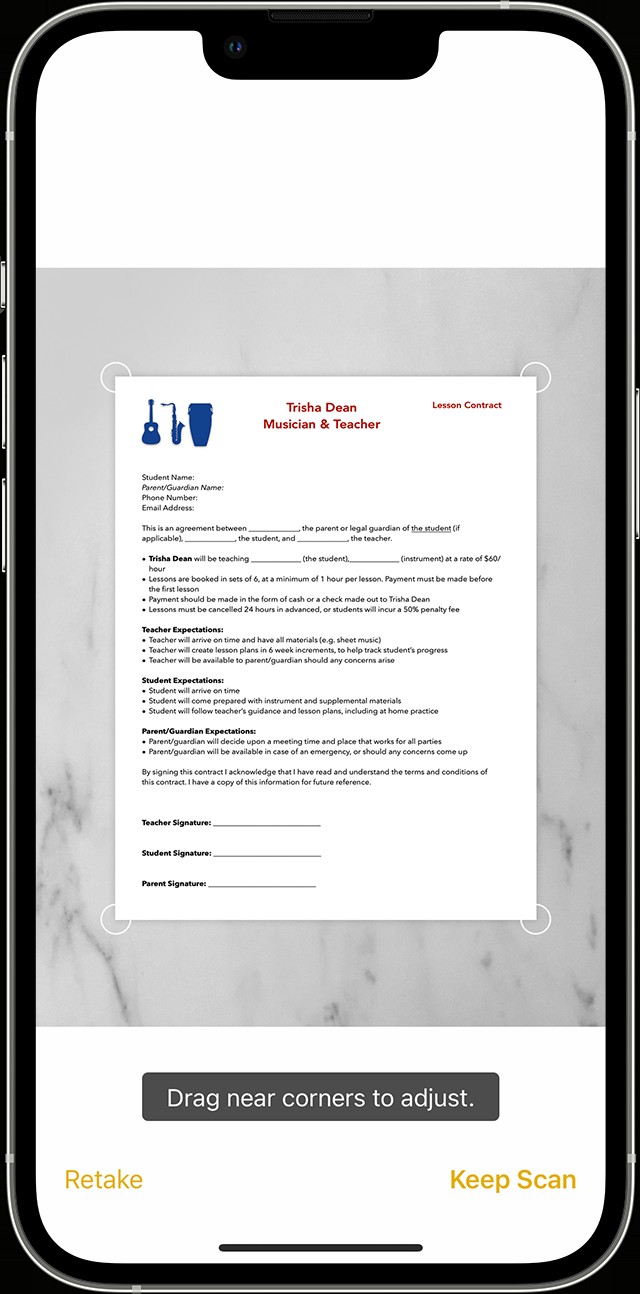
Adjust and Keep Scan: After capturing, your iPhone will likely detect the document’s edges. If necessary, drag the corners of the scan to precisely adjust the crop and ensure the entire page is included. Once you are satisfied with the scan area, tap Keep Scan.
-
Save or Add More Pages: You can now tap Save to finalize your scanned document. If you have multiple pages to scan, tap Rescan to capture additional pages and repeat steps 3-5. All scanned pages will be combined into a single document.
 Scanning a document with the iPhone camera in the Notes app.
Scanning Documents Using the Files App
For users who prefer to organize their scanned documents directly within the Files app, or for those who frequently work with files, the Files app provides another excellent scanning option.
Step-by-Step Guide to Scanning in Files
-
Open the Files App: Locate and open the Files app on your iPhone.
-
Access the Scan Documents Feature: In the Files app, tap the More button (represented by three dots in a circle, usually located in the top right or bottom right corner depending on your view). From the menu that appears, select Scan Documents.
-
Position and Capture Your Document: Just like with the Notes app, place your document on a flat surface and position your iPhone camera over it. The scanning process is identical to the Notes app – it may scan automatically or require you to tap the Shutter button or Volume buttons.
-
Adjust and Keep Scan: Adjust the corners of the scanned image if needed to perfectly frame your document, then tap Keep Scan.
-
Save Your Scanned Document: Tap Save to save the scanned document directly into your Files app. You can choose the location to save it within your Files structure for easy organization.
Signing Documents in Notes After Scanning
Beyond just scanning, the Notes app also lets you sign documents digitally, which is incredibly useful for forms or agreements.
Step-by-Step Guide to Signing
-
Open Your Scanned Document: In the Notes app, open the note containing the document you wish to sign. Then, tap on the scanned document to view it.
-
Enter Markup Mode: Tap the Markup button (it looks like a pen tip in a circle, often located in the top right corner). This will open up annotation tools.
Alt text: The Markup icon in the iPhone Notes app interface, used to access annotation and signature tools for scanned documents.
-
Add Your Signature: Tap the Add button (plus sign icon), and then select Signature from the options.
Alt text: The Signature icon within the Markup menu of the iPhone Notes app, allowing users to add digital signatures to documents.
-
Create or Insert a Signature: You can choose to add a saved signature if you’ve created one before, or tap Create New Signature to draw a new signature using your finger or an Apple Pencil (if you have a compatible iPad). Adjust the size and position of your signature on the document as needed.
-
Finalize Your Signature: Once your signature is placed correctly, tap Done. Your document is now signed and saved.
Conclusion
Scanning documents on your iPhone is remarkably simple and efficient thanks to the built-in capabilities of the Notes and Files apps. Whether you need to quickly digitize a receipt, a contract, or any paper document, your iPhone is ready to help. Explore these features and discover how they can streamline your document management and boost your productivity on the go.
