Scheduling emails in Outlook is a fantastic feature that can significantly boost your productivity and communication efficiency. Imagine perfectly timing your messages to land in inboxes when they’re most likely to be seen, regardless of your own work hours.
However, navigating Outlook’s scheduling options, especially with its evolving interface, can sometimes feel confusing. If you’ve ever felt lost trying to schedule an email, you’re not alone.
This guide is designed to walk you through the process of scheduling emails in various Outlook versions, ensuring you can master this useful feature no matter which version you’re using. Beyond basic scheduling, we’ll also explore how to overcome limitations and enhance your email scheduling capabilities.
Let’s dive into the step-by-step methods for scheduling your emails in Outlook.
Scheduling Emails in Different Outlook Versions
Outlook offers a built-in feature called “delay delivery” (now often referred to as “schedule send”) to allow you to compose an email now and send it at a later date and time. The exact steps vary slightly depending on whether you are using Web Outlook, Classic Outlook, or the New Outlook application. Let’s break down the process for each.
For Web Outlook (Microsoft 365)
The web version of Outlook, often accessed through a browser with Microsoft 365, has streamlined the scheduling process. While the terminology has shifted, the functionality is straightforward once you know where to look.
Here’s how to schedule emails in Web Outlook:
- Compose Your Email: Begin by creating a new email as you normally would. Add your recipients in the “To,” “Cc,” or “Bcc” fields, and craft your subject line and email body.
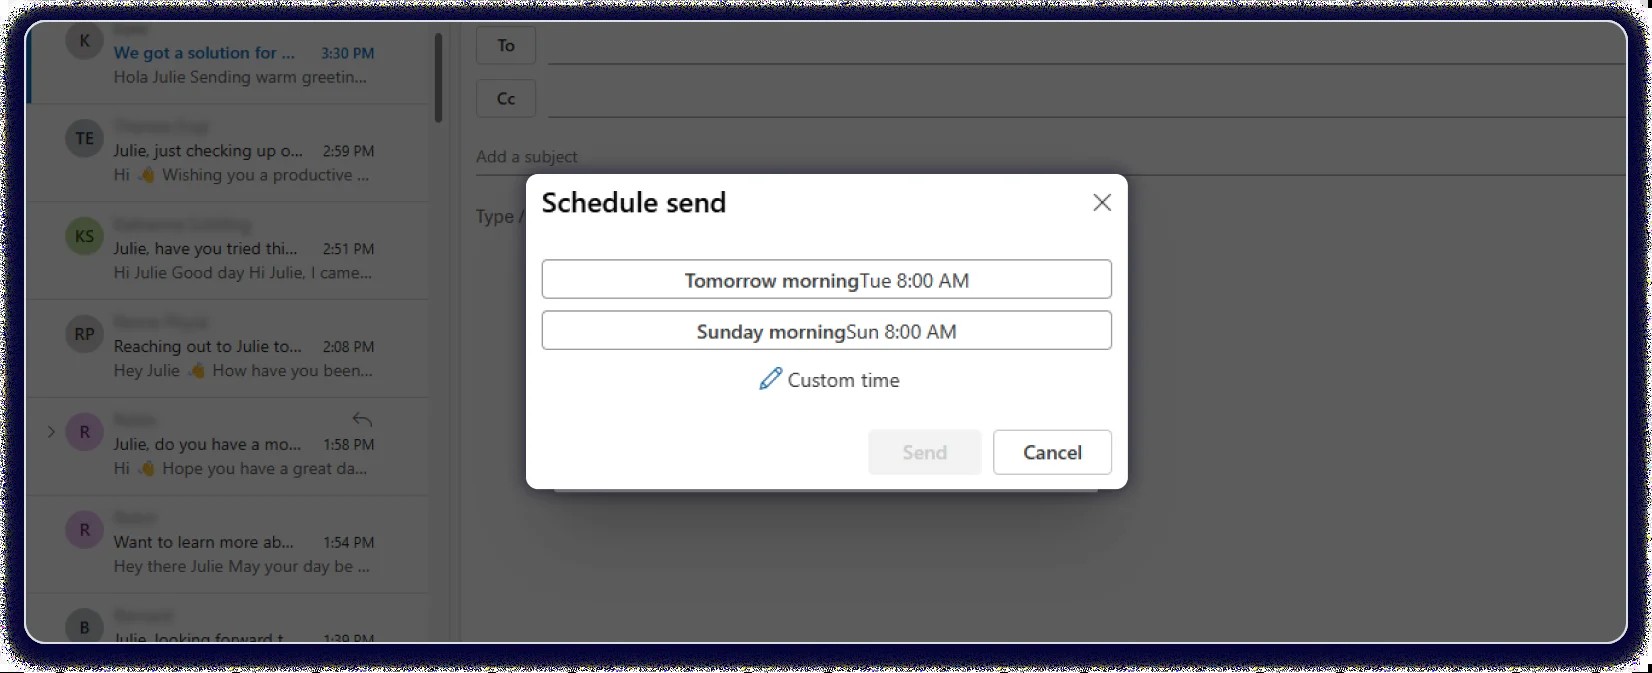
- Access Schedule Send: Instead of clicking the prominent “Send” button immediately, locate the downward arrow (⌄) right next to it. Click this arrow to reveal a dropdown menu. From the menu, select “Schedule send”.
- Choose Delivery Time: A “Schedule send” panel will appear. You’ll be presented with pre-set time options like “Tomorrow morning” or “Tomorrow afternoon.” You can choose one of these for quick scheduling. For more precise timing, select “Custom time” to specify your preferred date and time. Once you’ve made your selection, click “Send”.
After clicking “Send,” your email will be saved in your “Drafts” folder. It will remain there and be automatically sent at the time you scheduled.
Need to make changes? If you need to send your scheduled email immediately or adjust the schedule, navigate to your “Drafts” folder. Select the scheduled email, and click the “Edit” (pen) icon. From there, you can choose “Send now” or reschedule by repeating step 3.
For Classic Outlook
While less common now, some users, particularly in more traditional office environments, still utilize the Classic Outlook desktop application. Scheduling emails in Classic Outlook involves using the “Delay Delivery” feature, which is found in a different menu location.
Follow these steps to schedule emails in Classic Outlook:
- Create Your Email: Begin by composing your email as usual, filling in recipients, subject line, and the body of your message.
- Access Delay Delivery Options: Once your email is ready, look for the “Options” tab in the Outlook ribbon at the top of your email composition window. Click on “Options,” and then locate and select “Delay Delivery”.
- Set Delivery Time: Clicking “Delay Delivery” will open a “Properties” dialog box. Within this box, find the “Delivery options” section. Check the box labeled “Do not deliver before”. Once checked, you can then select your desired date and time for email delivery using the date and time pickers provided.
- Send Your Email: After setting your desired date and time, click “Close” in the “Properties” dialog box, and then click “Send” in your email composition window. Your email will be moved to the “Outbox” folder and will be automatically sent at the scheduled date and time.
For New Outlook App
The New Outlook application represents Microsoft’s latest iteration of the desktop email client, aiming for a more modern and user-friendly experience. Scheduling emails in the New Outlook App is designed to be intuitive, mirroring the simplicity of Gmail’s scheduling feature.
Here’s the process for scheduling emails in the New Outlook App:
- Compose Your Email: Start by creating a new email and completing all the essential fields – recipients, subject line, and your email content.
- Find “Schedule Send”: Similar to Web Outlook, look for the downward arrow (⌄) located next to the “Send” button. Click this arrow, and from the dropdown menu, select “Schedule send”.
- Select Date and Time: A “Schedule send” popup will appear, offering you pre-defined time options for scheduling your email. You can choose from these options for convenience, or select “Custom time” to set a specific date and time for delivery.
- Confirm Schedule: After selecting your preferred time, click “Send”. Your email will be saved to your “Drafts” folder and automatically sent at the scheduled time.
To modify a scheduled email in the New Outlook App, simply go to your “Drafts” folder and click on the email you want to edit. You’ll have the option to change the content, adjust the delivery timing, or send the email immediately.
Troubleshooting Common Issues with Outlook Scheduling
While Outlook’s scheduling features are generally reliable, users occasionally encounter issues. One common point of confusion, particularly with updates to Outlook, has been the renaming and repositioning of the scheduling feature itself.
In early 2024, some users reported that the “schedule send” feature seemed to be missing after Outlook updates. This wasn’t due to the feature being removed, but rather due to changes in terminology and UI placement. Microsoft shifted from the term “Delay Delivery” to “Schedule send,” and relocated the option within the email composition interface.
This change, while intended to simplify the user experience, initially caused frustration as users accustomed to “Delay Delivery” struggled to locate the equivalent “Schedule send” option. The key takeaway is to look for the dropdown arrow next to the “Send” button in both Web Outlook and the New Outlook App to access the scheduling functionality.
If you are still having trouble finding the schedule send feature, carefully review the steps outlined above for your specific Outlook version. Ensuring you are looking in the correct location, whether it’s the dropdown next to “Send” or the “Options” menu in Classic Outlook, should resolve most location-related issues.
Advanced Email Scheduling with Tools like Saleshandy
While Outlook’s built-in scheduling is useful for individual emails, it can become limited when you need to manage more complex email outreach, such as marketing campaigns or large-scale personalized communication. For these scenarios, specialized email outreach platforms like Saleshandy offer advanced capabilities.
Saleshandy is a dedicated cold email software designed to automate and enhance your email outreach directly from your Gmail or Outlook accounts. It allows you to schedule and send thousands of personalized emails with features that go beyond Outlook’s native capabilities.
Here’s how you can schedule emails in Outlook using Saleshandy:
Step-by-Step Guide to Scheduling with Saleshandy
- Sign Up for Saleshandy: Visit the Saleshandy signup page and create your account. Verify your email address via the confirmation link sent to you.
- Connect Your Outlook Account: Once logged in, navigate to “Settings” and then “Email Accounts.” Click “Add Email Account” and follow the prompts to connect your Outlook email account to Saleshandy. Saleshandy allows you to connect multiple email accounts (up to 50) for improved email deliverability in larger campaigns.
- Add Your Recipients (Prospects): Go to the “Prospects” section in your Saleshandy dashboard. You can add recipients individually or import a list in bulk using a CSV file.
- Create an Email Sequence: Navigate to the “Sequences” section and click “Create Sequence.” Here, you can craft personalized emails using merge tags and variables. Crucially, you can also schedule automated follow-up emails to be sent if recipients don’t respond to your initial message.
- Define Your Sending Schedule: Go to “Settings” and then the “Schedules” tab. Click “Add Schedule” to create a pre-set sending schedule. You can name your schedule, select your time zone, and specify the days and times you want your emails to be sent.
- Launch Your Email Campaign: Return to the “Sequences” tab and activate your created sequence by toggling the “Activate Sequence” switch. Saleshandy will then automatically send your scheduled emails according to your defined schedule.
How to Manage and Track Scheduled Emails in Outlook
Outlook provides a way to check on your scheduled emails, although it doesn’t offer proactive notifications about successful sending or delivery failures. To monitor your scheduled emails within Outlook itself, you can utilize the “Outbox” folder and customize your view to track scheduled delivery times.
Here’s how to track your scheduled emails in Outlook:
- Open the Outbox Folder: In Outlook, navigate to and open your “Outbox” folder. This folder is where emails are temporarily stored before being sent, including scheduled emails.
- Access Field Chooser: Right-click on the column header bar within your email list in the “Outbox.” From the context menu that appears, select “Field Chooser”.
- Add “Defer Until” Column: In the “Field Chooser” dialog box, locate the “Defer Until” field. Drag and drop this field header into the column header bar in your “Outbox,” placing it next to columns like “Subject.” This will add a “Defer Until” column to your Outbox view.
The “Defer Until” column will now display the scheduled send date and time for each email in your “Outbox,” allowing you to easily see which emails are scheduled and when they are set to be sent.
Limitations of Native Outlook Scheduling for Email Campaigns
While Outlook’s built-in scheduling is convenient for individual emails, it has limitations when it comes to larger email campaigns or more sophisticated outreach efforts:
- Limited Personalization: Outlook’s native features offer basic personalization, such as inserting names. However, it lacks advanced personalization options needed for truly tailored email campaigns.
- Difficult Campaign Management: Organizing and managing large-scale, segmented email campaigns with Outlook’s built-in scheduling can become cumbersome and inefficient.
- No Performance Tracking: Outlook does not provide built-in analytics to track email performance metrics like open rates, click-through rates, or reply rates, which are crucial for campaign optimization.
- Lack of Automated Follow-ups: Outlook does not offer automated follow-up email sequences. Manual follow-up is required for recipients who don’t respond, which is time-consuming for large campaigns.
For users who need to conduct effective email marketing or outreach campaigns, dedicated cold email software is generally recommended. These tools, like Saleshandy, are designed to overcome the limitations of native email clients by offering features like advanced personalization, campaign management, performance tracking, and automated follow-ups.
Key Takeaways
To effectively schedule emails in Outlook, remember these key points:
- “Schedule send” is the new “Delay delivery”: Be aware of the terminology change in newer Outlook versions. Look for “Schedule send” options.
- New Outlook is streamlined: The New Outlook and Web Outlook offer a simpler and faster scheduling process compared to Classic Outlook.
- Tools enhance bulk scheduling: For extensive email scheduling needs, especially for campaigns, consider using tools like Saleshandy to overcome the limitations of Outlook’s native features.
FAQs
1) How to schedule an email to send later in Outlook?
To schedule an email in Outlook for later delivery, compose your email, then use the “Schedule send” (or “Delay Delivery” in Classic Outlook) option to select your desired future date and time before sending.
2) Does Outlook delay delivery work even if the computer is asleep?
Yes, Outlook’s schedule send feature works even if your computer is in sleep mode. The scheduling information is stored on the email server, ensuring delivery at the set time, provided your Outlook is in online mode when scheduling.
3) How to remove delay delivery in Outlook?
To remove or edit a scheduled email, go to your “Drafts” folder. Open the scheduled email, and you will have the option to edit the content, change the scheduled time, or choose to “Send now” to override the schedule.
4) Does Outlook delay delivery work if the computer is off?
Yes, Outlook’s delayed delivery/schedule send feature is server-side. Your computer does not need to be on at the scheduled send time for the email to be sent.
5) Can you edit a scheduled email in Outlook?
Yes, you can easily edit a scheduled email in Outlook. Simply locate the email in your “Drafts” folder, open it to make your changes, and then click “Send” again to reschedule it with the modifications.