Taking a screenshot on your PC is a fundamental skill in today’s digital world. Whether you need to capture important information, share something visually, or record evidence, knowing how to screenshot on PC is essential. This guide will walk you through various methods to easily capture your screen on both Windows and Mac operating systems, ensuring you become a screenshot pro in no time.
Understanding Screenshots on Your PC
Before diving into the methods, let’s clarify what a screenshot is and why it’s so useful. A screenshot, also known as a screen capture, is a digital image of your computer screen’s display. Think of it as taking a photo of whatever is currently on your monitor.
Why are screenshots so valuable?
- Information Sharing: Quickly show someone exactly what you’re seeing on your screen, whether it’s an error message, a website layout, or a funny meme.
- Tutorials and Guides: Create visual step-by-step instructions for software usage or online processes.
- Record Keeping: Save important online receipts, chat conversations, or any on-screen information for future reference.
- Troubleshooting: Capture error messages or system behavior to share with tech support for quicker assistance.
- Evidence Collection: As highlighted in the original context, screenshots can be crucial for documenting instances of cyberbullying or online harassment.
Now that you understand the importance, let’s explore how to screenshot on PC using different techniques.
How to Screenshot on Windows PC
Windows offers several built-in tools and shortcuts to capture your screen. Here are the most common and effective methods:
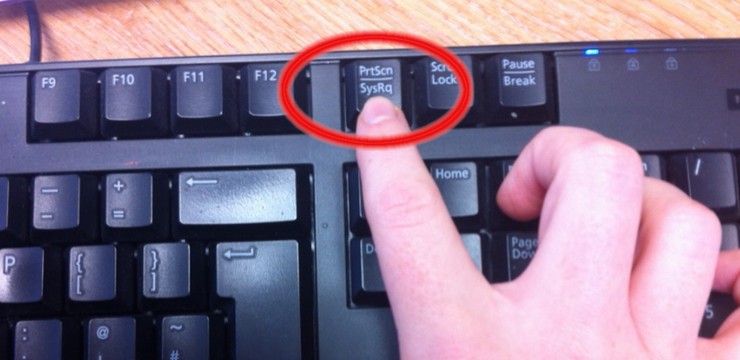
Using the Print Screen (PrtScn) Key
The simplest way to take a full-screen screenshot on Windows is by using the Print Screen key (often labeled PrtScn or Print Scrn). This key is usually located in the top right area of your keyboard.
- Capture the entire screen: Press the PrtScn key. This action copies an image of your entire screen to the clipboard – a temporary storage area in your computer’s memory.
- Paste the screenshot: To view and save the screenshot, you need to paste it into an application like Paint, Word, or any image editing software. Open your desired program and press Ctrl + V (or right-click and select “Paste”). The screenshot will appear, and you can then edit, save, or share it.
Capturing Only the Active Window
If you only want to screenshot the currently active window (the window you are currently working in), use the following shortcut:
- Capture the active window: Press Alt + PrtScn keys simultaneously. This will capture only the active window and copy it to the clipboard.
- Paste the screenshot: Open an image editing program and paste (Ctrl + V) the captured window to view, edit, and save it.
Using the Snipping Tool
For more control and editing options, Windows provides the Snipping Tool. This built-in utility allows you to capture specific portions of your screen and annotate them.
- Open Snipping Tool: Search for “Snipping Tool” in the Windows search bar and open the application.
- Choose a Snip type: Click on “Mode” to select the type of screenshot you want to take:
- Free-form Snip: Draw a freehand shape around the area you want to capture.
- Rectangular Snip: Drag a rectangle to select a specific area.
- Window Snip: Capture a single window.
- Full-screen Snip: Capture the entire screen (similar to PrtScn).
- Take the screenshot: Click “New” and follow the instructions based on the Snip type you selected.
- Edit and Save: The captured screenshot will open in the Snipping Tool window, where you can use pen and highlighter tools to annotate it. Click the “Save Snip” button to save your screenshot as an image file.
How to Screenshot on Mac
Mac also offers easy-to-use keyboard shortcuts for screen capturing. Here are the primary methods for how to screenshot on a Mac:
Using Keyboard Shortcuts
Mac’s keyboard shortcuts provide flexibility in capturing your entire screen or selected portions.
- Screenshot the entire screen: Press Command + Shift + 3 keys together. This instantly captures your entire screen and saves it as a file on your desktop.
- Screenshot a selected area: Press Command + Shift + 4 keys together. Your cursor will change to a crosshair. Click and drag to select the area you want to capture. Once you release the mouse button, the screenshot will be saved as a file on your desktop.
- Screenshot a specific window: Press Command + Shift + 4 keys together, then press the Space bar. The cursor will change to a camera icon. Click on the window you want to capture. This will screenshot only the selected window and save it to your desktop.
Using the Grab Utility
Similar to Windows’ Snipping Tool, macOS has a built-in utility called Grab. While less commonly used now due to the convenient keyboard shortcuts, Grab offers more options for timed screenshots and window captures. You can find Grab in the Utilities folder within Applications.
Tips for Effective Screenshots
- Keep it relevant: Only capture the necessary information to avoid clutter and make your screenshots clear and concise.
- Annotate when needed: Use editing tools to highlight important areas or add notes to your screenshots for better communication.
- Choose the right format: Save your screenshots in common image formats like JPG or PNG for easy sharing and viewing. PNG is generally better for screenshots with text and graphics, while JPG is suitable for photographic images.
- Organize your screenshots: If you take screenshots frequently, create folders to organize them for easy retrieval.
Mastering how to screenshot on PC is a valuable skill that enhances your digital literacy and productivity. By utilizing these simple methods on Windows and Mac, you can efficiently capture and share visual information whenever you need to. Practice these techniques to become proficient and make the most of screen capturing in your daily computer usage.