In today’s digital age, capturing what’s on your screen has become an indispensable skill. Whether you’re saving important information, sharing a funny online moment, or documenting evidence, knowing how to screenshot on your computer is essential. This guide will walk you through various methods to take screenshots on both Windows and macOS systems, ensuring you’re equipped to capture your screen effortlessly.
What is a Screenshot and Why is it Useful?
A screenshot, also known as a screen capture or screengrab, is simply a digital image of your computer screen. Think of it as taking a photo of whatever is displayed on your monitor. This image is saved as a graphics file, allowing you to easily share, edit, or store it for later use.
Screenshots are incredibly versatile and serve numerous purposes. They are invaluable for:
- Creating Tutorials and Guides: Demonstrating software functions or online processes becomes much clearer with visual aids. Screenshots allow you to show, step-by-step, exactly what a user needs to do.
- Preserving Information: Capture online receipts, important chat conversations, or fleeting online content that you might need to refer back to later, even if the original source changes or disappears.
- Technical Support and Communication: When encountering computer issues, a screenshot can instantly show tech support or friends exactly what you’re seeing, making troubleshooting much faster and more efficient.
- Documenting Errors: Capture error messages or glitches as evidence when reporting software bugs or website problems.
- Cyberbullying Evidence: As highlighted in the original context, screenshots are crucial for recording instances of cyberbullying, providing concrete proof for reporting and intervention.
- Sharing Moments: Quickly share funny social media posts, interesting articles, or anything visually engaging you find online with friends and family.
Knowing how to take screenshots efficiently can significantly enhance your digital productivity and communication. Let’s explore the methods for different operating systems, starting with Windows.
How to Screenshot on Windows
Windows offers several built-in tools and keyboard shortcuts to capture your screen. Here are the most common and effective methods:
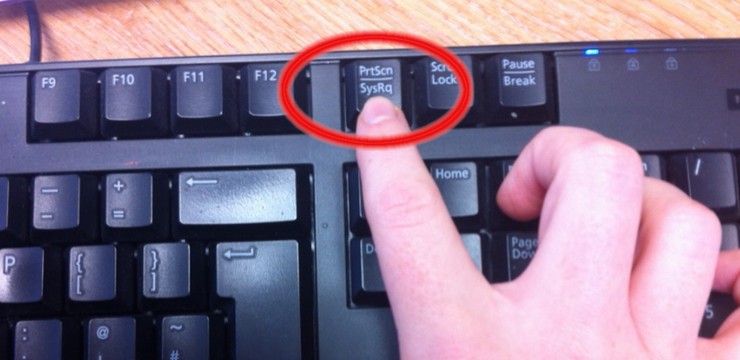
1. Using the Print Screen (PrtScn) Key for a Full-Screen Capture
The most straightforward way to take a screenshot of your entire screen in Windows is by using the Print Screen key. This key is usually located in the top right area of your keyboard, often labeled as PrtScn, Print Scrn, or similar.
Steps:
- Press the PrtScn key. Simply tap the Print Screen key once. You won’t see any visual confirmation immediately.
- Open an image editing program. The screenshot is copied to your clipboard, which is a temporary storage area in your computer’s memory. To view and save the screenshot, you need to paste it into an application. Popular choices include:
- Paint: A basic image editor included with Windows.
- Paint 3D: A more advanced version of Paint, also pre-installed on many Windows systems.
- Microsoft Word or other document editors: You can paste screenshots directly into documents.
- Image editing software like Adobe Photoshop or GIMP: For more advanced editing options.
- Paste the screenshot. In your chosen program, use the keyboard shortcut Ctrl + V (hold down the Ctrl key and press V) or right-click and select “Paste”. The full-screen screenshot will appear in the program window.
- Edit and Save. You can now crop, annotate, or make other edits to your screenshot before saving it as an image file (like JPEG or PNG).
Alt text: Close-up of a keyboard highlighting the Print Screen (PrtScn) key, demonstrating how to capture a full screen screenshot on Windows.
2. Capturing the Active Window with Alt + PrtScn
If you only want to capture the currently active window (the window you are currently working in), use the Alt + Print Screen shortcut.
Steps:
- Make sure the window you want to capture is active. Click on the window to bring it to the foreground.
- Press Alt + PrtScn keys together. Hold down the Alt key and then press the Print Screen key.
- Paste into an image editor. Open Paint or another image editor and paste the screenshot using Ctrl + V.
- Edit and Save. The screenshot of only the active window will be pasted, ready for editing and saving.
3. Using the Snipping Tool for Flexible Screenshots
Windows includes a handy utility called Snipping Tool that provides more flexibility in capturing screenshots. It allows you to capture specific portions of your screen, free-form selections, or window captures.
Steps to use Snipping Tool (available in Windows 7, 8, 10, and 11):
- Open Snipping Tool. Search for “Snipping Tool” in the Windows search bar and open the application.
- Choose a Snip Type. Click on “Mode” to select the type of screenshot you want:
- Free-form Snip: Draw a freehand shape around the area you want to capture.
- Rectangular Snip: Drag a rectangle to select a specific area.
- Window Snip: Capture a single window (like Alt + PrtScn, but with visual selection).
- Full-screen Snip: Captures the entire screen (like PrtScn).
- Click “New” (or “Delay” for timed screenshots). The screen will dim, and you can then select the area you want to capture based on your chosen snip type.
- Edit and Save. The captured snip will open in the Snipping Tool window, where you can use basic annotation tools (pen, highlighter, eraser) and then save the screenshot.
4. Windows Key + Shift + S Shortcut (Snip & Sketch – Windows 10 and 11)
For Windows 10 and 11 users, a modern and efficient way to take screenshots is using the Windows Key + Shift + S shortcut. This activates the Snip & Sketch tool (previously called Screen Sketch).
Steps:
- Press Windows Key + Shift + S keys together. The screen will dim, and your cursor will change to a crosshair.
- Select the area to capture. Drag your cursor to select a rectangular area of your screen.
- Screenshot is copied to clipboard. The selected portion of your screen is instantly captured and copied to your clipboard. A notification will also appear allowing you to open and annotate the screenshot in the Snip & Sketch application.
- Paste or Annotate. You can paste the screenshot directly into any application (Ctrl + V) or click the notification to open Snip & Sketch for annotations and saving.
How to Screenshot on macOS
macOS also provides several methods for taking screenshots, primarily through keyboard shortcuts and the Grab utility (older macOS versions) or the Screenshot app (newer versions).
1. Keyboard Shortcuts for Screenshots on macOS
macOS offers powerful keyboard shortcuts for different types of screenshots:
- Shift + Command + 3: Capture the Entire Screen
- Press and hold the Shift, Command (⌘), and 3 keys simultaneously.
- A screenshot of your entire screen will be taken and automatically saved as a file on your desktop.
Alt text: A hand pressing the Command (⌘), Shift, and 3 keys on a Mac keyboard, illustrating how to take a full screen screenshot on macOS.
-
Shift + Command + 4: Capture a Selected Portion
- Press and hold the Shift, Command (⌘), and 4 keys simultaneously.
- Your cursor will change to a crosshair. Drag the crosshair to select the area you want to capture.
- Once you release the mouse button, a screenshot of the selected area will be taken and saved to your desktop.
-
Shift + Command + 5: Open the Screenshot Toolbar (macOS Mojave and later)
- Press and hold Shift, Command (⌘), and 5 keys together.
- This opens a toolbar at the bottom of your screen with various screenshot options:
- Capture Entire Screen
- Capture Selected Window
- Capture Selected Portion
- Record Entire Screen
- Record Selected Portion
- You can also find options for saving location, timer, and microphone recording (for screen recordings).
2. Using the Grab Utility (Older macOS) or Screenshot App (Newer macOS)
For older macOS versions, Grab is a utility for taking screenshots. In newer macOS versions (macOS Mojave and later), the Screenshot app replaces Grab and is accessible via Shift + Command + 5.
Using Grab (Older macOS):
- Open Grab. Find Grab in the Utilities folder within Applications, or use Spotlight search (Command + Spacebar and type “Grab”).
- Select Capture Type. In the Grab menu bar, click “Capture” and choose from:
- Selection: Capture a selected area (similar to Shift + Command + 4).
- Window: Capture a specific window.
- Screen: Capture the entire screen (similar to Shift + Command + 3).
- Timed Screen: Capture the entire screen after a 10-second delay.
- Take the Screenshot. Follow the on-screen prompts to select the area or window, or wait for the timed screenshot.
- Save the Screenshot. The screenshot will open in a new window. Go to File > Save to save it.
Using Screenshot App (Newer macOS – via Shift + Command + 5 toolbar):
- Open Screenshot Toolbar. Press Shift + Command + 5.
- Choose Options. Select your desired capture type from the toolbar icons (Entire Screen, Selected Window, Selected Portion).
- Capture and Save. Click “Capture” or drag to select an area, depending on your chosen option. Screenshots are typically saved to the desktop, but you can change the save location in the “Options” menu on the toolbar.
Screenshots on Smartphones and Tablets (Brief Overview)
While this guide focuses on computers, it’s worth noting that taking screenshots on smartphones and tablets is also straightforward. The methods vary slightly depending on the device’s operating system (Android or iOS). Generally, it involves pressing a combination of buttons, usually the power button and volume down or home button simultaneously. A quick online search for “how to screenshot on [your phone model]” will provide specific instructions for your device.
Conclusion
Mastering the art of taking screenshots on your computer is a valuable skill in today’s digital world. Whether you’re a Windows or macOS user, the methods outlined above will empower you to capture your screen for various purposes, from creating helpful guides to preserving important information and documenting online experiences. Practice these techniques to become proficient at screen capturing and enhance your digital toolkit.