Screenshots are an indispensable tool in our daily digital lives. Whether you’re capturing a funny meme, saving important information, or creating a tutorial, knowing how to take a screenshot is essential. If you’re a Dell computer user, you’re in luck! Dell computers running Windows offer several easy ways to capture your screen. This guide will walk you through various methods to screenshot on your Dell computer, ensuring you can capture exactly what you need, every time.
Understanding the Print Screen Key on Your Dell
The key to taking screenshots on most Dell computers lies in the Print Screen key. This key, often abbreviated as PrtScr, PrntScrn, or similar variations on different keyboards, is your gateway to capturing your screen. Let’s locate it on your Dell desktop or laptop.
On a desktop Dell keyboard, the Print Screen key is typically found in the upper right-hand corner, often next to the F12 key and Scroll Lock. It’s usually clearly labeled, although the abbreviation might vary slightly depending on your specific keyboard model.
Figure 1: Illustration of the print screen key on a Dell KM5221W wireless keyboard
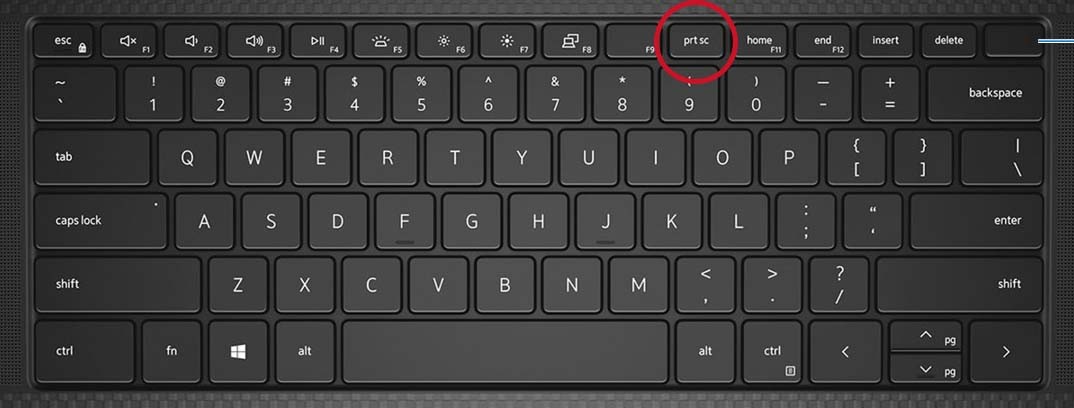
For Dell laptops, the Print Screen key’s location can vary a bit more. It’s commonly found on the Function key row (F1 to F12). Often, you’ll need to press the Fn (Function) key in conjunction with the PrtScr key to activate the screenshot function. This is because laptop keyboards are more compact, and some keys serve dual purposes. Look for “PrtScr” or a similar abbreviation on one of your Function keys, often F10.
Figure 2: Illustration of the print screen key on a Dell Precision 5550 mobile workstation keyboard
Some Dell laptops feature capacitive touch Function key rows. On these models, you might need to press the Fn key first to illuminate the function keys and then locate and use the PrtScr key. Always refer to your Dell laptop’s user manual for the most precise location if you’re unsure.
Figure 3: Illustration of a laptop with a capacitive Function Key row
Note: In rare cases, some Dell laptop keyboards might not have a dedicated Print Screen key. If you can’t find it, try pressing Fn + Insert keys together, as this combination sometimes performs the Print Screen function on these models.
Different Ways to Screenshot on Dell Windows Systems
Windows offers several built-in shortcuts using the Print Screen key to capture different parts of your screen on your Dell computer.
Capturing the Entire Screen
To capture everything visible on your Dell computer screen, here are a couple of methods:
- Windows Key + PrtScr: Pressing the Windows logo key and the PrtScr key simultaneously will take a screenshot of your entire screen and automatically save it as a file. You can find these screenshots in the Screenshots folder within your Pictures library. This is a quick and convenient way to save full-screen captures directly.
- PrtScr key (Clipboard Capture): Simply pressing the PrtScr key alone will also capture the entire screen. However, instead of saving it as a file, it copies the screenshot to your clipboard. This means the screenshot is temporarily stored in your computer’s memory, ready to be pasted into another application.
- Windows logo button + Volume Down (Tablets): If you are using a Dell tablet running Windows, you can capture the entire screen by pressing the Windows logo button and the volume down button at the same time. Similar to the Windows Key + PrtScr method, this will usually save the screenshot to the Screenshots folder.
Capturing Active Windows
Sometimes, you only need to capture a specific window you are currently working in, rather than the entire screen. Dell computers provide shortcuts for this too:
- PrtScr key (All Active Windows): While less common for capturing only the active window, pressing PrtScr alone, after ensuring the specific window is active, will capture all active windows. If you have multiple windows open, this method will capture all of them.
- Alt + PrtScr (Single Active Window): To capture only the currently active window (the window you are currently working in and is in the foreground), press the Alt key and the PrtScr key together. This method is perfect for capturing specific application windows without including the entire desktop.
Pasting and Using Your Screenshots
Once you’ve taken a screenshot using any of the PrtScr key methods (excluding Windows Key + PrtScr which saves directly), the image is on your clipboard. To use or edit it, you need to paste it into an application.
- Open an Application: Launch an image editing program like Microsoft Paint, Paint 3D, Adobe Photoshop, or even a document editor like Microsoft Word or an email client.
- Paste the Screenshot: In the application, use the keyboard shortcut Ctrl + V (hold down the Ctrl key and press V). This will paste the screenshot from your clipboard into the application window.
From here, you can edit the screenshot, crop it, add annotations, or save it in your desired image format.
Advanced Screenshotting with Snipping Tool
For more versatile screenshot options on your Dell computer, Windows includes the Snipping Tool. This built-in utility offers different screenshot modes, including:
- Rectangular Snip: Drag a rectangle to capture a selected area.
- Free-form Snip: Draw a freehand shape around the area you want to capture.
- Window Snip: Capture a specific window by selecting it.
- Full-screen Snip: Captures the entire screen (similar to PrtScr).
The Snipping Tool also provides basic annotation features, allowing you to draw or highlight directly on your screenshots before saving them. To access the Snipping Tool, simply search for “Snipping Tool” in the Windows search bar. For more detailed instructions on using the Snipping Tool, you can refer to Microsoft’s support page.
Conclusion
Taking screenshots on your Dell computer is straightforward and efficient using the Print Screen key and Windows built-in features. Whether you need to capture the entire screen, a specific window, or just a selected portion, Dell computers offer multiple methods to suit your needs. From quick clipboard captures to saved image files and advanced tools like the Snipping Tool, you have various options at your fingertips. Experiment with these methods to find the screenshot techniques that work best for you and enhance your daily computer usage.