Taking a screenshot on your Dell laptop is a fundamental skill, whether you’re capturing a funny meme, preserving important information, or creating a tutorial. Fortunately, Dell laptops, like most Windows-based machines, offer several easy methods to capture your screen. This guide will walk you through everything you need to know about how to screenshot on a Dell laptop, ensuring you never miss a screen-worthy moment.
Understanding the Print Screen Key on Your Dell Laptop
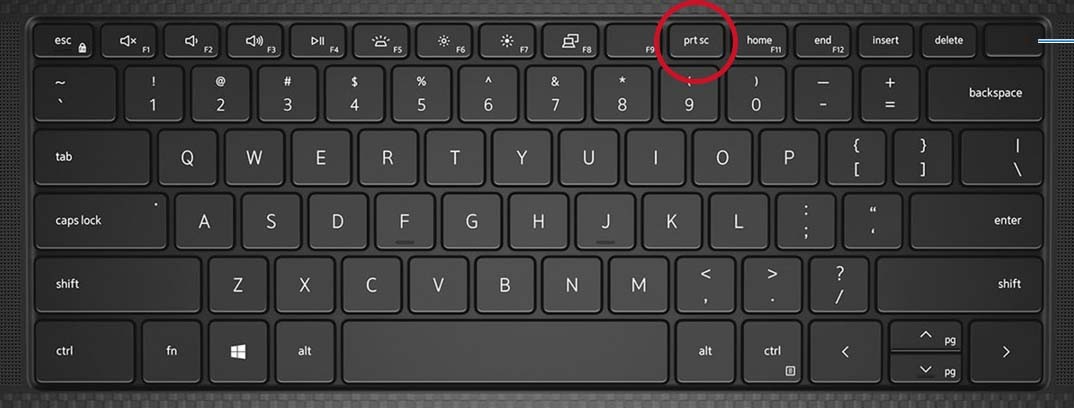
The cornerstone of taking screenshots on Dell laptops is the Print Screen key. This key, often abbreviated as PrtScr, PrntScrn, or similar variations, is your gateway to capturing what’s on your screen. On a standard desktop keyboard, you’ll typically find the Print Screen key located in the upper right-hand corner, often near the F12 key and the Scroll Lock key.
However, on Dell laptops, the location can vary slightly. Usually, the Print Screen function is integrated with the Function keys (F1 to F12) located at the top of your keyboard. You might find “PrtScr” printed on the F10 key, or another key in that row. To activate the Print Screen function on these laptops, you’ll often need to press and hold the Fn (Function) key, usually located near the bottom left corner of your keyboard, in conjunction with the designated Print Screen key.
It’s worth noting that some Dell laptop models, especially compact designs, might not have a dedicated Print Screen key at all. In these cases, the Print Screen function is often assigned to the Insert key, requiring you to press Fn + Insert to take a screenshot. If you are unsure, consulting your Dell laptop’s user manual is always a helpful step.
Figure 1: Example of Print Screen key location on a Dell desktop keyboard.
Figure 2: Print Screen function integrated with a Function key on a Dell laptop keyboard.
Different Ways to Screenshot on a Dell Laptop
Windows operating systems offer multiple ways to utilize the Print Screen key and other tools to capture screenshots on your Dell laptop. Here are the most common methods:
1. Capture the Entire Screen
This is the simplest method and captures everything visible on your display.
-
Method: Press the PrtScr key (or Fn + PrtScr on some laptops, or Fn + Insert on others).
- Result: The screenshot is copied to your clipboard. You won’t see any visual confirmation, but the image is there, ready to be pasted.
-
To save the screenshot as a file:
- Press Windows key + PrtScr (or Windows key + Fn + PrtScr, or Windows key + Fn + Insert depending on your laptop).
- Result: Your screen will briefly dim, and the screenshot is automatically saved as a PNG file in the “Screenshots” folder within your “Pictures” library. This is a quick way to save full-screen captures without needing to paste them into an application first.
2. Capture All Active Windows
If you have multiple windows open and want to capture all of them in a single screenshot, this method is for you.
-
Method: Press the Alt + PrtScr keys together (or Alt + Fn + PrtScr, or Alt + Fn + Insert).
- Result: A screenshot of all currently active windows is copied to your clipboard.
3. Capture a Single Active Window
Sometimes, you only need to capture a specific window, like a browser window or a document.
-
Method:
- Click on the window you want to capture to make it the active window.
- Press the Alt + PrtScr keys together (or Alt + Fn + PrtScr, or Alt + Fn + Insert).
- Result: Only the selected active window is captured and copied to your clipboard.
Pasting and Using Your Screenshots
Once you’ve captured a screenshot using any of the methods above (except for the Windows key + PrtScr method which saves directly to a file), the image resides on your clipboard. To use or save it, you need to paste it into an application.
-
Image Editors: Applications like Paint, Paint 3D (included in Windows), Photoshop, or GIMP are ideal for pasting and editing screenshots. Open your chosen image editor and press Ctrl + V (or right-click and select “Paste”) to paste the screenshot into a new document. From there, you can edit, crop, annotate, and save your screenshot in various formats (JPEG, PNG, etc.).
-
Documents, Emails, and More: You can also paste screenshots directly into documents (Word, Google Docs), emails (Outlook, Gmail), presentation software (PowerPoint), and many other applications that support image insertion. Simply open the application and document where you want to insert the screenshot and use Ctrl + V to paste it.
Beyond Print Screen: Using the Snipping Tool and Snip & Sketch
For more advanced screenshot options, Windows offers built-in tools like the Snipping Tool (older Windows versions) and Snip & Sketch (Windows 10 and 11). These tools provide more control and features:
-
Snipping Tool / Snip & Sketch: Search for “Snipping Tool” or “Snip & Sketch” in the Windows search bar to launch these applications. They allow you to capture specific regions of your screen, free-form selections, window snips, and full-screen snips. They also offer annotation tools to draw or write on your screenshots before saving or sharing.
Figure 3: Snip & Sketch tool interface in Windows.
These tools are particularly useful when you need more precision or want to quickly annotate your screenshots.
Conclusion
Mastering how to screenshot on a Dell laptop is a valuable skill for anyone using a Windows machine. From quickly capturing the entire screen with the Print Screen key to using more advanced tools like Snip & Sketch for precise captures and annotations, Windows provides a range of options to suit your needs. Experiment with these methods to find the quickest and most efficient way for you to capture and share your screen content.