Taking a screenshot on your PC is a fundamental skill in today’s digital world. Whether you’re a student, professional, or casual user, knowing how to capture your screen is incredibly useful. From saving important information to documenting online interactions, screenshots are indispensable. This guide will provide you with a detailed walkthrough on how to screenshot on a PC, covering various methods and tools for both Windows and macOS, ensuring you become a screenshot pro in no time.
Understanding the Basics: What is a Screenshot?
Before diving into the methods, let’s clarify what a screenshot is. Simply put, a screenshot, also known as a screen capture, is a digital image of what’s displayed on your computer screen at a given moment. Think of it as taking a photo of your screen. This image is saved as a file, which you can then share, edit, or store as needed. Screenshots are invaluable for various reasons, including:
- Capturing important information: Save online receipts, error messages, or social media posts.
- Creating tutorials and guides: Visually demonstrate steps in software or online processes.
- Preserving evidence: Document online conversations or content for future reference, including instances of cyberbullying.
- Sharing visual information quickly: Easily show someone exactly what you are seeing on your screen.
Now that we understand the importance of screenshots, let’s explore the different ways to take them on your PC.
How to Screenshot on a Windows PC
Windows offers several built-in methods and tools to capture screenshots, catering to different needs and preferences. Here’s a detailed look at each technique:
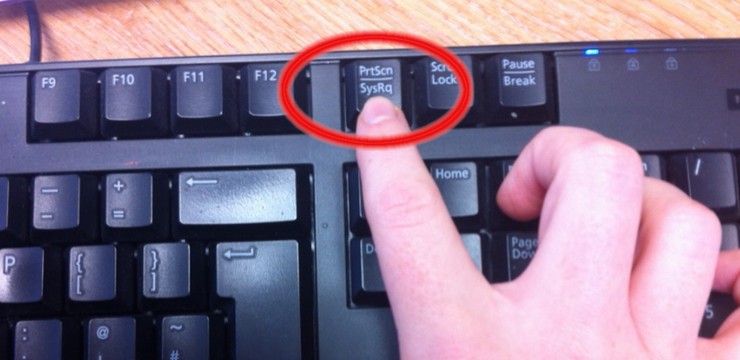
1. Using the Print Screen (PrtScn) Key for a Full-Screen Capture
The most basic and universal method is using the Print Screen key, often labeled as PrtScn, Print Scr, or similar. This key is typically located in the upper-right corner of your keyboard.
- Action: Press the PrtScn key.
- Result: This action captures an image of your entire screen and copies it to your clipboard. The clipboard is a temporary storage area for data that you can paste elsewhere.
- Next Steps: To view and save the screenshot, you need to paste it into an application that supports images, such as:
- Paint: A basic image editing program included with Windows. Open Paint from the Start Menu and press Ctrl + V (or right-click and select “Paste”) to paste the screenshot. You can then save the image as a PNG, JPG, or other image format.
- Word or other document editors: You can also paste the screenshot directly into a Word document, Google Docs, or similar applications for documentation purposes.
- Image Editing Software: For more advanced editing, paste the screenshot into programs like Adobe Photoshop, GIMP (free), or similar software.
2. Capturing the Active Window with Alt + Print Screen
If you only want to capture the currently active window (the window you are currently working in), use the following shortcut:
- Action: Press and hold the Alt key and then press the PrtScn key (Alt + PrtScn).
- Result: This captures only the active window and copies it to the clipboard.
- Next Steps: Paste the screenshot into Paint or another image editing program as described in the previous method to view, edit, and save it. This is useful when you want to focus on a specific application window without capturing the entire screen.
3. Saving Screenshots Directly as Files with Windows Key + Print Screen
For a quicker way to save screenshots without needing to paste them, use the Windows Key + Print Screen shortcut:
- Action: Press and hold the Windows Key (the key with the Windows logo) and then press the PrtScn key (Windows Key + PrtScn).
- Result: The screen will briefly dim, and a screenshot of your entire screen will be automatically saved as a PNG file in the “Screenshots” folder within your “Pictures” library.
- Next Steps: You can find your screenshots by opening File Explorer and navigating to Pictures > Screenshots. This method is ideal for quickly capturing and saving multiple screenshots.
4. Using the Snipping Tool for Selective Screenshots
For more control over what you capture, Windows includes the Snipping Tool. This utility allows you to capture specific portions of your screen and offers basic editing features.
- Accessing Snipping Tool:
- Click on the Start Menu (Windows icon in the bottom-left corner).
- Type “Snipping Tool” and select it from the search results.
- Using Snipping Tool:
- Click the New button in the Snipping Tool window. The screen will dim, and your cursor will turn into a crosshair.
- Select the type of snip you want to take from the Mode dropdown menu (e.g., Rectangular Snip, Free-form Snip, Window Snip, Full-screen Snip).
- Drag the crosshair to select the area you want to capture.
- Release the mouse button to take the screenshot.
- The screenshot will open in the Snipping Tool window, where you can:
- Annotate: Use the pen and highlighter tools to draw or highlight directly on the screenshot.
- Save: Click the Save Snip button (disk icon) to save the screenshot as a PNG, JPG, GIF, or HTML file.
- Copy: Click the Copy button to copy the snip to the clipboard for pasting elsewhere.
- Email: Click the Send Snip button to email the screenshot.
The Snipping Tool is a versatile option for capturing and quickly editing screenshots.
5. Utilizing Snip & Sketch (Newer Windows Versions)
In more recent versions of Windows 10 and Windows 11, Snip & Sketch is the newer, updated tool that replaces the Snipping Tool, although Snipping Tool is still available. Snip & Sketch offers similar functionality with a more modern interface and additional features.
- Accessing Snip & Sketch:
- Press Windows Key + Shift + S.
- Alternatively, search for “Snip & Sketch” in the Start Menu.
- Using Snip & Sketch:
- Upon opening Snip & Sketch (or using the shortcut), a small toolbar appears at the top of your screen.
- Choose your snip type: Rectangular Snip, Freeform Snip, Window Snip, or Full-screen Snip.
- Select the area you want to capture.
- The screenshot will automatically open in the Snip & Sketch editor.
- Editing Features: Snip & Sketch provides enhanced annotation tools, including:
- Pen: Various colors and thicknesses.
- Pencil: For sketching.
- Highlighter: To emphasize parts of the screenshot.
- Eraser: To remove annotations.
- Crop: To adjust the boundaries of the screenshot.
- Ruler and Protractor: For precise drawing and measuring.
- Saving and Sharing:
- Click the Save icon to save the screenshot.
- Click the Copy icon to copy it to the clipboard.
- Click the Share icon to directly share the screenshot through various apps.
Snip & Sketch is a powerful and user-friendly tool for capturing and annotating screenshots in Windows.
6. Game Bar for Screenshots in Games and Applications
Windows Game Bar, primarily designed for gamers, also includes a screenshot feature that can be used in games and other applications.
- Accessing Game Bar: Press Windows Key + G.
- Taking a Screenshot with Game Bar:
- Once the Game Bar is open, locate the Capture widget (it may be labeled with a camera icon).
- Click the Screenshot button (camera icon) within the Capture widget.
- Result: A screenshot of the current application or game window will be taken and saved.
- Finding Screenshots: Game Bar screenshots are typically saved in the “Captures” folder within your Videos library ( Videos > Captures).
Game Bar is a convenient option for quickly capturing in-game moments or screenshots from applications while gaming.
How to Screenshot on a Mac
macOS also offers multiple ways to take screenshots, utilizing keyboard shortcuts and built-in utilities. Here’s how to screenshot on a Mac:
1. Command + Shift + 3 for Full-Screen Capture
The quickest way to capture your entire screen on a Mac is using the following keyboard shortcut:
- Action: Press and hold Command (⌘) + Shift + 3 keys simultaneously.
- Result: This will take a screenshot of your entire screen, and the image file will be automatically saved to your desktop as a PNG file, named with the date and time of capture.
2. Command + Shift + 4 for Selected Area Capture
To capture a specific portion of your screen, use this shortcut:
- Action: Press and hold Command (⌘) + Shift + 4 keys simultaneously.
- Result: Your cursor will change to a crosshair. Drag the crosshair to select the area you want to capture. Once you release the mouse button, a screenshot of the selected area will be saved to your desktop as a PNG file.
- Options during selection:
- Press and hold Space bar: After starting your selection, press and hold the Space bar to move the entire selection area around without resizing it.
- Press and hold Shift key: Restrict movement to only one edge of the selection box.
- Press and hold Option (Alt) key: Resize the selection box from the center.
- Press Escape (Esc) key: Cancel the screenshot process.
3. Command + Shift + 5 for Screenshot Options (macOS Mojave and later)
For more advanced screenshot options and controls, macOS Mojave and later versions introduced the Screenshot toolbar:
- Action: Press and hold Command (⌘) + Shift + 5 keys simultaneously.
- Result: A small toolbar appears at the bottom of your screen, offering various screenshot and screen recording options:
- Capture Entire Screen: Takes a screenshot of the entire screen (same as Command + Shift + 3).
- Capture Selected Window: Click on a window to capture only that window.
- Capture Selected Portion: Drag to select a specific area to capture (same as Command + Shift + 4).
- Record Entire Screen: Starts recording a video of your entire screen.
- Record Selected Portion: Starts recording a video of a selected area of your screen.
- Options: Provides settings like:
- Save to: Choose where to save screenshots (Desktop, Documents, Clipboard, Mail, Messages, Preview, or other locations).
- Timer: Set a delay before taking the screenshot (None, 5 seconds, 10 seconds).
- Show Floating Thumbnail: Displays a small preview of the screenshot in the corner of your screen after capture.
- Remember Last Selection: Remembers the last selected area for quick recapture.
- Show Mouse Pointer: Include the mouse pointer in your screenshots or screen recordings.
The Screenshot toolbar offers a comprehensive suite of screenshot and screen recording features in macOS.
4. Using the Grab Utility (Older macOS Versions)
For older macOS versions or as an alternative to keyboard shortcuts, you can use the Grab utility.
- Accessing Grab:
- Open Finder.
- Go to Applications > Utilities > Grab.
- Alternatively, use Spotlight Search (Command + Space bar) and type “Grab” to find and open it.
- Using Grab:
- Once Grab is open, you’ll see a simple menu bar.
- Click on Capture in the menu bar.
- Choose from the following options:
- Selection: Allows you to drag and select an area to capture (similar to Command + Shift + 4).
- Window: Allows you to select a specific window to capture.
- Screen: Captures the entire screen (similar to Command + Shift + 3).
- Timed Screen: Allows you to set a timer before capturing the entire screen.
- After taking a screenshot with Grab, the image will open in a new window. You can then save it from the File > Save menu. Grab saves screenshots in the TIFF format by default, but you can convert them to other formats if needed.
Screenshots Beyond PC: A Quick Look at Mobile Devices
While this guide focuses on PCs, it’s worth briefly mentioning screenshots on smartphones and tablets, as the need to capture mobile screens is also common.
Android
The method for taking screenshots on Android devices varies slightly depending on the manufacturer and Android version. However, a common method is:
- Action: Press and hold the Power button and the Volume Down button simultaneously for a second or two.
- Result: The screen will typically flash, and a notification will appear indicating that a screenshot has been taken. Screenshots are usually saved in the “Screenshots” folder within your device’s Gallery or Photos app.
iOS (Apple iPhones and iPads)
On iPhones and iPads:
- For devices with Face ID (no Home button): Press and hold the Side button (power button) and the Volume Up button simultaneously.
- For devices with a Home button: Press and hold the Side button (power button) and the Home button simultaneously.
- Result: The screen will flash, and a screenshot thumbnail will briefly appear in the corner of the screen. Screenshots are saved in the Photos app.
Conclusion
Mastering screenshots on your PC is a valuable skill that enhances your digital productivity and communication. Whether you are using Windows or macOS, you now have a comprehensive understanding of various methods and tools available to capture your screen effectively. Experiment with these techniques to find the ones that best suit your workflow and needs. From simple full-screen captures to precise area selections and annotations, knowing how to screenshot on your PC empowers you to document, share, and preserve digital information with ease.