In today’s digital age, ensuring the privacy of your email communications is more critical than ever. Whether you’re sharing sensitive business information or personal details, knowing How To Send A Secure Email In Outlook is an essential skill. Encrypting your emails transforms them from easily readable text into an unreadable cipher, safeguarding your message from prying eyes. This comprehensive guide will walk you through the methods available in Outlook to encrypt your emails, ensuring your confidential information remains protected.
Understanding Email Encryption in Outlook
Email encryption is the process of encoding email messages to protect the confidentiality of their content. When an email is encrypted in Outlook, it’s converted into a scrambled format that is unreadable to anyone who doesn’t have the correct decryption key. This ensures that only the intended recipient can access and understand the message.
There are primarily two types of encryption options available in Outlook: S/MIME (Secure/Multipurpose Internet Mail Extensions) and Microsoft Purview Message Encryption using Information Rights Management (IRM). Each method offers a distinct approach to securing your email communications.
S/MIME Encryption
S/MIME is a widely recognized and accepted protocol for sending digitally signed and encrypted emails. It provides a robust layer of security by encrypting the email content and allowing for digital signatures to verify the sender’s identity. To utilize S/MIME encryption, both the sender and recipient need to have email applications, like Outlook, that are compatible with the S/MIME standard.
S/MIME offers key benefits for securing your emails:
- Encryption: Protects the email message content from unauthorized access, ensuring only the recipient with the private key can decrypt and read it.
- Digital Signatures: Verifies the sender’s identity, providing assurance to the recipient that the email genuinely originates from the claimed sender and hasn’t been tampered with in transit.
Microsoft Purview Message Encryption
Microsoft Purview Message Encryption, leveraging Information Rights Management (IRM), is another powerful encryption method available in Outlook, particularly for users with a Microsoft 365 qualifying subscription, such as Office 365 Enterprise E3. This encryption method is integrated within the Microsoft 365 ecosystem, offering seamless protection for sensitive information.
It’s important to note that Microsoft Purview Message Encryption should not be used on messages already encrypted or signed with S/MIME. Similarly, S/MIME should not be applied to messages already protected by IRM.
Step-by-Step Guide to Sending Secure Emails in Outlook
The process for sending secure emails varies slightly depending on whether you are using the new Outlook interface or the classic Outlook. Below are detailed instructions for both versions, covering both S/MIME and Microsoft Purview Message Encryption methods.
Using S/MIME Encryption in New Outlook
Before you can start sending S/MIME encrypted emails in new Outlook, you need to obtain a digital ID, also known as a digital certificate, and ensure it’s added to your computer’s keychain.
Encrypting a Single Email with S/MIME in New Outlook
- Compose Your Email: Begin by writing your email message in new Outlook as you normally would.
- Access Message Options: In the email message window, locate the ribbon and click on Options, then select More Options.
- Choose Encryption Options: In the Message options dialog box, you’ll find settings for sensitivity level, read/delivery receipts, and S/MIME protection. Select the Encrypt this message (S/MIME) option. You can also choose to add a digital signature by selecting Digitally sign this message (S/MIME) if desired.
- Confirm and Send: Click OK to apply the S/MIME encryption. Outlook may display a warning if it cannot verify that all recipients can decrypt the message. You can choose to send anyway, remove recipients, or retry checking. Once you’re ready, finish composing your email and click Send.
Encrypting All Emails with S/MIME in New Outlook
If you frequently send secure emails, you can set up new Outlook to automatically encrypt all outgoing messages using S/MIME.
-
Open Settings: Click on the Settings icon (gear icon) in Outlook, then navigate to Mail and select S/MIME.
-
Configure S/MIME Settings: In the S/MIME settings panel, you have the following options:
- Encrypt contents and attachment for all messages I send: Enable this option to automatically encrypt all outgoing emails.
- Add a digital signature to all messages I send: Enable this to digitally sign all your outgoing emails.
- Automatically choose the best certificate for digital signing: Leave this checked to allow Outlook to automatically select a base certificate. If unchecked, you’ll be prompted to choose the certificate each time.
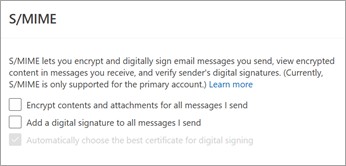 In S/MIME settings you can choose to Encrypt contents for all messages or add a digital signature to all messages
 -
Save Changes: Click OK to save your S/MIME settings. From now on, all emails you send from new Outlook will be encrypted (and digitally signed, if you chose that option).
Using Microsoft Purview Message Encryption in New Outlook
If your organization uses Microsoft 365 with an Office 365 Enterprise E3 license, you can leverage Microsoft Purview Message Encryption for securing your emails in new Outlook.
- Compose Your Email: Write your email message as usual.
- Access Encryption Options: In the email message window, click on Options in the ribbon, and then select Encrypt.
- Choose Encryption Type: A dropdown menu will appear with different encryption options. Select the encryption level that suits your needs, such as Encrypt (which applies general encryption) or Do Not Forward (which adds restrictions on forwarding and other actions).
- Send Securely: Finish composing your email and click Send. The message will be sent with the selected Microsoft Purview Message Encryption applied.
Using S/MIME Encryption in Classic Outlook
For users still utilizing the classic Outlook interface, S/MIME encryption is also available. Similar to new Outlook, you’ll need to have a digital certificate installed before proceeding.
Adding a Certificate for S/MIME in Classic Outlook
Before you can configure S/MIME in classic Outlook, you must add a digital certificate to your system. This is a prerequisite for using S/MIME encryption.
Configuring Your S/MIME Certificate in Classic Outlook
Once you have your S/MIME certificate set up on your computer, you need to configure Outlook to use it for encryption.
- Open Trust Center Settings: In Outlook, go to File > Options > Trust Center > Trust Center Settings.
- Navigate to Email Security: In the Trust Center Settings window, select Email Security in the left pane.
- Access Encryption Settings: Under Encrypted email, click on Settings.
- Choose S/MIME Certificate: In the Certificates and Algorithms section, click Choose and select your S/MIME certificate from the list.
- Confirm Settings: Click OK in each dialog box to save your settings and return to Outlook.
Encrypting a Single Email with S/MIME in Classic Outlook
After configuring your S/MIME certificate, you can encrypt individual emails as needed.
- Compose Your Email: Create your email message in classic Outlook.
- Select Encryption Option: Go to the Options tab in the email message window and click on Encrypt.
- Choose Restriction (Optional): You may see options for restrictions, such as Do Not Forward. Select the desired restriction if needed, or simply choose the standard encryption option.
- Send Encrypted Email: Finish composing your message and click Send.
Encrypting All Outgoing Messages using S/MIME in Classic Outlook
For consistently secure communication, you can set classic Outlook to encrypt all outgoing emails by default.
- Open Trust Center Settings: Navigate to File > Options > Trust Center > Trust Center Settings in Outlook.
- Go to Email Security Tab: Select the Email Security tab in the Trust Center window.
- Enable Encryption for Outgoing Messages: Under Encrypted email, check the box labeled Encrypt contents and attachments for outgoing messages.
- Configure Additional Settings (Optional): To adjust settings like choosing a specific certificate, click Settings.
- Save Changes: Click OK to save your changes. All subsequent emails sent from classic Outlook will be automatically encrypted.
Best Practices for Secure Email Communication in Outlook
Beyond simply encrypting your emails, consider these best practices to enhance your overall email security in Outlook:
- Regularly Update Your Digital Certificate: Ensure your digital certificate is up-to-date and valid to maintain seamless S/MIME encryption.
- Educate Recipients: Inform your recipients about encrypted emails, especially if they are new to receiving them, to ensure smooth communication.
- Use Strong Passwords: Protect your email account with a strong, unique password to prevent unauthorized access at the account level.
- Be Cautious of Phishing: Encryption protects content, but be vigilant about phishing attempts. Always verify the sender’s identity, even with encrypted emails.
- Consider Sensitivity Levels: Outlook allows you to set sensitivity levels for emails (e.g., Personal, Private, Confidential). While not encryption, they provide recipients with context about the message’s sensitivity.
By implementing email encryption in Outlook and following these best practices, you can significantly enhance the security and privacy of your email communications. Whether you choose S/MIME or Microsoft Purview Message Encryption, Outlook provides the tools necessary to protect your sensitive information in today’s digital landscape.
See also
- View and reply to encrypted messages in Outlook
- Secure messages by using a digital signature
- Get a digital ID
- Find digital ID or digital ID services
- Send a digitally signed or encrypted message for Mac
- Advanced Outlook.com security for Microsoft 365 subscribers
- Learn about encrypted messages in Outlook.com
- Encrypt messages using S/MIME in Outlook on the web