In today’s digital age, ensuring the privacy and security of your email communications is more critical than ever. Microsoft Outlook offers robust features to encrypt your emails, protecting sensitive information from unauthorized access. This comprehensive guide will walk you through how to send encrypted email in Outlook, using both S/MIME and Microsoft Purview Message Encryption, ensuring your messages remain confidential.
Understanding Email Encryption in Outlook
Email encryption transforms your readable message text into scrambled cipher text, making it indecipherable to anyone without the correct decryption key. Outlook provides two primary encryption methods:
-
S/MIME (Secure/Multipurpose Internet Mail Extensions): A widely recognized protocol for sending digitally signed and encrypted emails. S/MIME encryption requires both sender and recipient to have compatible email applications and digital certificates. It offers both encryption for content protection and digital signatures for sender verification.
-
Microsoft Purview Message Encryption (IRM – Information Rights Management): Integrated with Microsoft 365 subscriptions, this method provides message encryption based on Information Rights Management. It’s particularly useful for organizations utilizing Microsoft 365 Enterprise E3 licenses or higher, offering seamless encryption within the Microsoft ecosystem.
Choosing the right method depends on your needs and infrastructure. S/MIME provides broad compatibility but requires certificate management, while Microsoft Purview Message Encryption offers tighter integration within Microsoft 365 environments.
Encrypting a Single Email Using S/MIME in New Outlook
For users of the new Outlook interface, encrypting individual emails with S/MIME is a straightforward process. Before you begin, ensure you have obtained a digital ID (digital certificate) and added it to your computer’s keychain.
Prerequisites: Get a Digital ID
A digital ID is essential for S/MIME encryption, acting as your digital certificate to verify your identity and enable encryption. If you haven’t already, you’ll need to obtain a digital ID from a trusted Certificate Authority or your organization’s IT department. Instructions for obtaining and adding a digital ID to Outlook can be found in Microsoft’s documentation.
Steps to Encrypt a Single Email
- Compose Your Email: Begin by writing your email in Outlook as you normally would.
- Access Message Options: In the email message window, navigate to the ribbon and select Options > More Options.
- Select Encryption: In the Message options dialog box, locate the S/MIME protection options. Choose Encrypt this message (S/MIME). You can also choose to Digitally sign this message (S/MIME) for added sender verification.
- Confirm and Send: Click OK to apply the encryption settings. Outlook may display a warning if it cannot verify recipient decryption capabilities. Review recipients, and then click Send to dispatch your encrypted email.
Encrypting All Outgoing Emails Using S/MIME in New Outlook
For consistent email security, you can configure new Outlook to automatically encrypt all outgoing messages using S/MIME.
Steps to Encrypt All Emails
-
Open Settings: Click on Settings (gear icon) in Outlook, then navigate to Mail > S/MIME.
-
Configure S/MIME Settings: Under S/MIME settings, you’ll find options to:
- Encrypt contents and attachment for all messages I send: Enable this to automatically encrypt all outgoing emails.
- Add a digital signature to all messages I send: Enable this to digitally sign all outgoing emails.
- Automatically choose the best certificate for digital signing: Allows Outlook to automatically select a certificate. Uncheck to manually select certificates if needed.
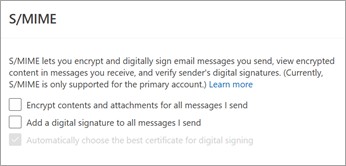 S/MIME settings in new Outlook showing options to encrypt all outgoing messages and add digital signatures for enhanced email security.
 -
Save Changes: Click OK to save your S/MIME settings. From now on, all emails you send from new Outlook will be encrypted by default.
Encrypting a Message with Microsoft Purview Message Encryption in New Outlook
If your organization uses Microsoft 365 Enterprise E3 or a higher license, you can leverage Microsoft Purview Message Encryption for email security in new Outlook.
Steps to Encrypt with Purview Message Encryption
- Compose Your Email: Write your email in Outlook.
- Access Encryption Options: In the email message, go to Options and select Encrypt.
- Choose Encryption Type: Select the desired encryption level. Options like Encrypt or Do Not Forward provide different levels of restriction on recipient actions.
- Send Encrypted Email: Finish composing your message and click Send. Microsoft Purview Message Encryption will secure your email based on the chosen restrictions.
It’s important to note that Microsoft Purview Message Encryption should not be used on messages already encrypted or signed with S/MIME. Remove any existing S/MIME encryption before applying Purview Message Encryption, and vice versa.
Encrypting Emails Using S/MIME in Classic Outlook
Users of classic Outlook can also encrypt emails using S/MIME. The process involves adding and configuring your S/MIME certificate, then applying encryption to individual or all outgoing messages.
Adding a Certificate in Classic Outlook
Similar to new Outlook, you must first obtain and add a digital ID to your computer for S/MIME functionality in classic Outlook.
Configuring Your S/MIME Certificate
- Open Trust Center Settings: In Outlook, go to File > Options > Trust Center > Trust Center Settings.
- Navigate to Email Security: In the Trust Center Settings window, select Email Security in the left pane.
- Access Encryption Settings: Under Encrypted email, click on Settings.
- Choose S/MIME Certificate: In the Certificates and Algorithms section, click Choose and select your S/MIME certificate from the available options.
- Confirm Settings: Click OK to confirm your certificate selection and close the Trust Center settings.
Encrypting a Single Email in Classic Outlook
- Compose Your Email: Create a new email message.
- Select Encryption Option: In the email message window, navigate to Options > Encrypt.
- Choose Encryption Type: Select the encryption option that meets your security needs, such as Do Not Forward.
- Send Encrypted Email: Complete your email and click Send.
Encrypting All Outgoing Messages in Classic Outlook
- Open Trust Center Settings: Go to File > Options > Trust Center > Trust Center Settings in Outlook.
- Navigate to Email Security: Select the Email Security tab.
- Enable Encryption for Outgoing Messages: Under Encrypted email, check the box Encrypt contents and attachments for outgoing messages.
- Configure Additional Settings (Optional): For advanced settings like choosing a specific certificate, click Settings.
- Save Changes: Click OK to save your settings. All subsequent emails will be encrypted by default.
Conclusion
Securing your email communications in Outlook is essential for protecting sensitive information. Whether you choose S/MIME for its broad compatibility or Microsoft Purview Message Encryption for seamless Microsoft 365 integration, Outlook provides the tools you need to safeguard your privacy. By following these steps, you can confidently send encrypted emails, ensuring your messages are only readable by intended recipients.
For further information and advanced options, refer to the following resources:
- View and reply to encrypted messages in Outlook
- Secure messages by using a digital signature in Outlook
- Get a digital ID in Outlook
- Encrypt messages using S/MIME in Outlook on the web