Setting out of office in Outlook is essential for managing communications while you’re away, ensuring your contacts are informed and their inquiries are addressed promptly. At HOW.EDU.VN, we understand the importance of seamless communication, offering expert advice to optimize your Outlook experience, including vacation responder setup and auto-reply configurations. For those seeking advanced tips or personalized support, our team of over 100 renowned PhDs is available to provide tailored solutions.
1. Understanding the Importance of Setting “Out of Office” in Outlook
Setting up an “Out of Office” (OoO) message in Outlook is more than just a courtesy; it’s a critical component of professional communication and time management. An effective OoO reply manages expectations, redirects inquiries, and maintains a positive impression, even when you’re unavailable. Here’s a deeper look at why this feature is so vital:
1.1. Professional Communication
In today’s fast-paced business environment, immediate responses are often expected. An OoO message provides an instant acknowledgment that you’ve received the sender’s email, assuring them that their message hasn’t been lost in the digital void. This immediate response is professional and considerate, reflecting well on you and your organization.
1.2. Managing Expectations
One of the primary functions of an OoO reply is to manage the sender’s expectations. By clearly stating when you will return and have access to your email, you set a realistic timeframe for when they can expect a response. This prevents frustration and the need for follow-up emails, ensuring a smoother communication process for everyone involved.
1.3. Providing Alternative Contacts
An effective OoO message not only informs senders of your absence but also provides alternative contacts for urgent matters. Including the email address or phone number of a colleague who can assist in your absence ensures that important issues are addressed promptly. This is particularly crucial for customer service, sales, and other time-sensitive roles.
1.4. Maintaining Productivity
Setting up an OoO message helps you maintain your productivity by minimizing distractions during your time off. Knowing that your contacts are informed and have alternative resources allows you to focus on your vacation, personal matters, or other priorities without the constant worry of unanswered emails.
1.5. Avoiding Misunderstandings
Without an OoO message, senders might assume their email has been ignored, leading to misunderstandings and potentially damaged relationships. An automated reply ensures that everyone is aware of your absence, preventing any negative perceptions and maintaining transparency.
1.6. Customizing Your Message
Outlook allows you to customize your OoO message to suit different audiences. You can create separate messages for internal and external contacts, providing more specific information and instructions to each group. This level of customization ensures that your message is relevant and helpful to everyone who receives it.
1.7. Enhancing Customer Service
For businesses, an OoO message is an essential tool for enhancing customer service. It assures customers that their inquiries are important and will be addressed, even if there is a delay. By providing alternative contact information, you ensure that customers can still receive assistance, maintaining a positive customer experience.
1.8. Supporting Work-Life Balance
Setting up an OoO message is a practical way to support work-life balance. It allows you to disconnect from work and recharge without feeling guilty or worried about neglecting your responsibilities. Knowing that your communications are being managed professionally allows you to fully enjoy your time off.
1.9. Legal and Compliance Considerations
In some industries, responding to emails within a specific timeframe is a legal or compliance requirement. An OoO message can help you meet these obligations by acknowledging receipt of the email and providing an estimated response time, even when you are unavailable.
1.10. Leveraging Expert Assistance
For those seeking to optimize their Outlook settings or address more complex communication challenges, HOW.EDU.VN offers expert assistance from a team of over 100 renowned PhDs. Our experts can provide personalized advice and support to help you make the most of Outlook’s features and maintain effective communication in any situation.
In summary, setting up an “Out of Office” message in Outlook is a fundamental practice for professional communication, expectation management, and productivity. By taking the time to configure your OoO settings correctly, you can ensure that your contacts are informed, their inquiries are addressed, and your time off is truly restful.
2. Step-by-Step Guide: Setting Up Automatic Replies in Outlook
Setting up automatic replies in Outlook ensures that anyone who emails you while you’re away receives an immediate notification, managing their expectations and directing them to alternative contacts if necessary. Here’s a detailed, step-by-step guide on how to set this up in various versions of Outlook.
2.1. Outlook for Microsoft 365, Outlook 2019, Outlook 2016, Outlook 2013, and Outlook 2010
This method applies to the most recent versions of Outlook, offering a straightforward process for setting up automatic replies.
2.1.1. Open Outlook and Navigate to the “File” Tab
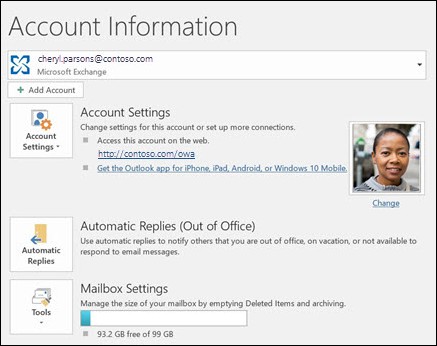
Start by opening your Outlook application. In the top-left corner of the Outlook window, click on the “File” tab. This tab provides access to account settings, options, and other administrative functions.
2.1.2. Select “Automatic Replies (Out of Office)”
In the “File” menu, look for an option labeled “Automatic Replies (Out of Office).” This option may be located under the “Info” section, which is typically selected by default when you open the “File” menu. Click on “Automatic Replies (Out of Office)” to open the Automatic Replies dialog box.
2.1.3. Configure Automatic Replies
In the Automatic Replies dialog box, you’ll find several options to customize your out-of-office message:
- Send automatic replies: Select this option to enable automatic replies. If you want to disable automatic replies, simply select “Do not send automatic replies.”
- Only send during this time range (optional): This option allows you to schedule your automatic replies to be sent only during a specific period. Check the box next to this option and enter the start and end dates and times for your absence. This is useful if you know exactly when you’ll be away and want the automatic replies to stop automatically upon your return.
2.1.4. Compose Your Out-of-Office Message
Outlook allows you to create separate out-of-office messages for internal and external recipients. This is useful if you want to provide different levels of detail or instructions to colleagues within your organization versus external contacts.
- Inside My Organization: This tab allows you to create a message that will be sent to people within your company. Type your message in the text box provided. Be sure to include information such as the dates of your absence, when you will be checking email again, and who to contact for urgent matters.
- Outside My Organization: This tab allows you to create a message that will be sent to people outside your company. You can choose to send automatic replies to all external senders or only to your contacts. To send to all external senders, check the box next to “Auto-reply to people outside my organization” and compose your message in the text box. If you only want to send to your contacts, select the “My contacts only” option.
2.1.5. Save Your Settings
Once you have configured your automatic replies and composed your messages, click “OK” to save your settings. Outlook will now automatically send your out-of-office message to anyone who emails you during the specified time range.
2.2. Outlook on the Web (Office 365)
If you use Outlook on the web, the process is slightly different but equally straightforward.
2.2.1. Access Outlook Settings
Sign in to your Office 365 account and open Outlook on the web. Click on the gear icon in the top-right corner of the page to open the Settings menu.
2.2.2. Navigate to Automatic Replies
In the Settings menu, type “automatic replies” in the search bar and select the “Automatic replies” option from the search results. Alternatively, you can click on “View all Outlook settings” at the bottom of the Settings menu, then select “Mail” > “Automatic replies.”
2.2.3. Configure Automatic Replies
In the Automatic replies settings, you’ll find similar options to the desktop version of Outlook:
- Turn on automatic replies: Select this option to enable automatic replies.
- Send replies only during a time period: Check this box to schedule your automatic replies. Enter the start and end dates and times for your absence.
- Send automatic replies inside my organization: Compose your message for internal recipients in the text box provided.
- Send automatic replies to senders outside my organization: Select this option to send automatic replies to external senders. You can choose to send to all external senders or only to your contacts. Compose your message in the text box provided.
2.2.4. Save Your Settings
After configuring your automatic replies and composing your messages, click “Save” to save your settings. Your out-of-office message will now be sent automatically to anyone who emails you during the specified time range.
2.3. Outlook Mobile App (iOS and Android)
You can also set up automatic replies using the Outlook mobile app, allowing you to manage your out-of-office status on the go.
2.3.1. Open the Outlook Mobile App and Access Settings
Open the Outlook app on your iOS or Android device. Tap on your profile icon in the top-left corner of the screen to open the menu. From the menu, tap on the gear icon to access the Settings.
2.3.2. Navigate to Automatic Replies
In the Settings menu, scroll down and tap on “Automatic Replies.”
2.3.3. Configure Automatic Replies
In the Automatic Replies settings, you can enable and configure your out-of-office message:
- Turn on Automatic Replies: Slide the toggle to the “On” position to enable automatic replies.
- Reply to everyone: Select this option to send automatic replies to all senders.
- Reply only to my organization: Select this option to send automatic replies only to people within your company.
- Set a time period: Enable this option to schedule your automatic replies. Enter the start and end dates and times for your absence.
- Compose Your Message: Type your out-of-office message in the text box provided.
2.3.4. Save Your Settings
After configuring your automatic replies and composing your message, tap the checkmark or “Save” button to save your settings. Your out-of-office message will now be sent automatically to anyone who emails you during the specified time range.
2.4. Troubleshooting Common Issues
While setting up automatic replies in Outlook is generally straightforward, you may encounter some common issues. Here are a few tips for troubleshooting:
- Automatic Replies Not Sending: Ensure that you have selected the “Send automatic replies” option and that the time range is correctly configured. Also, check your internet connection to ensure that Outlook can send the messages.
- Message Not Displaying Correctly: If your out-of-office message is not displaying correctly, check the formatting and ensure that you are using plain text. Avoid using special characters or HTML formatting that may not be supported by all email clients.
- External Recipients Not Receiving Automatic Replies: If external recipients are not receiving your automatic replies, check your settings to ensure that you have enabled automatic replies for senders outside your organization. Also, check your email server settings to ensure that automatic replies are not being blocked by a spam filter.
By following these step-by-step instructions and troubleshooting tips, you can easily set up automatic replies in Outlook and ensure that your contacts are informed of your absence and provided with alternative resources.
3. Crafting the Perfect “Out of Office” Message: Tips and Examples
Your “Out of Office” (OoO) message is a reflection of your professionalism and consideration for your contacts. A well-crafted message not only informs people of your absence but also manages their expectations and provides helpful alternatives. Here are some tips and examples to help you create the perfect OoO message.
3.1. Essential Elements of an Effective OoO Message
Before diving into examples, let’s outline the essential elements that every effective OoO message should include:
3.1.1. A Clear Statement of Absence
Start by clearly stating that you are currently out of the office. This should be the first sentence of your message to immediately inform the sender of your unavailability.
- Example: “Thank you for your email. I am currently out of the office.”
3.1.2. Dates of Absence
Provide the exact dates of your absence. This helps the sender understand when they can expect a response from you.
- Example: “I will be out of the office from July 10, 2024, to July 20, 2024.”
3.1.3. Expected Response Time
Indicate when you will be back in the office and able to respond to emails. Be realistic about your response time, especially if you anticipate a backlog of emails upon your return.
- Example: “I will be back in the office on July 21, 2024, and will respond to your email as soon as possible.”
3.1.4. Alternative Contact Information
Provide the name and contact information of a colleague who can assist with urgent matters in your absence. This ensures that important issues are addressed promptly.
- Example: “For urgent matters, please contact [Colleague’s Name] at [Colleague’s Email Address] or [Colleague’s Phone Number].”
3.1.5. A Polite Closing
End your message with a polite closing, thanking the sender for their understanding.
- Example: “Thank you for your understanding. I look forward to responding to your email upon my return.”
3.2. Examples of Effective OoO Messages
Here are several examples of effective OoO messages tailored to different scenarios:
3.2.1. Basic OoO Message
This is a simple and straightforward message that includes all the essential elements.
Thank you for your email. I am currently out of the office from July 10, 2024, to July 20, 2024. I will be back in the office on July 21, 2024, and will respond to your email as soon as possible. For urgent matters, please contact Jane Doe at [email protected] or 555-123-4567. Thank you for your understanding.
3.2.2. Detailed OoO Message
This message provides more detail and specific instructions for different types of inquiries.
Thank you for your email. I am currently out of the office on vacation from July 10, 2024, to July 20, 2024, with limited access to email. I will be back in the office on July 21, 2024, and will respond to your email as soon as possible.
- For customer support inquiries: Please contact our support team at [email protected].
- For sales-related questions: Please contact John Smith at [email protected] or 555-987-6543.
- For all other matters: I will address your email upon my return.
Thank you for your patience and understanding.
3.2.3. OoO Message for Internal Contacts
This message is tailored for colleagues within your organization, providing more specific information about your responsibilities and ongoing projects.
Hi Team,
I am currently out of the office from July 10, 2024, to July 20, 2024. I will be back in the office on July 21, 2024.
- For project A inquiries: Please contact Sarah Jones at [email protected].
- For project B inquiries: Please contact Michael Brown at [email protected].
- For urgent matters related to my responsibilities: Please contact my manager, David Lee, at [email protected] or 555-111-2222.
I will catch up on emails upon my return. Thank you for your cooperation.
3.2.4. OoO Message with Limited Access to Email
This message informs senders that you have limited access to email and may not be able to respond promptly.
Thank you for your email. I am currently out of the office from July 10, 2024, to July 20, 2024, with limited access to email. I will be checking emails periodically, but my response time may be delayed. For urgent matters, please contact Lisa Green at [email protected] or 555-333-4444. Thank you for your understanding.
3.2.5. OoO Message with No Alternative Contact
If you are unable to provide an alternative contact, be transparent and set realistic expectations.
Thank you for your email. I am currently out of the office from July 10, 2024, to July 20, 2024, with no access to email. I will be back in the office on July 21, 2024, and will respond to your email as soon as possible. Thank you for your patience.
3.3. Tips for Crafting the Perfect OoO Message
Here are some additional tips to help you craft the perfect OoO message:
3.3.1. Be Clear and Concise
Use clear and concise language to convey your message. Avoid jargon and overly complex sentences.
3.3.2. Proofread Your Message
Always proofread your message for grammar and spelling errors. A polished message reflects well on your professionalism.
3.3.3. Customize for Different Audiences
Create separate messages for internal and external contacts to provide more relevant information and instructions.
3.3.4. Set Realistic Expectations
Be realistic about your response time. It’s better to underpromise and overdeliver than to set unrealistic expectations.
3.3.5. Update Your Message Regularly
If your absence is extended or your circumstances change, update your OoO message accordingly.
3.3.6. Consider Adding a Personal Touch
If appropriate for your workplace culture, consider adding a personal touch to your message, such as a brief explanation of why you are out of the office.
- Example: “I am currently out of the office on vacation, spending time with my family. I will be back in the office on July 21, 2024.”
3.3.7. Test Your Message
Before leaving the office, send a test email to yourself to ensure that your OoO message is working correctly.
By following these tips and examples, you can craft an effective “Out of Office” message that informs your contacts, manages their expectations, and maintains your professional image.
4. Advanced Tips for Managing Outlook “Out of Office” Settings
While setting up a basic “Out of Office” (OoO) message is straightforward, Outlook offers several advanced features and settings that can help you manage your communications more effectively. Here are some advanced tips for maximizing the benefits of Outlook’s OoO functionality.
4.1. Using Rules to Customize Automatic Replies
Outlook rules allow you to create highly customized automatic replies based on specific criteria. This is particularly useful if you want to send different messages to different senders or handle certain types of emails in a specific way.
4.1.1. Creating a Rule for Specific Senders
You can create a rule to send a specific OoO message only to certain senders, such as important clients or colleagues.
- Open Outlook and Navigate to Rules: In Outlook, click on the “File” tab, then select “Manage Rules & Alerts.”
- Create a New Rule: In the Rules and Alerts dialog box, click on “New Rule.”
- Start from a Blank Rule: Under “Start from a blank rule,” select “Apply rule on messages I receive” and click “Next.”
- Specify Conditions: In the “Step 1: Select condition(s)” section, choose the conditions that apply to the senders you want to target. For example, you can select “from people or public group” and then specify the email addresses of the senders.
- Specify Actions: In the “Step 1: Select action(s)” section, choose “reply using a specific template.” Click on the underlined “a specific template” to select a template.
- Create or Select a Template: You can either create a new email template or select an existing one. If creating a new template, compose your OoO message and save it as an Outlook template (.oft file).
- Complete the Rule: Follow the remaining steps in the Rules Wizard to name your rule and turn it on.
4.1.2. Creating a Rule for Specific Subjects
You can also create a rule to send a specific OoO message based on the subject line of the email.
- Follow Steps 1-3 Above: Open Outlook, navigate to “Manage Rules & Alerts,” and create a new rule based on messages you receive.
- Specify Conditions: In the “Step 1: Select condition(s)” section, choose “with specific words in the subject.” Click on the underlined “specific words” to enter the keywords or phrases you want to target.
- Specify Actions: In the “Step 1: Select action(s)” section, choose “reply using a specific template” and select the appropriate template.
- Complete the Rule: Follow the remaining steps in the Rules Wizard to name your rule and turn it on.
4.2. Using Categories to Manage Emails During Your Absence
Outlook categories allow you to tag and organize emails, making it easier to prioritize and respond to them upon your return.
4.2.1. Creating Categories
- Open Outlook and Navigate to Categories: In Outlook, right-click on an email and select “Categorize” > “All Categories.”
- Create a New Category: In the Color Categories dialog box, click on “New.”
- Name and Color-Code Your Category: Enter a name for your category (e.g., “Urgent,” “Important,” “Follow Up”) and choose a color to associate with it.
- Save Your Category: Click “OK” to save your new category.
4.2.2. Applying Categories to Emails
During your absence, ask your alternative contact to apply categories to incoming emails based on their urgency and importance. Upon your return, you can quickly sort and prioritize emails based on their assigned categories.
4.3. Setting Up Multiple Email Accounts in Outlook
If you manage multiple email accounts in Outlook, you can configure separate OoO messages for each account.
4.3.1. Configuring Automatic Replies for Each Account
- Open Outlook and Navigate to Automatic Replies: In Outlook, click on the “File” tab and select “Automatic Replies (Out of Office).”
- Select the Email Account: In the Automatic Replies dialog box, use the “This automatic reply applies to this account” dropdown menu to select the email account you want to configure.
- Configure Automatic Replies: Follow the steps outlined in Section 2 to configure automatic replies for the selected email account.
- Repeat for Each Account: Repeat this process for each email account you manage in Outlook.
4.4. Using Shared Mailboxes and Delegation
If you are part of a team or manage a shared mailbox, you can delegate access to your mailbox or set up automatic replies for the shared mailbox.
4.4.1. Delegating Access to Your Mailbox
- Open Outlook and Navigate to Account Settings: In Outlook, click on the “File” tab, then select “Account Settings” > “Delegate Access.”
- Add a Delegate: In the Delegates dialog box, click on “Add.”
- Select a Delegate: Choose the person you want to delegate access to and click “Add.”
- Grant Permissions: Grant the delegate the appropriate permissions to access your mailbox, calendar, and tasks.
- Save Your Settings: Click “OK” to save your settings.
4.4.2. Setting Up Automatic Replies for a Shared Mailbox
- Open Outlook and Access the Shared Mailbox: Open Outlook and ensure that you have access to the shared mailbox.
- Navigate to Automatic Replies: In Outlook, click on the “File” tab and select “Automatic Replies (Out of Office).”
- Configure Automatic Replies: Follow the steps outlined in Section 2 to configure automatic replies for the shared mailbox.
4.5. Mobile Device Management (MDM) Policies
For organizations that use Mobile Device Management (MDM) policies, IT administrators can enforce specific OoO settings on employees’ mobile devices. This ensures that employees are consistently managing their communications while away from the office.
4.6. Leveraging Expert Assistance from HOW.EDU.VN
For those seeking to optimize their Outlook settings or address more complex communication challenges, HOW.EDU.VN offers expert assistance from a team of over 100 renowned PhDs. Our experts can provide personalized advice and support to help you make the most of Outlook’s features and maintain effective communication in any situation.
By implementing these advanced tips, you can take full advantage of Outlook’s “Out of Office” functionality and ensure that your communications are managed effectively, even when you’re away.
5. Common Mistakes to Avoid When Setting Up “Out of Office” in Outlook
Setting up an “Out of Office” (OoO) message in Outlook is a crucial task for managing communications during your absence. However, several common mistakes can undermine the effectiveness of your message and create confusion or frustration for your contacts. Here are some common mistakes to avoid when setting up your OoO in Outlook.
5.1. Not Setting Up an OoO Message at All
One of the most significant mistakes is simply not setting up an OoO message when you are away from the office. This leaves senders in the dark about your absence and can lead to misunderstandings, missed opportunities, or delays in addressing important issues.
5.2. Providing Vague or Unclear Information
Your OoO message should be clear and concise, providing specific information about your absence and expected response time. Avoid vague or ambiguous language that can leave senders confused.
- Example of a vague message: “I am out of the office and will respond to your email as soon as possible.”
- Why it’s problematic: This message doesn’t provide any information about when you will be back in the office or who to contact for urgent matters.
5.3. Forgetting to Include the Dates of Absence
Failing to include the dates of your absence is another common mistake. Without this information, senders have no way of knowing when they can expect a response from you.
- Example of a message without dates: “I am out of the office and will have limited access to email.”
- Why it’s problematic: This message doesn’t specify when you will be back in the office, leaving senders unsure of when to expect a response.
5.4. Not Providing Alternative Contact Information
If you are unable to respond to emails during your absence, it’s essential to provide alternative contact information for urgent matters. Failing to do so can leave senders stranded and unable to address critical issues.
- Example of a message without alternative contact information: “I am out of the office and will respond to your email upon my return.”
- Why it’s problematic: This message doesn’t provide any alternative contacts for urgent matters, leaving senders with no recourse if they need immediate assistance.
5.5. Setting Unrealistic Expectations
Be realistic about your response time when you return to the office. It’s better to underpromise and overdeliver than to set unrealistic expectations that you can’t meet.
- Example of an unrealistic message: “I will respond to your email immediately upon my return.”
- Why it’s problematic: This message sets an unrealistic expectation that you will be able to respond to all emails immediately upon your return, which may not be possible due to a backlog of messages.
5.6. Using a Generic or Impersonal Message
Your OoO message should be professional and informative, but it should also reflect your personality and the culture of your organization. Avoid using a generic or impersonal message that sounds robotic or unengaged.
- Example of a generic message: “I am currently out of the office. Thank you for your email.”
- Why it’s problematic: This message is bland and uninformative, providing no useful information to the sender.
5.7. Not Proofreading Your Message
Always proofread your OoO message for grammar and spelling errors. A message with errors can undermine your professionalism and create a negative impression.
5.8. Forgetting to Turn Off Automatic Replies Upon Your Return
One of the most embarrassing mistakes is forgetting to turn off your automatic replies when you return to the office. This can lead to confusion and annoyance for senders who receive an OoO message even though you are available to respond.
5.9. Not Customizing Your Message for Different Audiences
Outlook allows you to create separate OoO messages for internal and external contacts. Failing to customize your message for different audiences can result in sending irrelevant or inappropriate information to certain senders.
- Example of a message not customized for internal contacts: “I am out of the office and will respond to your email as soon as possible.”
- Why it’s problematic: This message doesn’t provide any specific information about your responsibilities or ongoing projects, which may be important for your colleagues to know.
5.10. Not Testing Your Message
Before leaving the office, send a test email to yourself to ensure that your OoO message is working correctly and that it contains all the necessary information.
5.11. Seeking Expert Advice from HOW.EDU.VN
For those seeking to optimize their Outlook settings or address more complex communication challenges, how.edu.vn offers expert assistance from a team of over 100 renowned PhDs. Our experts can provide personalized advice and support to help you make the most of Outlook’s features and maintain effective communication in any situation.
By avoiding these common mistakes, you can ensure that your “Out of Office” message in Outlook is effective, informative, and professional.
6. Automating Your Workday: Integrating “Out of Office” with Other Tools
Setting up an “Out of Office” (OoO) message in Outlook is a fundamental step in managing your communications when you’re away. However, to truly automate your workday and ensure seamless operations, it’s beneficial to integrate your OoO settings with other tools and platforms. Here’s how you can integrate your OoO with various tools to enhance productivity and maintain a professional presence.
6.1. Integrating with Calendar Applications
Integrating your OoO with calendar applications ensures that your availability is accurately reflected in your schedule, preventing scheduling conflicts and managing expectations.
6.1.1. Outlook Calendar Integration
Outlook seamlessly integrates with its own calendar, automatically blocking out time when you set up your OoO. This prevents colleagues from scheduling meetings during your absence.
- Set Up Your OoO: Follow the steps in Section 2 to set up your OoO message in Outlook.
- Ensure Calendar is Updated: Verify that your Outlook calendar is updated to reflect your time off. Outlook typically syncs your OoO dates with your calendar automatically.
6.1.2. Google Calendar Integration
If you use Google Calendar, you can sync your Outlook calendar to ensure that your availability is consistent across both platforms.
- Sync Outlook and Google Calendars: Use a third-party tool or app to sync your Outlook and Google Calendars. Several options are available, such as Calendar Sync or IFTTT (If This Then That).
- Verify Availability: Once synced, verify that your OoO dates are accurately reflected in your Google Calendar.
6.2. Integrating with Project Management Tools
Integrating your OoO with project management tools ensures that your team is aware of your absence and can reassign tasks or adjust timelines accordingly.
6.2.1. Asana Integration
- Update Your Asana Status: In Asana, update your status to indicate that you are out of the office and when you will return.
- Reassign Tasks: Review your assigned tasks and reassign them to colleagues as necessary.
- Communicate with Your Team: Use Asana’s communication features to inform your team of your absence and any changes to project timelines or responsibilities.
6.2.2. Trello Integration
- Update Your Trello Profile: In Trello, update your profile to indicate that you are out of the office and when you will return.
- Reassign Cards: Review your assigned cards and reassign them to colleagues as necessary.
- Communicate on Boards: Use Trello’s commenting features to inform your team of your absence and any changes to card assignments or deadlines.
6.3. Integrating with Customer Relationship Management (CRM) Systems
Integrating your OoO with CRM systems ensures that your clients and customers are aware of your absence and that their inquiries are addressed promptly.
6.3.1. Salesforce Integration
- Update Your Salesforce Status: In Salesforce, update your status to indicate that you are out of the office and when you will return.
- Reassign Leads and Opportunities: Review your assigned leads and opportunities and reassign them to colleagues as necessary.
- Set Up Automated Responses: Use Salesforce’s automation features to set up automated responses to customer inquiries, informing them of your absence and providing alternative contact information.
6.3.2. HubSpot Integration
- Update Your HubSpot Profile: In HubSpot, update your profile to indicate that you are out of the office and when you will return.
- Reassign Contacts: Review your assigned contacts and reassign them to colleagues as necessary.
- Set Up Automated Workflows: Use HubSpot’s workflow automation features to set up automated responses to customer inquiries, informing them of your absence and providing alternative contact information.
6.4. Integrating with Communication Platforms
Integrating your OoO with communication platforms ensures that your colleagues and contacts are aware of your absence and that their messages are routed to the appropriate channels.
6.4.1. Slack Integration
- Set a Slack Status: In Slack, set a status to indicate that you are out of the office and when you will return.
- Set Up Automatic Replies: Use Slack’s settings to set up automatic replies to direct messages, informing senders of your absence and providing alternative contact information.
- Inform Your Team: Communicate with your team in relevant channels to inform them of your absence and any changes to responsibilities or workflows.
6.4.2. Microsoft Teams Integration
- Set a Teams Status: In Microsoft Teams, set a status to indicate that you are out of the office and when you will return.
- Set Up Automatic Replies: Use Teams’ settings to set up automatic replies to direct messages, informing senders of your absence and providing alternative contact information.
- Inform Your Team: Communicate with your team in relevant channels to inform them of your absence and any changes to responsibilities or workflows.