Setting up a chessboard correctly is the first crucial step before you can enjoy a game of chess. Whether you’re a complete novice eager to learn this classic strategy game or teaching someone new, knowing how to arrange the pieces is essential. This guide will walk you through each step to ensure your chessboard is perfectly set up, so you can start playing in no time.
Step-by-Step Guide to Setting Up Your Chess Board
Follow these eight simple steps to arrange your chess pieces accurately and get ready for your match.
Step 1: Orient the Board Correctly – “White on Right”
The very first thing is to make sure the chessboard is facing the right way. A chessboard is not symmetrical, and correct orientation is key to proper setup. Look at the corners of the board. One corner should be a white or light-colored square, and the corner diagonally opposite should also be white or light. The rule to remember is “white on the right”. This means that the square on the bottom right of each player should be a light-colored square. If this is not the case, rotate the board 90 degrees until you get it right.
Step 2: Place the Pawns on the Second Rank
Pawns are the foot soldiers of your chess army. They are placed on the second rank (the second row from the edge of the board closest to you). For both White and Black, this means filling every square of the second rank with a pawn. This line of pawns acts as the frontline defense and offense in your chess game.
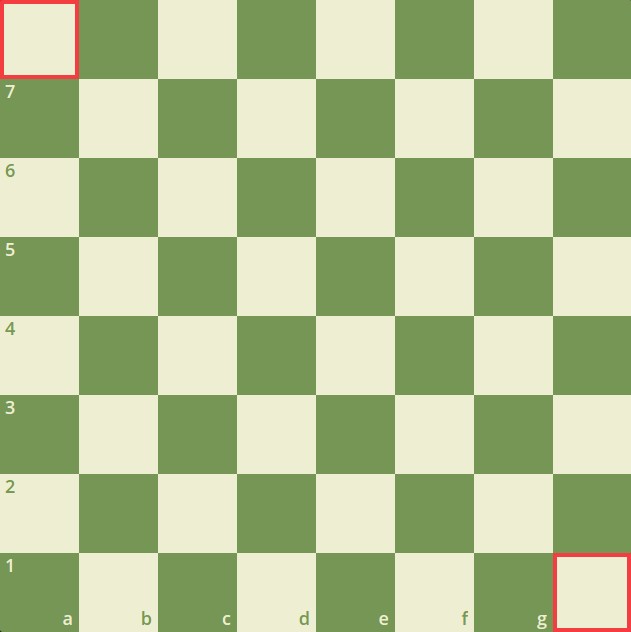
Step 3: Position the Rooks in the Corners
Rooks are the pieces that look like castles, and fittingly, they go in the corners of the chessboard. Place one rook on each corner square of the first rank (the row closest to you). For both White and Black, this means placing two rooks each. Rooks are powerful pieces, especially in the later stages of the game.
Step 4: Add the Knights Next to the Rooks
Knights are the pieces that often resemble horses. They are placed next to the rooks, on the squares immediately inward from the corners. For each side, White and Black, place two knights, one beside each rook. Knights are unique in their movement as they can “jump” over other pieces.
Step 5: Place the Bishops Beside the Knights
Bishops are positioned next to the knights. For both White and Black, you will have two bishops. Place each bishop on the square immediately next to each knight, moving towards the center of the board. Bishops control diagonals and are crucial for both attacking and defending.
Step 6: Queen on Her Own Color
Now we come to the Queen and King, often the most recognizable pieces. The Queen is placed on the square of her own color. This is a very important rule to remember! The White Queen goes on a light-colored square, and the Black Queen goes on a dark-colored square. This leaves only one square left for the King on this rank.
Step 7: Place the King on the Remaining Square
Finally, the King is placed on the last remaining empty square on the first rank. For each player, there will be only one spot left after placing all the other pieces, and that is where the King resides. The King is the most important piece in chess – protect him at all costs!
Step 8: Remember, White Moves First
Once you have set up all the pieces, you are ready to play! In chess, the player with the White pieces always makes the first move. Traditionally, players decide who plays White by chance, such as flipping a coin or hiding a white pawn in one hand and letting your opponent choose.
With your chessboard now correctly set up, you’re all set to begin your chess game. If you’re still unsure or want a visual guide, check out videos online demonstrating these steps. And if you’re ready to play right away, you can always find a game already set up for you online at platforms like Chess.com!