Taking a screenshot on your Windows computer is a fundamental skill for capturing and sharing what’s on your screen. Whether you need to record an error message, share a funny moment online, or save a copy of important information, Windows offers a built-in tool right at your fingertips: the Print Screen key. This guide will walk you through everything you need to know about how to screenshot on Windows using the Print Screen key, ensuring you can capture your screen exactly as you need it.
Locating the Print Screen Key on Your Keyboard
Before you can start taking screenshots, it’s important to find the Print Screen key on your keyboard. Its location can vary slightly depending on whether you are using a desktop or laptop computer.
On desktop keyboards, the Print Screen key is usually situated in the upper right-hand corner, often near the function keys (F1-F12). You might see it labeled as Print Screen, PrtScn, PrntScr, PrtSc, or similar abbreviations. For simplicity, we’ll refer to it as PrtSc throughout this article.
Figure 1: Location of the Print Screen key on a desktop keyboard
Alt text: The Print Screen key is highlighted in red on a Dell KM5221W wireless keyboard, located in the upper right section above the arrow keys and number pad.
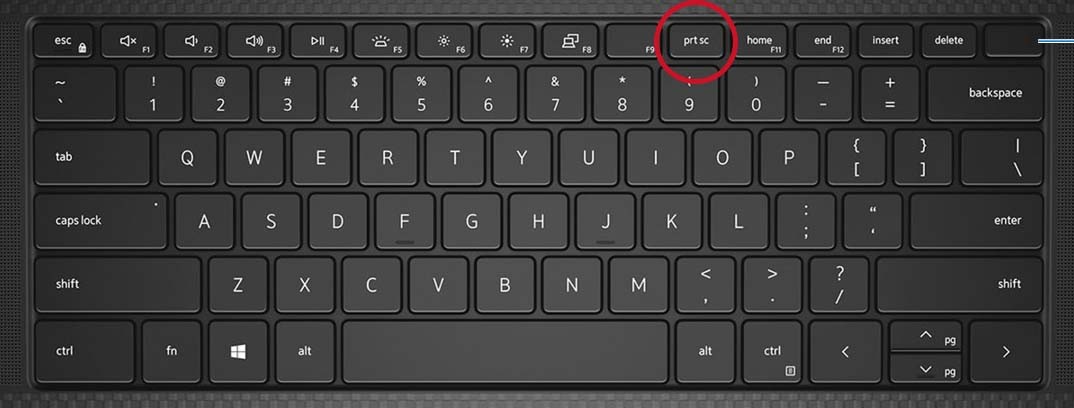
For laptop keyboards, the Print Screen key is commonly found within the Function key row. You might need to press the Fn (Function) key in combination with a Function key (often F10) to activate the Print Screen function.
Laptops with capacitive Function Key rows require pressing the Fn key to toggle the function keys and reveal the Print Screen option. Look for the illuminated PrtSc label and then use it with the methods described below. Consult your laptop’s user manual for specific details if needed.
Figure 2: Print Screen key on a laptop keyboard
Alt text: The Print Screen key, labeled PrtScn, is shown on the top right corner of a Dell Precision 5550 mobile workstation keyboard, integrated with the Delete key.
Note: Some compact laptop keyboards might not have a dedicated Print Screen key. In such cases, you can usually perform the Print Screen function by pressing and holding Fn + Insert keys together.
How to Take Different Types of Screenshots on Windows
The Print Screen key offers several ways to capture your screen, depending on what you need to screenshot:
Capturing the Entire Screen
To take a screenshot of your entire screen, including everything visible on all monitors if you have multiple displays, follow these steps:
- Press the Windows logo key + PrtSc key simultaneously.
- If you are using a tablet, press the Windows logo button + the volume down button at the same time.
After pressing these keys, your entire screen will be captured. For Windows 10 and Windows 11, the screen might briefly dim to indicate that the screenshot has been taken. The screenshot is automatically saved as a file in the Screenshots folder within your Pictures library.
Capturing All Active Windows
If you want to capture all currently open and active windows on your screen, use this method:
- Simply press the PrtSc key.
This will capture an image of all your active windows. The screenshot is copied to your clipboard, ready to be pasted into an application.
Capturing a Single Active Window
To screenshot only one specific window that you are currently working in, follow these steps:
- Click on the window you want to capture to make it the active window.
- Press the Alt + PrtSc keys together.
This method will capture only the content of the selected active window and copy it to your clipboard.
Pasting and Using Your Screenshots
Once you’ve captured your screenshot using any of the methods above, it is saved to your clipboard (except for the full-screen capture using Windows key + PrtSc, which saves as a file). To use or edit your screenshot, you need to paste it into an application.
- Open an image editing program like Microsoft Paint, Photoshop, GIMP, or even a document program like Microsoft Word.
- Use the keyboard shortcut Ctrl + V to paste the screenshot into a new document or image within the application.
From there, you can edit, save, or share your screenshot as needed.
Figure 3: Illustration of pasting a screenshot in Paint
Alt text: Screenshot of Microsoft Paint application showing the Paste function in the top left corner menu, indicating how to paste the captured screenshot for editing.
For more advanced screenshot options, such as capturing specific regions of your screen or annotating screenshots, you can explore the Snipping Tool in Windows. However, for quick and simple screen captures, the Print Screen key remains a highly efficient and readily available tool.