Sharing your iPhone location with friends and family can be incredibly useful, whether it’s for coordinating meetups or ensuring loved ones’ safety. However, there are times when you might need to regain some privacy and stop sharing your location without making a big deal out of it. This article will explore effective methods to stop sharing your iPhone location discreetly, ensuring you maintain control over your location data without unnecessary notifications.
 stop sharing iPhone location without them knowing
Can You Stop Sharing Location without Them Knowing?
Yes, it is indeed possible to stop sharing your iPhone location without sending a direct notification to the person you’re sharing with. However, it’s important to understand that while you can avoid immediate alerts, the other person might eventually realize that your location is no longer being shared. For instance, if they regularly check your location, they’ll notice it’s either frozen in time or completely unavailable. Furthermore, some methods might have side effects, such as temporarily limiting certain functionalities on your iPhone.
5 Ways to Stop Sharing iPhone Location Without Notifying Others
While numerous online resources might suggest various workarounds, our practical tests have narrowed down the truly effective methods to five. These methods allow you to stop sharing your location without triggering any immediate alerts. Let’s delve into these reliable techniques.
1. Turn on Airplane Mode
The most straightforward and quickest method is enabling Airplane Mode. This action instantly cuts off all wireless communications on your iPhone, including cellular, Wi-Fi, and Bluetooth. Consequently, your phone ceases to transmit your real-time location.
Activating Airplane Mode will not send any notification within iMessage or the Find My app to alert the person you’re sharing with that you’ve stopped sharing. When they check the Find My app, they will see your last known location with a timestamp indicating “xxx minutes/hours ago” instead of a “Live” update.
Note: Keep in mind that Airplane Mode also means you’ll miss calls, messages, and internet access. Once you disable Airplane Mode, your location sharing will resume and update for the person you’ve shared it with.
If you find this temporary disconnection acceptable, here are the simple steps:
Step 1: Access the Control Center on your iPhone by swiping down from the top-right corner of your screen (or swiping up from the bottom on older models).
Step 2: Locate the Airplane Mode icon (it looks like an airplane).
Step 3: Tap the Airplane Mode icon to toggle it on, turning it orange to indicate it’s enabled.
Enabling Airplane Mode via the iPhone Control Center to temporarily stop location sharing.
2. Stop Sharing Location with a Specific Contact on Find My
For a more targeted approach, you can use the Find My app to stop sharing your location with specific individuals. This method offers greater control, allowing you to choose exactly who you no longer want to share your location with.
Similar to Airplane Mode, using the Find My app to stop sharing doesn’t trigger any notifications to the contact. When they check Find My, your name will simply disappear from their list of shared locations.
Note: This action completely stops location sharing with the chosen contact within the Find My app until you manually re-enable it.
Here’s how to stop sharing with a specific contact using the Find My app:
Step 1: Open the Find My app on your iPhone.
Step 2: Tap the “People” tab located at the bottom of the screen.
Step 3: Select the name of the contact with whom you wish to stop sharing your location.
Step 4: Scroll down to the bottom of their contact card and tap “Stop Sharing My Location.”
Using the Find My app to selectively stop sharing location with a chosen contact.
3. Completely Turn Off Share My Location in Find My
Another option within the Find My app is to disable the “Share My Location” feature entirely. This will halt all location sharing initiated through Find My, although it’s important to note that it doesn’t affect the “Find My iPhone” functionality for device recovery. You’ll still be able to locate your own devices, but your location will be hidden from everyone else.
Disabling “Share My Location” is also a silent action, meaning no notifications are sent to your contacts. If someone attempts to check your location, they will see “No Location Found.”
Note: This method stops sharing your location with everyone. You’ll need to manually turn “Share My Location” back on if you want to resume sharing with anyone in the future.
Follow these steps to turn off “Share My Location” in Find My:
Step 1: Open the Find My app on your iPhone.
Step 2: Tap the “Me” tab, located at the bottom-left corner of the screen.
Step 3: Toggle the “Share My Location” switch to the off position (grey).
Alternatively, you can also disable this feature through the Settings app by navigating to Settings > your Apple ID (your name at the top) > Find My, and then toggle off “Share My Location.”
Disabling the “Share My Location” feature in the Find My app to stop sharing with all contacts.
4. Turn off Location Services in Settings
For a more comprehensive approach, you can disable Location Services directly within your iPhone’s Settings. This will prevent your device from sharing its location not only through Find My and iMessage but also with any other apps that rely on location data.
Turning off Location Services is another method that doesn’t send notifications. However, similar to turning off “Share My Location” in Find My, checking your location in Find My will result in a “No Location Found” message.
Note: Disabling Location Services impacts all apps that require location access, such as maps, weather apps, and ride-sharing services. These apps may not function correctly until you re-enable Location Services.
If you’re okay with temporarily sacrificing location-based app functionality, here’s how to disable Location Services:
Step 1: Open the Settings app on your iPhone.
Step 2: Tap on “Privacy & Security.”
Step 3: Tap on “Location Services.”
Step 4: Toggle the “Location Services” switch to the off position (grey).
Turning off Location Services in iPhone Settings to broadly disable location sharing.
5. Block and Unblock the Specific Contact
A slightly unconventional but effective method, found through user discussions and our own testing, involves blocking and immediately unblocking the contact you want to stop sharing your location with. This action disrupts the location sharing without any notification being sent.
When you block and unblock a contact, the location sharing is silently terminated.
However, if the other person manually checks, they might notice your name disappears from the “People” tab in their Find My app. If you were sharing location via iMessage, they might see a message indicating that your location has expired.
If you’re comfortable with this quick block-unblock method, follow these steps:
Step 1: Open the Contacts app on your iPhone.
Step 2: Locate and select the contact with whom you want to stop sharing your location.
Step 3: Tap on their name to open their contact card.
Step 4: Scroll down to the bottom and tap “Block this Caller.”
Step 5: After waiting for approximately one second, tap “Unblock this Caller.”
Using the block and unblock method in the Contacts app for a discreet stop to location sharing.
How Can I Choose the Best Method?
With several ways to stop sharing your iPhone location discreetly, selecting the most suitable method depends on your specific needs and priorities. Each method has its advantages and limitations.
To help you decide, consider this comparison table:
| Methods | Advantage | Limits | What Is Your Location Like? |
|---|---|---|---|
| Turn on Airplane Mode | Quickest and easiest, one-tap action. | 1. Disconnects internet access and notifications. 2. Location sharing resumes when turned off. | Shown as ‘xxx minutes/hours ago’. |
| Stop Sharing Location with a Specific Contact on Find My | Targeted control, choose specific individuals. | None directly related to device functionality. | Name disappears from their “People” tab in Find My app. |
| Completely Turn off Share My Location in Find My | Stops sharing with all contacts at once. | Must be manually re-enabled to resume sharing. | Shown as “No Location Found.” |
| Turn off Location Services in Settings | Comprehensive privacy, stops location sharing for all apps. | Impacts functionality of location-dependent apps. | Shown as “No Location Found.” |
| Block and unblock the specific contact | No need to adjust location settings or modes. | Might be noticed if the person actively checks Find My or iMessage location sharing frequently. | 1. Name disappears from “People” tab in Find My. 2. iMessage may show ‘xxx’s location expired’. |
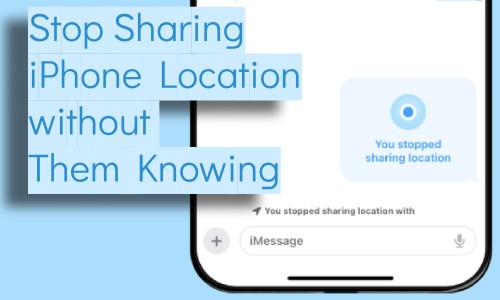
How to Stop Sharing Location on iMessage?
If you realize you’re sharing your location through iMessage and want to stop it, you absolutely can. Here’s how:
Step 1: Open the iMessage app and go to the conversation with the person you are sharing your location with.
Step 2: Tap on the location information box within the conversation.
Step 3: At the bottom of the location card, tap “Stop Sharing My Location.”
Note: Once you stop sharing your location via iMessage, the recipient will see “XXX’s location has expired” within the chat.
Can I Hide My Current Location without Stopping Sharing?
While the methods above focus on stopping location sharing, you might wonder if it’s possible to mask your actual location without completely turning off sharing. The answer is yes, and there are a couple of ways to achieve this.
1. Use a Secondary Device
If you have an older iPhone or iPad, you can utilize it as a secondary device to share a different location. This involves setting up location sharing from this secondary device, linked to your Apple ID.
By doing so, you can essentially broadcast a “fake” location without interrupting the sharing process itself. The person you’re sharing with won’t receive any alerts indicating a location change or discrepancy.
Here’s how to set it up:
Step 1: Sign in to your secondary iPhone or iPad using the same Apple ID as your primary device.
Step 2: Open the Find My app on the secondary device.
Step 3: Tap the “Me” tab.
Step 4: Scroll down and tap “Use This iPhone as My Location.”
Setting a secondary iPhone as the location source within the Find My app.
2. Use an iPhone Location Changer App
Location changer apps, also known as location spoofing apps, allow you to virtually alter your GPS location. These apps can make your iPhone appear to be in a completely different place. This offers a more subtle way to control your perceived location without stopping sharing altogether.
This method gives you the flexibility to choose any location, enhancing your privacy control. It’s particularly useful when you want to manage what others see while maintaining the appearance of continuous location sharing.
Simply download a reputable location changer app from the App Store, follow the setup instructions, and select your desired fake location.
However, be aware that these apps can sometimes consume more battery as they often run in the background.
Note: While convenient, location changer apps may interfere with the proper functioning of some location-based apps and services.
Bonus: Get Alerts about Your Child’s Shared Location
Understanding that individuals might seek ways to discreetly manage location sharing, it’s also important for parents to have tools to monitor their children’s location reliably. For this purpose, consider using AirDroid Parental Control.
This app allows you to create geofences and receive instant alerts when your child enters or leaves designated areas. It helps you stay informed about their whereabouts without constant manual checks.
Step 1: Download the AirDroid Parental Control app on your device.
Step 2: Open the app and follow the on-screen prompts to grant necessary permissions.
Step 3: Install AirDroid Kids on your child’s iPhone and pair it with your parent account.
Step 4: In AirDroid Parental Control, tap the “Location” icon at the bottom.
Step 5: Tap “Geofence” and set up your desired geofenced areas.
Once configured, you’ll receive notifications whenever your child crosses the boundaries of these geofences.
Setting up geofences in AirDroid Parental Control to monitor a child’s location.
Final Words
Managing your iPhone location sharing discreetly involves choosing the right method for your needs. Whether it’s using Airplane Mode for a quick break, selectively stopping sharing in Find My, or employing more advanced techniques like secondary devices or location spoofing, you have several options to maintain your location privacy without directly notifying others. Select the method that best aligns with your privacy requirements and technical comfort level.
FAQs about Stopping iPhone Location Sharing
- If I Stop Sharing My Location Will They Know?
It depends on the method. Stopping sharing in iMessage will show “xxx’s location expired.” In Find My, no notification is sent, but they’ll notice when they check your location.
- How to Know If Someone Stopped Sharing Location?
In iMessage, you’ll see “xxx’s location expired.” In Find My, their real-time location will no longer be visible.
Visual representation for FAQ section.
- Does Airplane Mode Turn off Location?
Yes, Airplane Mode disables all location services, including location sharing.
- Can You Tell When Someone Checks Your Location on Find My iPhone?
No, Find My does not notify you when someone checks your location.
Visual representation for FAQ section.
- Does No Location Found Mean They Stopped Sharing?
Not necessarily. It could be due to network issues, a turned-off phone, or stopped location sharing.