Setting up a new Apple Watch is an exciting experience, bringing a world of features to your wrist. The very first step, and arguably the most fundamental, is turning it on. This guide will walk you through the simple process of powering up your Apple Watch and getting it ready for pairing with your iPhone, ensuring a smooth and effortless start to your wearable journey.
To begin, you’ll need a few essentials. First and foremost, ensure you have an iPhone XS or a later model. These models are compatible with the latest Apple Watch features and operating systems. Your iPhone should also be updated to the latest version of iOS to guarantee seamless compatibility. If you’re unsure about your iPhone model, Apple provides resources to identify your iPhone model. Similarly, instructions for updating your iPhone to the newest iOS version are readily available. Having the latest software on both devices is crucial for a trouble-free setup.
Before you even think about pressing any buttons, there are a couple of preliminary steps to ensure a smooth power-on and setup process. Firstly, updating your iPhone to the latest iOS version is paramount. This ensures compatibility and access to the newest features for both your phone and watch. Secondly, confirm that Bluetooth is enabled on your iPhone. Apple Watches communicate with iPhones via Bluetooth, so this connection needs to be active. Finally, your iPhone should be connected to a stable Wi-Fi or cellular network. A network connection is necessary for downloading updates, signing into your Apple ID, and completing the setup process.
If you’re transitioning from an older iPhone and have already set up an Apple Watch, but wish to connect it to a new iPhone, Apple simplifies this process as well. You can transfer your Apple Watch and all its content to your new iPhone, maintaining all your data and settings.
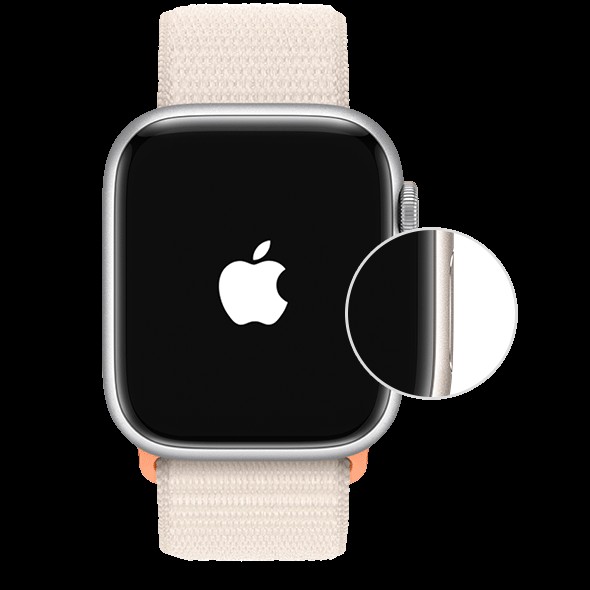
Now, let’s get to the main task: turning on your Apple Watch. Locate the side button on the right side of your Apple Watch. This elongated button is distinct from the Digital Crown, the rotating dial. To power on your Apple Watch, press and hold the side button. Keep pressing it for a few seconds until you see the Apple logo appear on the watch face. This is the universal symbol indicating that your Apple Watch is powering up. Once the logo is visible, you can release the side button.
After turning it on, place the Apple Watch on your wrist, ensuring it’s snug but comfortable. The watch needs to be in contact with your skin to activate and function correctly.
With your Apple Watch powered on and on your wrist, the next step involves your iPhone. Bring your Apple Watch close to your iPhone. Within a few moments, you should see a message pop up on your iPhone screen that reads: “Use your iPhone to set up this Apple Watch.” When this message appears, tap Continue.
If, for any reason, this message doesn’t automatically appear, don’t worry. You can manually initiate the pairing process. Open the Apple Watch app on your iPhone (it’s a pre-installed app with a watch icon). Within the app, tap on All Watches located at the top, and then tap Add Watch. This will manually start the pairing process.
At this stage, you’ll be asked to specify who the Apple Watch is for. If it’s for yourself, tap Set Up for Myself. Alternatively, if you are setting up the watch for a family member, perhaps a child or an elderly relative, tap Set Up for a Family Member. If you choose this option, you will then need to follow the specific steps to set up the watch for someone in your family.
It’s crucial to maintain proximity between your Apple Watch and iPhone throughout the subsequent setup steps. Keep them close together to ensure a stable and uninterrupted connection.
The next stage of the setup process involves visually pairing your devices. Your iPhone will now use its camera to scan a unique animation displayed on your Apple Watch face. Hold your iPhone directly over the animation, centering the watch face within the viewfinder that appears on your iPhone screen. Maintain this position and wait for a message on your iPhone confirming that your Apple Watch is successfully paired. This visual pairing method is quick and usually very reliable.
However, if you encounter difficulties with the camera pairing, or if the animation doesn’t appear on your watch, or if your iPhone is unable to read the animation, there’s a manual pairing option. On your iPhone screen, tap Pair Apple Watch Manually. Selecting this will guide you through an alternative, step-by-step process to pair your devices without relying on the camera. Follow the on-screen prompts to complete the manual pairing.
Once paired, you’ll be prompted to choose between setting up your Apple Watch as new or restoring from a backup. If this is your very first Apple Watch, select Set Up as New Apple Watch. You might be prompted to update your Apple Watch to the latest version of watchOS at this point; if so, it’s recommended to proceed with the update to ensure you have the most current software.
If you have previously used another Apple Watch with your current iPhone, a screen will appear asking Make This Your New Apple Watch?. This screen offers Express Setup, which quickly configures your new watch based on your previous setup. Tap Apps & Data and Settings to review how Express Setup will configure your new watch, and then tap Continue if you are happy with these settings. For more control over the setup, tap Customize Settings. This option allows you to restore from a backup of a previous Apple Watch, giving you the option to choose a specific backup, or to select Set Up as New Apple Watch if you prefer a completely fresh start and want to customize every setting individually.
Occasionally, your Apple Watch may require a software update on your iPhone before it can be fully set up. If your iPhone indicates that a software update is necessary, tap Update Now and allow the update process to complete before continuing the watch setup.
Next, you’ll be asked to choose your preferred wrist for wearing the Apple Watch – either left or right. Select your choice and tap Continue.
You will then need to read and agree to the Terms and Conditions. Carefully review them, and if you agree, tap Agree to proceed.
The subsequent steps involve personalizing your Apple Watch experience. You may be asked to sign in to your Apple Account. If prompted, enter your Apple Account password. If you are not immediately asked to sign in, you can do so later through the Apple Watch app by navigating to General > Apple Account and signing in there. Signing into your Apple ID is essential for features like cellular connectivity on cellular models of the Apple Watch and iCloud integration.
If Find My is not already enabled on your iPhone, you might be asked to turn on Activation Lock. If an Activation Lock screen appears, it means your Apple Watch is already linked to an Apple Account. To continue the setup, you will need to enter the email address and password associated with that Apple Account. If you purchased a pre-owned Apple Watch and encounter an Activation Lock screen, you might need to contact the previous owner to remove Activation Lock.
You will then be given the option to create a passcode for your Apple Watch. While you can skip this step, it’s highly recommended to set up a passcode, especially if you plan to use features like Apple Pay which requires a passcode for security. On your iPhone, tap Create a Passcode or Add a Long Passcode, and then switch to your Apple Watch to enter your new passcode. If you prefer not to use a passcode, tap Don’t Add Passcode.
Following the passcode setup, you can customize settings such as selecting your preferred text size and choosing whether to use bold text for better readability.
If you opted for Express Setup earlier, your Apple Watch will automatically apply certain settings from your iPhone. You’ll see a summary of settings being shared, such as Find My, Location Services, Wi-Fi Calling, and Diagnostics, which will be automatically enabled on your Apple Watch if they are active on your iPhone.
You will also be prompted to add or update personal details like your date of birth. This information is important for accurate Fitness and Health data tracking. You can also configure health notifications, such as noise level monitoring, and learn about Emergency SOS and Fall Detection features.
For cellular models of Apple Watch, you’ll be guided through the process of setting up cellular service, allowing your watch to connect to a mobile network independently of your iPhone.
Next, you will be prompted to set up Apple Pay by adding a credit or debit card. Follow the on-screen instructions to add your card details. Your iPhone will then guide you through exploring other features, such as the Always On display (on supported models) and choosing your preferred app view (Grid View or List View).
As the setup nears completion, your Apple Watch and iPhone will synchronize data in the background. Keep your devices close together during this syncing process to ensure it completes smoothly. Your Apple Watch will display the watch face once the pairing and synchronization are finished, indicating that it is ready for use.
Once setup is complete, it’s time to start exploring your new Apple Watch. Familiarize yourself with the gestures that control your Apple Watch. Apple also provides a comprehensive Apple Watch User Guide for in-depth information. You can also personalize your watch by learning how to customize your watch face and add or remove apps to tailor it to your needs.
If you encounter any issues during the power-on or setup process, Apple provides helpful resources to troubleshoot common problems.
If your Apple Watch won’t turn on: The most common reason is a depleted battery. Try charging your Apple Watch for at least a few minutes and then try turning it on again.
If you’re asked for a passcode you don’t recognize: This usually indicates that the Apple Watch is still paired with a previous iPhone. If you can’t recall the passcode, you will need to erase your Apple Watch and set it up again. This will remove the old pairing and allow you to set it up with your current iPhone.
If an Activation Lock screen appears: As mentioned earlier, this means the watch is linked to an Apple Account. You’ll need to enter the credentials for that account. If it’s a second-hand watch and you don’t know the credentials, contact the previous owner to remove Activation Lock.
If you can’t complete the setup or encounter an error message: Consult Apple Support or their online resources for specific error codes or general setup troubleshooting. For further assistance, you can contact Apple Support directly. They can provide personalized guidance to resolve any setup issues you may be experiencing.