Uninstalling games can sometimes be more complicated than diving into the game itself, and when it comes to removing Valorant, many players find themselves searching for clear instructions. Whether you’re clearing up disk space, resolving persistent technical issues, or simply deciding to take a break from the intense gameplay, understanding the correct way to uninstall Valorant is essential. The process isn’t as straightforward as simply deleting the game files, primarily because of Riot Vanguard, Valorant’s anti-cheat system, which integrates deeply into your system to ensure fair play.
Knowing the proper procedure to remove Valorant not only frees up valuable storage space but also ensures your system remains clean and performs optimally. A thorough uninstallation process prevents lingering files and potential conflicts down the line. This comprehensive guide for 2024 will walk you through every step on How To Uninstall Valorant effectively. We’ll cover the standard method, alternative approaches for when things don’t go as planned, and troubleshooting for common issues like “Valorant won’t uninstall” or “Why can’t I uninstall Valorant?”.
By the end of this guide, you’ll be fully equipped with the knowledge to confidently uninstall Valorant from your PC, ensuring a complete removal without leaving behind unwanted traces. Let’s dive into the process and make sure your system is clean and ready for whatever comes next.
Understanding Your Reasons to Uninstall Valorant
There are many reasons why you might decide to uninstall Valorant. Sometimes, it’s driven by frustrating technical problems. Players often encounter errors like critical issues or problems related to Windows TPM 2.0 and Secure Boot.
Often, a fresh installation is the recommended fix for these persistent problems. Common Valorant error codes that are often resolved with a clean reinstall include VAN9001, VAN 128, VAN -102, VAN -104, and many more. Starting fresh can eliminate corrupted files and system conflicts that might be causing these issues.
Beyond technical fixes, personal reasons might also lead you to uninstall Valorant. The competitive ranked mode and sometimes toxic in-game environments can become sources of stress. If the ranked grind is negatively impacting your mental well-being, uninstalling can be a positive step towards reducing stress.
Feeling like Valorant is consuming too much of your time, or even becoming an addiction, is another valid reason to remove the game. Recognizing the need for a break or a shift in focus is important for maintaining a healthy balance.
Common Uninstall Errors and How to Avoid Them
When you attempt to uninstall Valorant, you may encounter errors that leave you wondering why Valorant is not uninstalling. This is because simply trying to uninstall Valorant like any other standard application might not fully remove it from your system.
The primary culprit behind this is Riot Vanguard, Valorant’s anti-cheat system. Vanguard’s deep system integration prevents straightforward uninstallation methods from completely removing the game and its components. This is designed to protect the game from cheating, but it adds an extra layer of complexity when uninstalling.
Here are some common Valorant error codes you might encounter, not necessarily during uninstallation, but often related to game issues that might prompt you to uninstall:
| Error Code | Message | Solution |
|---|---|---|
| VAN 140 | Valorant has encountered a connection error. Please relaunch to reconnect. | Upgrade Windows 7 to Windows 10 or 11. If the error persists, uninstall Riot Vanguard and Valorant and reinstall. Valorant Support is currently working on an official solution. |
| VAN9001 | Secure Boot or TPM (Trusted Platform Module) 2.0 is not enabled. | Check if your Windows 11 system supports Secure Boot and TPM 2.0. Enable them in your BIOS settings if necessary. |
| VAN9002 | This build of Vanguard requires Control Flow Guard (CFG) to be enabled in system exploit protection settings. | Change your exploit protection settings to enable CFG. If the error persists, submit a ticket to Valorant Support Site. |
| VAN9003 | Secure Boot is not enabled. | Check if your Windows 11 system supports Secure Boot and enable it in your BIOS. |
If you encounter these or other errors and decide that uninstalling is the best course of action, following the correct steps is crucial to avoid further complications and ensure a clean removal.
Step-by-Step Guide to Uninstalling Valorant Completely
To thoroughly uninstall Valorant from your Windows PC, you need to follow a specific sequence of steps, primarily focusing on disabling and uninstalling Riot Vanguard before removing the game itself. Here’s a detailed, step-by-step guide:
Step 1: Exit Riot Vanguard
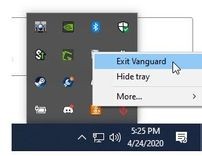
- Locate the Vanguard Icon: Look for the Riot Vanguard icon in your system tray, usually found in the bottom-right corner of your taskbar. It typically looks like a stylized “V.”
- Right-Click and Exit: Right-click on the Vanguard logo to bring up a menu. Select the “Exit Vanguard” option from the menu.
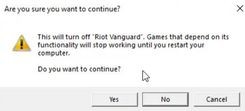
- Confirm Exit: A confirmation prompt will appear, asking if you are sure you want to exit Vanguard. Click “Yes” to proceed. This action stops the Vanguard anti-cheat service from running on your computer, which is necessary before you can uninstall it.
Step 2: Uninstall Riot Vanguard
- Open Settings App: Use the keyboard shortcut “Windows key + I” to quickly open the Windows Settings app. Alternatively, you can click on the Start Menu and then select the “Settings” icon (gear icon).
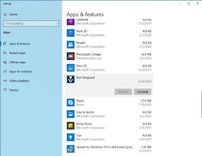
- Navigate to Apps: In the Settings app, click on the “Apps” section. This will take you to the Apps & features settings where you can manage installed applications.
- Find Riot Vanguard: In the list of installed apps, scroll down or use the search bar to locate “Riot Vanguard“. Click on it to select it.
- Uninstall Vanguard: Once selected, an “Uninstall” button will appear. Click this button. Windows will then prompt you to confirm the uninstallation. Follow the on-screen instructions to complete the uninstallation process for Riot Vanguard.
Step 3: Uninstall Valorant
- Return to Apps List: If you’re not already there, use the “Windows key + I” shortcut again to open the Settings app and go back to the “Apps” section.
- Find Valorant: In the apps list, locate “Valorant“. You can again scroll through the list or use the search bar to find it quickly.
- Uninstall Valorant: Click on “Valorant” to select it, and then click the “Uninstall” button. Confirm your decision when prompted to remove Valorant from your Windows PC.
- Restart Your System: After successfully uninstalling both Riot Vanguard and Valorant, it’s crucial to restart your computer. This ensures that all components are fully removed and that any ongoing processes are terminated.
- Check for Leftover Files: After restarting, open “File Explorer“. In the address bar, type or paste “C:Riot Games” and press Enter. If any folders or files related to Riot Games are still present, delete them manually. This step ensures a completely clean uninstallation.
By meticulously following these steps, you will effectively disable Vanguard, uninstall Riot Vanguard, and then completely remove Valorant from your system. Restarting your PC at the end is a key step to finalize the process and eliminate any lingering traces of the game.
Alternative Methods to Uninstall Valorant
If the standard method described above doesn’t work, or if you encounter issues like “Why can’t I uninstall Valorant?”, there are alternative methods you can try. Often, problems arise due to Windows settings issues or corrupted game files. In such cases, manually uninstalling Vanguard and Valorant using Command Prompt can be effective.
Using Command Prompt for Uninstallation
This method uses command lines to directly remove the Vanguard service. Before proceeding, ensure you have exited Vanguard from the system tray as described in the first step of the standard method.
- Open Command Prompt as Administrator: Press the Windows key or click on the Start Menu. Type “CMD” to search for Command Prompt. In the right pane, click on “Run as administrator“. This is crucial as administrative privileges are required to execute these commands.
- Enter Commands to Delete Vanguard Services: In the Command Prompt window, type the following commands one by one, pressing Enter after each command:
sc delete vgcsc delete vgk
These commands instruct the system to delete the Vanguard service (vgc) and Vanguard kernel mode service (vgk).
- Restart Your System: Restart your computer after executing these commands. This step is essential to ensure the Vanguard services are fully stopped and removed.
- Delete Riot Vanguard Folder: After restarting, open File Explorer. Navigate to
C:Program Files. Locate the folder named “Riot Vanguard” and delete it. - Uninstall Valorant via Settings: Now, follow the steps to uninstall Valorant through the Settings app as described in the standard method (Step 3 in the step-by-step guide). Since Vanguard has been manually removed, the uninstallation of Valorant should proceed smoothly.
This Command Prompt method is often effective in resolving issues that prevent standard uninstallation and ensures a thorough removal of both Vanguard and Valorant.
Will I lose my game progress if I uninstall Valorant? No, uninstalling Valorant will not cause you to lose your game progress. All your progress, including rank, skins, and other achievements, is saved on your Riot account, which is stored on cloud servers. You can retrieve your progress whenever you log back into Valorant with the same account credentials after reinstalling the game.
Is it possible to uninstall Valorant from the Riot Client? No, Valorant cannot be uninstalled directly from within the Riot Client. The Riot Client is a launcher for various Riot Games, but game-specific uninstallations need to be done through the operating system’s app settings, as described in the methods above. Following the steps outlined in this guide will effectively remove Valorant and, if you choose to uninstall it separately via the Apps settings, the Riot Client as well.
Troubleshooting Common Uninstall Issues
Even with detailed guides, you might still encounter issues while uninstalling Valorant. Common problems include residual files remaining after uninstallation or needing to reinstall the game later. Here’s how to troubleshoot these situations:
Dealing with Residual Files After Uninstall
After uninstalling Valorant and Riot Vanguard, some hidden files may still linger on your system. To ensure a completely clean removal and free up space, you should check and delete these residual files:
- Open Run Dialog: Press “Windows + R” keys simultaneously to open the “Run” dialog box.
- Access AppData Roaming Folder: Type “%appdata%” in the Run dialog and press Enter. This will open the Roaming folder within your AppData directory. Look for a folder named “Riot Games” and delete it if present.
- Access LocalAppData Folder: Open the Run dialog again (Windows + R) and type “%LocalAppData%” then press Enter. In the LocalAppData folder, find and delete the “Riot Games” folder.
- Access ProgramData Folder: Open the Run dialog once more (Windows + R) and type “%ProgramData%” and press Enter. In the ProgramData folder, check for a “Riot Games” folder and delete it. Note that ProgramData is a hidden folder, so ensure your File Explorer is set to show hidden items.
For a deeper system cleanup, you might consider using a registry cleaner application like CCleaner or RegSeeker. These tools can help remove any remaining registry entries related to Valorant, which can further clean up your system. However, use registry cleaners with caution, as incorrect use can lead to system instability. Always back up your registry before using such tools.
Reinstalling Valorant: A Quick Guide
If you decide to reinstall Valorant in the future, the process is straightforward:
- Visit the Official Valorant Website: Go to https://playvalorant.com/en-us using your web browser.
- Log In or Register: Log in to your existing Riot account, or register for a new account if needed.
- Download Valorant: Navigate to the download page on the Valorant website. Click the download button to download the Valorant installer.
- Run the Installer: Once the download is complete, run the installer file. Follow the on-screen instructions to install the Valorant client on your computer.
- Update and Launch: After installation, launch the Valorant client. It will automatically check for and download any necessary updates. Allow sufficient time for updates to complete.
- Log In and Play: Once updated, log in to Valorant with your Riot account credentials. Choose your server, and you’re ready to jump back into the game.
Remember, your game progress is linked to your Riot account, so reinstalling Valorant will not affect your rank, skins, or other in-game items. Everything will be as you left it.
If you continue to experience issues or have more specific questions, reaching out to Riot Games Support through their official support channels is always a good option for personalized assistance.
Conclusion
This guide has provided a detailed walkthrough on how to uninstall Valorant from your PC, addressing not only the standard uninstallation steps but also alternative methods and troubleshooting for common issues. We’ve emphasized the importance of properly removing Riot Vanguard, Valorant’s anti-cheat system, to ensure a complete and clean uninstallation.
Whether your reasons for uninstalling are technical troubleshooting, mental well-being, or simply freeing up space, following these methodologies will help you effectively remove the game and maintain your system’s health. Meticulously removing residual files is crucial for optimizing system performance and avoiding potential conflicts with future software installations.
Uninstalling Valorant, while potentially reversible through reinstallation, allows you to manage your gaming experience on your own terms. The comprehensive steps, alternative techniques, and troubleshooting tips provided equip you with the knowledge to handle the uninstallation process efficiently and effectively.
The broader lessons from this guide extend beyond just uninstalling Valorant. They offer valuable insights into managing software installations and maintaining overall system health. Whether you’re taking a break from Valorant or making space for new digital experiences, this guide empowers you to do so with confidence and competence.
FAQs
Q: What are the steps to uninstall Valorant in 2024?
A: To completely uninstall Valorant in 2024, follow these steps:
- Disable Riot Vanguard by exiting it from the system tray.
- Uninstall Riot Vanguard via Windows Settings > Apps > Apps & features.
- Uninstall Valorant via Windows Settings > Apps > Apps & features.
- Restart your computer.
- Manually delete any remaining Riot Games folders in C:Riot Games, %appdata%, %LocalAppData%, and %ProgramData%.
- Optionally, use a registry cleaner to remove residual registry entries.
Q: Why can’t I uninstall Valorant?
A: If you are facing difficulties uninstalling Valorant, it’s likely because Riot Vanguard needs to be uninstalled separately first. Attempting to uninstall Valorant without first removing Vanguard can lead to incomplete removal and errors. Ensure you exit Vanguard and uninstall it before trying to uninstall Valorant.
Q: Is it possible to completely uninstall Riot Vanguard?
A: Yes, it is possible to completely uninstall Riot Vanguard. You can uninstall it through the Windows Settings > Apps > Apps & features, by finding “Riot Vanguard” in the list and selecting “Uninstall”. Keep in mind that Riot Vanguard is required to play Valorant and League of Legends, so uninstalling it will prevent you from playing these games until it is reinstalled.