Unpairing your Apple Watch is a necessary step in several situations, whether you’re upgrading to a new model, selling or gifting your current one, or simply troubleshooting connection issues. When you unpair your Apple Watch, it essentially restores it to its factory settings, removing your personal data and settings. This guide will walk you through the process of how to unpair your Apple Watch effectively, ensuring a smooth and secure transition.
Before You Begin: Important Considerations Before Unpairing
Before you dive into the unpairing process, there are a few crucial points to keep in mind to ensure a seamless experience:
-
Have Your Paired iPhone Nearby (If Possible): The ideal method for unpairing your Apple Watch involves using your paired iPhone. This method not only erases all content and settings but also removes Activation Lock, which is essential if you plan to give away or sell your watch. Activation Lock prevents anyone else from using your Apple Watch without your Apple ID and password.
-
Transit Cards in Wallet App: If you’re using a transit card in your Apple Watch’s Wallet app, it’s vital to remove it before unpairing. This prevents any issues with your transit card after the unpairing process. You can find instructions on how to remove your transit card from your Apple Watch on Apple Support.
-
Cellular Plan Management: For GPS + Cellular models, you’ll be given options to manage your cellular plan during unpairing. Decide whether you want to keep or remove your plan based on your future plans for the Apple Watch.
-
No Physical SIM or Reset Button: It’s important to note that Apple Watches do not have physical SIM slots or traditional reset buttons. The small holes you see are for microphones, speakers, and depth measurement on certain models. Do not attempt to insert any objects into these holes.
How to Unpair Apple Watch When You Have Your iPhone
This is the recommended method for most users as it ensures complete unpairing and removes Activation Lock. Follow these steps to unpair your Apple Watch using your iPhone:
-
Bring Your Devices Close: Ensure your Apple Watch and the iPhone it’s paired with are close to each other throughout the unpairing process.
-
Open the Apple Watch App on Your iPhone: Locate and open the Apple Watch app on your iPhone’s home screen.
-
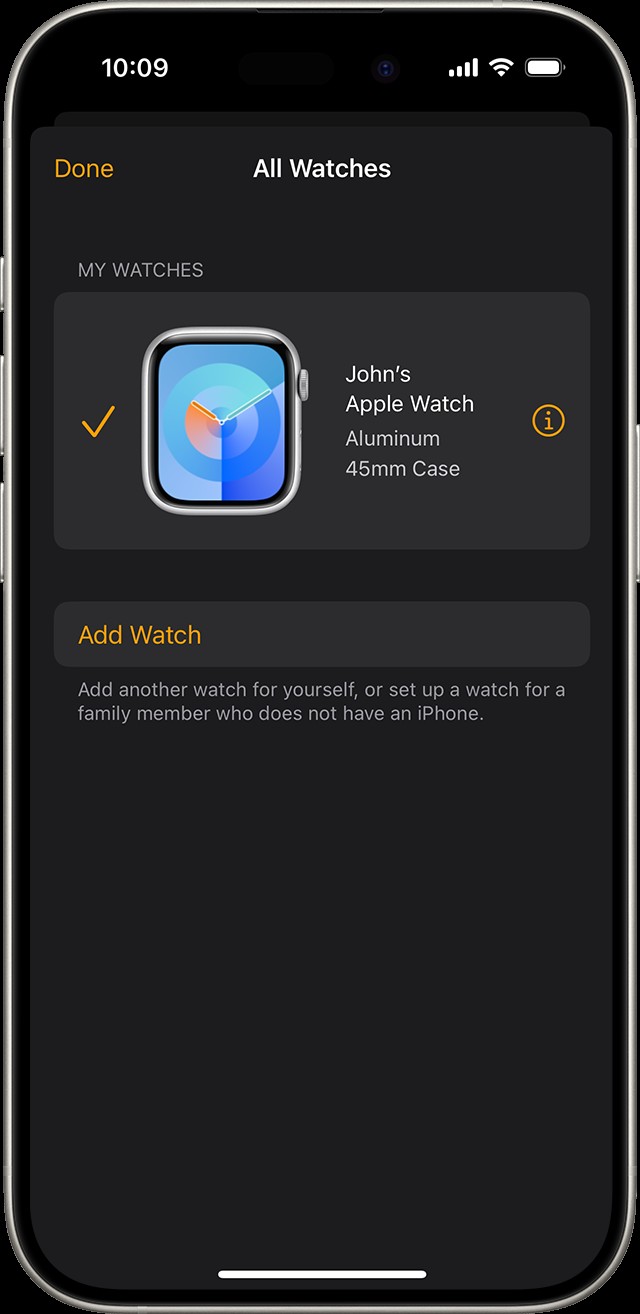
Navigate to All Watches: In the Apple Watch app, tap on the “My Watch” tab at the bottom. Then, tap “All Watches” at the top of the screen.
-
Access Watch Settings: You will see a list of your paired Apple Watches. Tap the “info” button (it looks like a lowercase ‘i’ in a circle) next to the Apple Watch you intend to unpair.
-
Initiate Unpairing: On the watch settings screen, scroll down and tap “Unpair Apple Watch.”
-
Confirm Unpairing: A confirmation prompt will appear. Tap “Unpair [Your Apple Watch Name]” to proceed.
-
Cellular Plan Options (For Cellular Models): If you have a GPS + Cellular Apple Watch, you’ll be asked whether to keep or remove your cellular plan.
- Keep Plan: Choose this option if you plan to pair your Apple Watch with the same iPhone again in the future.
- Remove Plan: Select this if you don’t intend to pair the watch with this iPhone again. If you’re not pairing with another watch or iPhone, you may need to contact your carrier to cancel your cellular subscription separately.
-
Enter Apple ID Password: For security and to disable Activation Lock, you’ll be prompted to enter your Apple ID password. Type your password and then tap “Unpair.”
During this process, your iPhone automatically creates a new backup of your Apple Watch data before erasing it. This backup can be used to restore a new Apple Watch later. Once the unpairing is complete, your Apple Watch will display the “Start Pairing” message, indicating it’s ready to be paired again or set up as new.
After unpairing, you have the option to set up your Apple Watch again with a different iPhone or the same one, or you can turn it off completely if you are selling or giving it away.
How to Erase Apple Watch Without Your iPhone
In situations where you don’t have access to your paired iPhone, you can still erase your Apple Watch directly, although Activation Lock will remain enabled. Here’s how to erase your Apple Watch without an iPhone:
-
Open Settings on Your Apple Watch: Press the Digital Crown on the side of your Apple Watch to access the app menu and tap the “Settings” app icon (it looks like a gear).
-
Navigate to Reset Options: In the Settings app, scroll down and tap “General,” then scroll down again and tap “Reset.”
-
Choose Erase All Content and Settings: On the Reset screen, tap “Erase All Content and Settings.”
-
Enter Passcode (If Prompted): If you have a passcode set up on your Apple Watch, you’ll be asked to enter it.
-
Cellular Plan Options (For Cellular Models): Similar to the iPhone unpairing method, for GPS + Cellular models, you’ll need to choose whether to keep or remove your cellular plan. Select the option that suits your needs.
-
Confirm Erasing: Tap “Erase All” to confirm your decision and begin the factory reset process.
After confirming, your Apple Watch will reset to its factory settings, erasing all your personal content, data, and settings. However, it’s important to remember that this method does not remove Activation Lock. To remove Activation Lock, unpairing with your iPhone is necessary. When setting up the watch again, you will need the Apple ID and password associated with the watch to bypass Activation Lock if it was not removed by unpairing with the iPhone.
Learn More About Apple Watch Passcodes
If you happen to forget your Apple Watch passcode and are having trouble resetting your device, Apple provides resources to help. You can find guidance on what to do if you forgot your Apple Watch passcode on their support website.
By following these detailed steps, you can confidently unpair your Apple Watch, whether you have your iPhone or not, ensuring your data is secure and your device is ready for its next chapter.