Creating and managing email signatures in Outlook is essential for professional communication. A well-crafted signature not only provides recipients with your contact information but also reinforces your brand identity. Whether you’re updating your job title, adding new contact details, or simply refreshing your signature design, this guide will walk you through the process of how to update your signature in Outlook, ensuring your emails always leave a lasting impression.
Accessing Signature Settings in Outlook
The first step to updating your signature is to navigate to the signature settings within Outlook. This process is straightforward and will only take a few moments.
- Open a new email message: Start by clicking on the “New Email” button in Outlook. This action will open a new message window, providing you with access to the necessary menu options.
- Navigate to the Signature menu: In the new message window, locate the “Message” tab in the ribbon at the top. Within this tab, find the “Signature” button. It might be displayed directly or located under a dropdown menu depending on your Outlook window size and whether you are composing a new email, reply, or forward. Click on “Signature” and then select “Signatures” from the dropdown menu. This will open the “Signatures and Stationery” dialog box, where you can manage your email signatures.
Accessing the signature settings in Outlook when replying or forwarding an email, showing the “Signature” button under the “Message” menu.
Editing an Existing Signature or Creating a New One
Once you have the “Signatures and Stationery” dialog box open, you can either edit an existing signature or create a brand new one.
-
Select a signature to edit or create new: In the “Select signature to edit” section, you will see a list of your current signatures. To modify an existing signature, simply select it from the list. If you want to create a new signature, click on the “New” button.
-
Name your new signature (if creating new): If you clicked “New,” a “New Signature” dialog box will appear. Type a descriptive name for your new signature in the text field and click “OK”. This name will help you identify the signature later when choosing which one to use.
-
Edit your signature: In the “Edit signature” box, you can now compose or modify your signature content. Outlook provides a mini formatting bar just above the edit box, allowing you to change fonts, font sizes, font colors, text alignment, and more. For more complex signatures, you can even use Word to design your signature with elements like bullets, tables, or borders, and then copy and paste it into the “Edit signature” box. You can also use pre-designed templates for inspiration and to save time.
Tips for enhancing your signature:
- Links and Images: Utilize the formatting bar to add hyperlinks to your website or social media profiles and insert images like your company logo to enhance brand recognition.
- Social Media Icons: Consider adding social media icons to your signature to further connect with your network professionally.
- Templates: Explore pre-designed templates for a professionally designed starting point. Many templates are available online, including those from Microsoft, which you can customize to fit your needs.
Setting Default Signatures for Emails
To ensure your signature is automatically added to your emails, you need to configure the default signature settings.
- Choose default signature settings: In the “Choose default signature” section, you will find dropdown menus for “E-mail account,” “New messages,” and “Replies/forwards.”
- Associate signature with email account: If you have multiple email accounts in Outlook, use the “E-mail account” dropdown to choose which email account you want to associate with the signature you are editing. You can set different default signatures for each email account.
- Set default for new messages: To automatically add a signature to all new emails you compose, use the “New messages” dropdown. Select the signature you want to use as your default for new messages. If you prefer not to automatically add a signature to new messages, select “(none)”.
- Set default for replies and forwards: Similarly, use the “Replies/forwards” dropdown to choose a signature to be automatically included when you reply to or forward emails. You can select a different signature than the one for new messages, or choose “(none)” if you don’t want automatic signatures for replies and forwards.
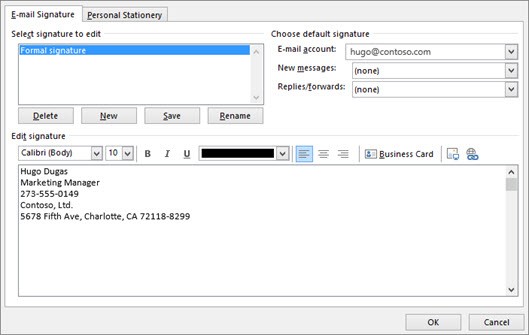 Configuring default signature settings in Outlook, selecting signatures for new messages and replies/forwards.
Configuring default email signatures in Outlook settings, demonstrating options for new messages and replies/forwards.
- Save changes: Once you have configured your signature and default settings, click “OK” to save your changes and close the “Signatures and Stationery” dialog box.
Important Note: If you have just created a new signature and set it as default, it will not automatically appear in the email message you opened in the first step. The default signature setting will apply to all future new messages. To add the signature to the current email, you will need to insert it manually as described below.
Adding a Logo or Image to Your Signature
Visual elements like logos or professional headshots can significantly enhance your email signature. Here’s how to add an image:
- Open Signature settings: Follow the steps in “Accessing Signature Settings in Outlook” to open the “Signatures and Stationery” dialog box.
- Select signature to edit: Choose the signature you want to add an image to from the “Select signature to edit” list.
- Insert image: In the “Edit signature” box, place your cursor where you want to insert the image. Click on the “Image” icon in the formatting bar.
- Locate and insert your image: A dialog box will appear, allowing you to browse your computer and locate the image file you want to use. Select your image and click “Insert.”
- Resize image (if needed): After inserting the image, you might need to resize it to fit appropriately within your signature. Right-click on the image, and select “Picture.” Go to the “Size” tab, and adjust the height and width as needed. To maintain the image’s proportions, ensure the “Lock aspect ratio” checkbox is selected. Click “OK” to save the resized image.
- Save changes: Click “OK” in the “Signatures and Stationery” dialog box to save your changes.
Manually Inserting a Signature
Even if you have set up default signatures, there might be times when you want to use a different signature or add a signature to an email you are drafting before setting up defaults. Here’s how to manually insert a signature:
- In your email message: In the email message window where you are composing your email, go to the “Message” tab in the ribbon.
- Click on Signature: Find and click the “Signature” button.
- Choose your signature: A dropdown menu will appear, listing all the signatures you have created. Select the signature you want to insert into your email. The selected signature will be immediately added to your email message.
By following these steps, you can effectively update and manage your Outlook signatures, ensuring every email you send professionally represents you. Regularly reviewing and updating your signature is a good practice to keep your contact information current and your email communication polished.