Have you ever been captivated by the sharp, attention-grabbing sound of a finger whistle? Perhaps you’ve seen it in movies, used to hail a cab or get someone’s attention across a crowded space. For many, including myself, learning How To Whistle With Your Fingers has been a long-held aspiration. It seems like such a cool and practical skill, yet the technique can feel elusive.
If you’ve tried countless times to produce that piercing sound and ended up frustrated, you’re not alone. Many people share this desire to master the finger whistle, often recalling a family member who possessed this impressive ability. Like many others, I was determined to unlock this skill and share the secret with you. After dedicated practice and some initial struggles, I finally cracked the code.
This guide breaks down the process into simple, manageable steps, so you too can learn how to whistle loudly and clearly with your fingers. Get ready to impress your friends and family with this awesome skill!
Step-by-Step Guide to Finger Whistling
The secret to a powerful finger whistle lies in using your fingers to shape your mouth in a specific way. Your fingers play two crucial roles: positioning your tongue correctly and tucking your lips to create the ideal airflow for producing a whistle. This precise formation acts like a bevel, channeling your breath to generate that distinctive, sharp sound.
There are several finger combinations you can use, and experimentation is key to finding what works best for you. Let’s explore two popular and effective methods:
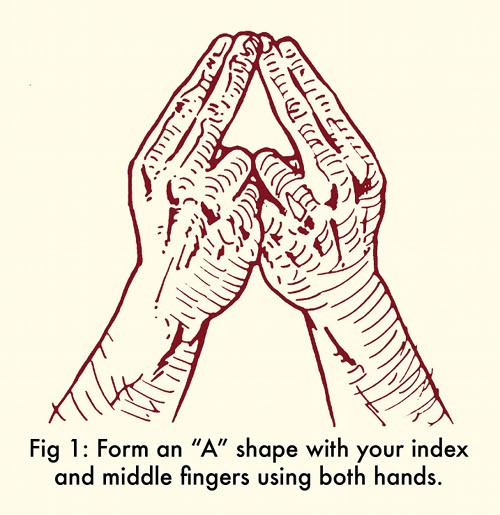
Two-Handed Index and Middle Finger Technique
This method is often favored for its power and control, making it a great starting point for beginners.
- Prepare Your Fingers: On both hands, extend your index and middle fingers, keeping them pressed closely together. Fold your ring and pinky fingers down towards your palm, securing them with your thumbs.
- Form the “A” Shape: Bring the middle fingers of both hands together, creating a distinct “A” shape with your index fingers forming the sides.
Many find this two-handed technique provides a louder and more forceful whistle due to the stability and control it offers.
One-Handed “OK” Sign Method
For a more casual and convenient approach, the one-handed “OK” sign technique is an excellent alternative. This allows you to whistle with just one hand, leaving your other hand free.
- Create the “OK” Shape: Form the “OK” sign using either your thumb and index finger or your thumb and middle finger of your preferred hand. Ensure the tip of your thumb touches the side of your index or middle finger, creating a small circle.
Mastering Lip and Tongue Placement for a Clear Whistle
Proper lip and tongue positioning are fundamental to successful finger whistling. These steps ensure you create the optimal conditions for sound production:
- Moisten Your Lips: Lightly wet your lips by licking them. This helps create a better seal and facilitates lip movement.
- Tuck Your Lips Over Your Teeth: Curl your lips inwards, tucking them back over your teeth. Imagine mimicking the look of someone without teeth. Your lips need to completely cover your teeth to create the necessary airflow channel for whistling. Experiment with how much or little you tuck your lips, as this can vary from person to person. Your fingers will assist in maintaining the tucked position of your lower lip.
- Position Your Tongue Backwards: This is often the trickiest part to master, but it’s the key to unlocking the finger whistle. Instead of simply pushing your tongue back, try this refined technique:
- Place the tips of your chosen fingers (either the two-handed combo or the one-handed “OK” sign) just underneath the tip of your tongue.
- Fold the tip of your tongue back and downwards, towards the back of your mouth, using your fingers to gently guide it. You’re essentially folding the front portion of your tongue back onto itself.
- Push your tongue further back into your mouth with your fingers until your first knuckle (of your index or middle finger) reaches your lower lip.
This specific tongue folding method is effective for many, but some individuals find success by simply pushing their tongue back without folding. Experiment with both approaches to discover what works best for your mouth and tongue structure.
The Art of Blowing to Produce a Loud Whistle
With your fingers correctly positioned, lips tucked, and tongue placed back, you’re ready to blow and create the whistle sound:
- Seal Your Mouth Around Your Fingers: Close your mouth firmly around your fingers, ensuring a complete seal. No air should escape from the sides of your mouth.
- Blow Gently at First: Start by blowing out a soft stream of air through the opening between your fingers. The air should only be directed over your bottom lip. If you feel air escaping from the sides of your mouth, tighten the seal around your fingers.
- Check Your Tongue Position: Ensure your tongue is not protruding into the hole between your fingers, as this will obstruct the airflow and prevent a whistle sound.
Initially, you might not produce a clear whistle. This is perfectly normal. The key is to make small adjustments. Modify the finger placement under your tongue, experiment with different finger angles, and slightly alter how much you tuck your lips. Listen for a faint, breathy sound, similar to blowing across the top of a bottle. As you find the “sweet spot,” gradually increase the force of your breath until you achieve a loud, piercing whistle.
Important Note: When you’re first learning, take breaks between attempts. Repeatedly blowing without pause can lead to hyperventilation, dizziness, and headaches.
Practice and Persistence: The Key to Mastering the Finger Whistle
Like any skill, mastering the finger whistle requires dedicated practice. Don’t be discouraged if you don’t get it immediately. Consistent effort and experimentation are crucial.
Set aside time for focused practice sessions. If you live with others, consider practicing outdoors or in a separate room to minimize any potential annoyance from the initial, less refined attempts. Even short practice bursts, like during traffic stops while driving alone, can be beneficial.
With persistence and patience, you’ll eventually discover the precise combination of finger position, lip tuck, tongue placement, and breath control that unlocks your finger whistling ability. Once you do, you’ll have a fun and impressive skill to showcase!
Quick Recap – Finger Whistling in 4 Steps:
- Form an “A” shape with your index and middle fingers using both hands (or use the one-handed “OK” sign).
- Draw your lips back to cover your teeth completely.
- Push your tongue back into your mouth, folding the tip back if helpful.
- Blow air through the hole between your index fingers (or through the “OK” sign opening).
Illustrations are based on original work by Ted Slampyak.