Taking a screenshot with a computer is a fundamental skill in today’s digital world. How Do You Screenshot With A Computer? You can capture your screen using keyboard shortcuts, built-in tools, or third-party software, and HOW.EDU.VN is here to guide you through each method, ensuring you can effectively grab, save, and share important information. Mastering the art of screen capture not only streamlines communication but also enhances productivity and collaboration, making it easier to share tutorials, document issues, or preserve valuable content. Let’s dive into the world of digital snapshots and explore how to make the most of screen capturing, image editing, and effective communication.
1. Understanding the Basics of Screenshots
Screenshots, also known as screen captures or screen grabs, are digital images of what’s displayed on your computer screen. They are incredibly useful for a variety of purposes, from creating tutorials to documenting errors. Let’s explore the fundamental aspects of screenshots.
1.1. What is a Screenshot?
A screenshot is simply a digital snapshot of your computer screen. It captures everything visible on your display at a particular moment. Think of it as taking a photo of your screen.
1.2. Why are Screenshots Important?
Screenshots serve multiple critical functions:
- Documentation: They provide visual evidence of software bugs, error messages, or specific settings.
- Communication: Screenshots can quickly illustrate a point or process, saving time and clarifying instructions.
- Tutorials: They are essential for creating step-by-step guides and visual aids.
- Archiving: Screenshots preserve important information, such as online receipts or social media posts, that might otherwise be lost.
- Collaboration: They allow you to share exactly what you’re seeing with colleagues, facilitating teamwork and problem-solving.
1.3. Basic Terminology
Before diving into the how-to, let’s define some basic terms:
- Active Window: The window that is currently in use and responds to your commands.
- Clipboard: A temporary storage area in your computer’s memory where copied data is held before being pasted.
- Image Editor: Software used to modify and enhance images, such as Microsoft Paint, Adobe Photoshop, or GIMP.
- File Format: The structure in which an image is saved, such as JPEG, PNG, or GIF.
- Screen Capture Tool: Software or a built-in feature that allows you to take screenshots.
2. Taking Screenshots on Windows
Windows offers several built-in methods for capturing your screen. Each has its own advantages, depending on what you need to capture and how you want to use the screenshot.
2.1. Using the Print Screen (PrtScn) Key
The Print Screen key is the most straightforward method for taking a screenshot on Windows.
2.1.1. Capturing the Entire Screen
To capture the entire screen:
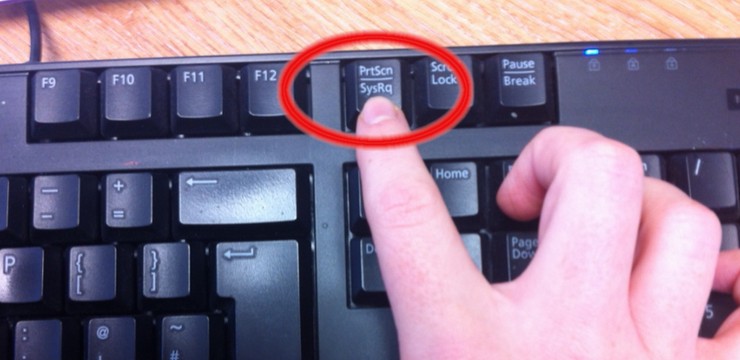
- Locate the “PrtScn” key on your keyboard. It’s usually in the upper-right corner, near the function keys (F1-F12).
- Press the “PrtScn” key. This copies an image of your entire screen to the clipboard.
- Open an image editing program like Microsoft Paint.
- Paste the screenshot by pressing “Ctrl + V” or right-clicking and selecting “Paste.”
- Edit the screenshot as needed, and save it in your desired file format (e.g., JPEG, PNG).
2.1.2. Capturing the Active Window
To capture only the active window:
- Make sure the window you want to capture is active (i.e., it’s the one you’re currently using).
- Press “Alt + PrtScn” keys simultaneously. This captures only the active window to the clipboard.
- Open an image editing program.
- Paste the screenshot (“Ctrl + V”).
- Edit and save the image.
2.2. Using the Snipping Tool
The Snipping Tool is a built-in Windows utility designed specifically for taking screenshots. It offers more flexibility than the Print Screen key.
2.2.1. Accessing the Snipping Tool
- Click on the Start menu.
- Type “Snipping Tool” in the search bar.
- Click on “Snipping Tool” to open the application.
2.2.2. Snipping Tool Modes
The Snipping Tool offers several modes for capturing screenshots:
- Free-form Snip: Allows you to draw a free-form shape around the area you want to capture.
- Rectangular Snip: Lets you drag a rectangle around the desired area.
- Window Snip: Captures a single window.
- Full-screen Snip: Captures the entire screen.
2.2.3. Taking a Screenshot with Snipping Tool
- Open the Snipping Tool.
- Select your desired mode from the “Mode” dropdown menu.
- Click “New.”
- Follow the on-screen instructions to select the area you want to capture.
- The screenshot will open in the Snipping Tool window.
- Use the built-in annotation tools (pen, highlighter) to edit the screenshot.
- Click the “Save” icon to save the screenshot in your desired file format.
2.3. Using the Snip & Sketch Tool (Windows 10 and Later)
Snip & Sketch is the modern replacement for the Snipping Tool in Windows 10 and later versions. It offers similar functionality with a more streamlined interface.
2.3.1. Accessing Snip & Sketch
- Press “Windows Key + Shift + S” simultaneously. This opens the Snip & Sketch toolbar at the top of your screen.
- Alternatively, you can find it in the Start menu or by searching for “Snip & Sketch.”
2.3.2. Snip & Sketch Modes
Snip & Sketch offers the following capture modes:
- Rectangular Snip: Drag a rectangle around the area you want to capture.
- Freeform Snip: Draw a free-form shape around the desired area.
- Window Snip: Capture a single window.
- Full-screen Snip: Capture the entire screen.
2.3.3. Taking a Screenshot with Snip & Sketch
- Press “Windows Key + Shift + S.”
- Select your desired mode from the toolbar.
- Follow the on-screen instructions to select the area you want to capture.
- The screenshot will appear as a notification in the bottom-right corner of your screen.
- Click the notification to open the screenshot in the Snip & Sketch window.
- Use the annotation tools to edit the screenshot.
- Click the “Save” icon to save the screenshot.
2.4. Using the Game Bar (Windows 10 and Later)
The Game Bar is a built-in Windows feature primarily designed for gamers, but it can also be used to take screenshots of any application.
2.4.1. Accessing the Game Bar
- Press “Windows Key + G” simultaneously to open the Game Bar.
2.4.2. Taking a Screenshot with the Game Bar
- Open the Game Bar (“Windows Key + G”).
- Click the “Screenshot” icon (camera icon) in the Game Bar.
- The screenshot will be saved in the “Captures” folder within your “Videos” folder.
2.5. Third-Party Screenshot Tools for Windows
While Windows offers several built-in options, third-party screenshot tools provide additional features and flexibility.
2.5.1. Lightshot
Lightshot is a popular, lightweight screenshot tool known for its ease of use and quick editing capabilities.
-
Key Features:
- Customizable keyboard shortcuts.
- Quick selection of screen area.
- Real-time editing tools (arrows, text, lines).
- Direct upload to the cloud.
- Reverse image search.
-
How to Use:
- Download and install Lightshot.
- Press the “PrtScn” key (or your chosen shortcut) to activate Lightshot.
- Select the area you want to capture.
- Use the editing tools to annotate the screenshot.
- Save the screenshot or upload it online.
2.5.2. Greenshot
Greenshot is an open-source screenshot tool with a wide range of features, making it suitable for both basic and advanced users.
-
Key Features:
- Capture full screen, window, or selected region.
- Annotate, highlight, and obfuscate parts of the screenshot.
- Save to file, clipboard, printer, or upload to online services.
- Integration with Microsoft Office.
-
How to Use:
- Download and install Greenshot.
- Press the “PrtScn” key to activate Greenshot.
- Select the capture mode (region, window, full screen).
- Edit the screenshot in the Greenshot editor.
- Choose your desired output (save, copy, print, upload).
2.5.3. PicPick
PicPick is a full-featured screen capture and image editing tool that offers a comprehensive set of options for creating and modifying screenshots.
-
Key Features:
- Multiple capture modes (full screen, window, scrolling window, region).
- Image editor with a wide range of tools (shapes, arrows, text, effects).
- Color picker, pixel ruler, and protractor.
- Upload to FTP, web services, or social media.
-
How to Use:
- Download and install PicPick.
- Choose your capture mode from the PicPick toolbar or system tray icon.
- Edit the screenshot in the PicPick editor.
- Save, share, or upload the screenshot.
3. Taking Screenshots on macOS
macOS provides a seamless and intuitive screenshot experience with several built-in keyboard shortcuts and the Grab utility.
3.1. Using Keyboard Shortcuts
macOS offers several keyboard shortcuts for capturing different types of screenshots.
3.1.1. Capturing the Entire Screen
To capture the entire screen:
- Press “Command (⌘) + Shift + 3” keys simultaneously.
- The screenshot will be automatically saved as a PNG file on your desktop.
3.1.2. Capturing a Selected Area
To capture a specific area of the screen:
- Press “Command (⌘) + Shift + 4” keys simultaneously.
- Your cursor will change to a crosshair.
- Click and drag to select the area you want to capture.
- Release the mouse button to take the screenshot.
- The screenshot will be saved as a PNG file on your desktop.
3.1.3. Capturing a Specific Window
To capture a specific window:
- Press “Command (⌘) + Shift + 4” keys simultaneously.
- Press the “Spacebar.” Your cursor will change to a camera icon.
- Click on the window you want to capture.
- The screenshot will be saved as a PNG file on your desktop.
3.1.4. Copying a Screenshot to the Clipboard
If you want to copy the screenshot to the clipboard instead of saving it as a file, hold down the “Control” key while using any of the above shortcuts. For example, “Command (⌘) + Shift + Control + 3” will copy the entire screen to the clipboard.
3.2. Using the Grab Utility
The Grab utility is a built-in macOS application for taking screenshots. It provides similar functionality to the Snipping Tool in Windows.
3.2.1. Accessing the Grab Utility
- Open “Finder.”
- Go to “Applications” -> “Utilities.”
- Double-click on “Grab” to open the application.
3.2.2. Capture Options in Grab
The Grab utility offers several capture options:
- Selection: Allows you to select a specific area of the screen.
- Window: Captures a single window.
- Screen: Captures the entire screen.
- Timed Screen: Captures the entire screen after a 10-second delay.
3.2.3. Taking a Screenshot with Grab
- Open the Grab utility.
- Choose your desired capture option from the “Capture” menu.
- Follow the on-screen instructions to select the area or window you want to capture.
- The screenshot will open in a new window.
- Save the screenshot by going to “File” -> “Save” or pressing “Command (⌘) + S.”
3.3. Using the Screenshot App (macOS Mojave and Later)
macOS Mojave and later versions include a dedicated Screenshot app that combines the functionality of the keyboard shortcuts and the Grab utility into a single interface.
3.3.1. Accessing the Screenshot App
- Press “Command (⌘) + Shift + 5” keys simultaneously to open the Screenshot app toolbar at the bottom of your screen.
3.3.2. Capture Options in the Screenshot App
The Screenshot app offers the following capture options:
- Capture Entire Screen: Captures the entire screen.
- Capture Selected Window: Captures a single window.
- Capture Selected Portion: Allows you to select a specific area of the screen.
- Record Entire Screen: Records a video of the entire screen.
- Record Selected Portion: Records a video of a specific area of the screen.
3.3.3. Taking a Screenshot with the Screenshot App
- Press “Command (⌘) + Shift + 5” keys simultaneously.
- Choose your desired capture option from the toolbar.
- Follow the on-screen instructions to select the area or window you want to capture.
- The screenshot will be saved as a PNG file on your desktop, or you can click the thumbnail in the corner of the screen to edit it using Markup tools.
3.4. Third-Party Screenshot Tools for macOS
Like Windows, macOS also has several third-party screenshot tools that offer additional features and customization options.
3.4.1. Snagit
Snagit is a powerful and versatile screen capture and recording tool that offers a wide range of features for creating professional-quality visuals.
-
Key Features:
- Capture full screen, region, window, or scrolling screen.
- Record video from your screen or webcam.
- Advanced image editing tools (annotations, effects, stamps).
- Templates for creating documentation and tutorials.
- Integration with Microsoft Office, Google Drive, and other applications.
-
How to Use:
- Download and install Snagit.
- Choose your capture type from the Snagit toolbar.
- Select the area you want to capture.
- Edit the screenshot in the Snagit editor.
- Save, share, or upload the screenshot.
3.4.2. CleanShot X
CleanShot X is a lightweight and intuitive screenshot tool designed specifically for macOS, offering a clean interface and powerful features.
-
Key Features:
- Capture full screen, region, window, or scrolling screen.
- Annotate screenshots with arrows, text, and shapes.
- Hide desktop icons for cleaner screenshots.
- Record video from your screen or webcam.
- Cloud storage and sharing.
-
How to Use:
- Download and install CleanShot X.
- Use the keyboard shortcuts or the menu bar icon to initiate a capture.
- Select the area you want to capture.
- Edit the screenshot with the built-in tools.
- Save, share, or upload the screenshot.
3.4.3. Monosnap
Monosnap is a free screenshot and video recording tool that offers a range of features for creating and sharing visuals.
-
Key Features:
- Capture full screen, region, or window.
- Annotate screenshots with arrows, text, and shapes.
- Record video from your screen or webcam.
- Cloud storage and sharing.
- Integration with various services like Google Drive, Dropbox, and Evernote.
-
How to Use:
- Download and install Monosnap.
- Use the keyboard shortcuts or the menu bar icon to initiate a capture.
- Select the area you want to capture.
- Edit the screenshot with the built-in tools.
- Save, share, or upload the screenshot.
4. Editing and Annotating Screenshots
Once you’ve captured a screenshot, you may want to edit or annotate it to highlight specific areas, add text, or redact sensitive information.
4.1. Built-In Editing Tools
Both Windows and macOS offer basic editing tools for screenshots.
4.1.1. Windows
- Paint: Windows Paint is a simple image editor that allows you to crop, resize, annotate, and add shapes to your screenshots.
- Snip & Sketch: Snip & Sketch (Windows 10 and later) includes annotation tools such as a pen, highlighter, and eraser.
- Photos App: The Windows Photos app allows you to crop, rotate, adjust colors, and add filters to your screenshots.
4.1.2. macOS
- Markup Tools: When you take a screenshot in macOS Mojave and later, a thumbnail appears in the corner of the screen. Clicking the thumbnail opens the screenshot in Preview with Markup tools, allowing you to annotate, crop, rotate, and add shapes and text.
- Preview: The Preview app in macOS allows you to view, edit, and annotate images, including screenshots. You can crop, resize, add shapes, text, and signatures to your screenshots.
4.2. Third-Party Editing Tools
For more advanced editing capabilities, consider using third-party image editing software.
4.2.1. Adobe Photoshop
Adobe Photoshop is a professional-grade image editing software that offers a comprehensive set of tools for editing and enhancing screenshots.
- Key Features:
- Advanced selection and masking tools.
- Layers and blending modes.
- Retouching and color correction tools.
- Filters and effects.
- Text and shape tools.
4.2.2. GIMP
GIMP (GNU Image Manipulation Program) is a free and open-source image editor that offers many of the same features as Photoshop.
- Key Features:
- Selection and masking tools.
- Layers and blending modes.
- Retouching and color correction tools.
- Filters and effects.
- Text and shape tools.
- Scripting and automation.
4.2.3. Skitch
Skitch is a free annotation and screen capture tool by Evernote that allows you to quickly edit and share screenshots.
- Key Features:
- Arrows, shapes, and text tools.
- Pixelation for blurring sensitive information.
- Easy sharing to Evernote and other services.
4.3. Tips for Effective Annotation
- Use Arrows and Shapes: Use arrows and shapes to draw attention to specific areas of the screenshot.
- Add Text: Use text to provide context or explanations.
- Highlight Important Information: Use the highlighter tool to emphasize key details.
- Redact Sensitive Information: Use pixelation or black bars to hide sensitive information.
- Keep it Clean and Simple: Avoid cluttering the screenshot with too many annotations.
5. Saving and Sharing Screenshots
Once you’ve captured and edited your screenshot, you’ll need to save it in a suitable file format and share it with others if necessary.
5.1. File Formats
The choice of file format depends on the intended use of the screenshot.
- JPEG (JPG): JPEG is a widely supported format that offers good compression, making it suitable for sharing screenshots online. However, JPEG uses lossy compression, which can reduce image quality, especially with repeated edits.
- PNG: PNG is a lossless format that preserves image quality, making it ideal for screenshots with text, graphics, or sharp lines. PNG files are generally larger than JPEG files.
- GIF: GIF is a lossless format that supports animations, making it suitable for short animated screenshots.
- BMP: BMP is an uncompressed format that preserves image quality but results in very large file sizes.
5.2. Saving Screenshots
- Windows: In Paint, Snipping Tool, or Snip & Sketch, go to “File” -> “Save As” and choose your desired file format and location.
- macOS: In Preview or the Screenshot app, go to “File” -> “Save” or “File” -> “Export” and choose your desired file format and location.
5.3. Sharing Screenshots
- Email: Attach the screenshot to an email message.
- Cloud Storage: Upload the screenshot to a cloud storage service like Google Drive, Dropbox, or OneDrive and share the link.
- Social Media: Share the screenshot on social media platforms like Twitter, Facebook, or LinkedIn.
- Instant Messaging: Send the screenshot through instant messaging apps like Slack, Microsoft Teams, or WhatsApp.
- Online Forums: Upload the screenshot to an online forum or discussion board.
6. Troubleshooting Common Screenshot Issues
Sometimes, you may encounter issues while taking screenshots. Here are some common problems and their solutions.
6.1. Print Screen Key Not Working
- Check Keyboard: Ensure the Print Screen key is not damaged or disabled.
- Function Key: On some laptops, you may need to press the “Fn” key in combination with the “PrtScn” key.
- Driver Issues: Update your keyboard drivers.
- Conflicting Software: Some software may interfere with the Print Screen function. Close any potentially conflicting applications.
6.2. Screenshot is Black or Empty
- Hardware Acceleration: Disable hardware acceleration in your browser or graphics settings.
- Driver Issues: Update your graphics card drivers.
- Protected Content: Some content, such as DRM-protected videos, cannot be captured.
6.3. Screenshot Quality is Poor
- File Format: Save the screenshot in PNG format to preserve image quality.
- Compression: Avoid excessive compression when saving the screenshot.
- Original Resolution: Capture the screenshot at the original resolution of the screen or window.
6.4. Snipping Tool Not Opening
- Permissions: Ensure you have the necessary permissions to run the Snipping Tool.
- System Files: Run a system file check to repair any corrupted system files.
- Alternative Tool: Use the Snip & Sketch tool as an alternative (Windows 10 and later).
7. Advanced Screenshot Techniques
For more advanced users, here are some techniques to enhance your screenshot workflow.
7.1. Capturing Scrolling Windows
- Greenshot: Greenshot can capture scrolling windows, allowing you to capture entire web pages or documents that extend beyond the visible screen area.
- PicPick: PicPick also offers a scrolling window capture mode.
- Browser Extensions: Some browser extensions, like “GoFullPage” for Chrome, can capture entire web pages as screenshots.
7.2. Taking Timed Screenshots
- Grab (macOS): The Grab utility in macOS offers a “Timed Screen” option that captures the screen after a 10-second delay.
- Snagit: Snagit allows you to set a custom delay before capturing a screenshot.
7.3. Creating Animated GIFs
- LiceCAP: LiceCAP is a free tool for creating animated GIFs from screen recordings.
- ShareX: ShareX can also record your screen and save it as an animated GIF.
7.4. Using Command-Line Tools
- NirCmd (Windows): NirCmd is a command-line utility that allows you to take screenshots from the command line or scripts.
- Screencapture (macOS): Screencapture is a command-line tool in macOS that allows you to take screenshots from the terminal.
8. The Benefits of Expert Consultation
While this guide provides comprehensive information on taking screenshots, sometimes you need expert advice on specific technical issues or complex projects. That’s where HOW.EDU.VN comes in.
8.1. Access to Top Experts
HOW.EDU.VN connects you with over 100 renowned Ph.D. experts across various fields. Whether you’re dealing with software glitches, hardware compatibility issues, or need guidance on advanced screenshot techniques, our experts can provide tailored solutions.
8.2. Personalized Solutions
Our experts offer personalized consultations to address your unique needs. They can help you troubleshoot specific problems, recommend the best tools for your tasks, and provide step-by-step instructions.
8.3. Time and Cost Savings
Instead of spending hours searching for solutions online, consulting with our experts can save you time and money. They provide efficient, reliable advice that gets you back on track quickly.
8.4. Secure and Confidential Consultations
We prioritize your privacy and ensure that all consultations are secure and confidential. You can trust our experts to handle your information with the utmost care.
9. How to Get Expert Help from HOW.EDU.VN
Getting expert help from HOW.EDU.VN is easy.
- Visit Our Website: Go to HOW.EDU.VN.
- Browse Experts: Explore our directory of experts and select the one who best matches your needs.
- Request a Consultation: Fill out a simple form to request a consultation.
- Get Personalized Advice: Connect with the expert and receive personalized advice and solutions.
10. Frequently Asked Questions (FAQs)
Here are some frequently asked questions about taking screenshots and using expert consultation services.
10.1. How do I take a screenshot on my computer?
On Windows, use the “PrtScn” key for the entire screen or “Alt + PrtScn” for the active window. On macOS, use “Command + Shift + 3” for the entire screen or “Command + Shift + 4” for a selected area.
10.2. What is the best file format for saving screenshots?
PNG is generally the best format for preserving image quality, especially for screenshots with text and graphics. JPEG is suitable for sharing online due to its smaller file size.
10.3. How can I edit screenshots?
Use built-in tools like Windows Paint or macOS Preview, or third-party image editors like Adobe Photoshop or GIMP.
10.4. How do I capture a scrolling window?
Use tools like Greenshot, PicPick, or browser extensions like “GoFullPage” for Chrome.
10.5. What are the benefits of consulting with an expert?
Expert consultation provides personalized solutions, saves time and money, and ensures secure and confidential advice.
10.6. How can HOW.EDU.VN help me with technical issues?
HOW.EDU.VN connects you with top Ph.D. experts who can provide tailored solutions for your specific technical needs.
10.7. Is it safe to share sensitive information during a consultation?
Yes, HOW.EDU.VN prioritizes your privacy and ensures that all consultations are secure and confidential.
10.8. How much does it cost to consult with an expert?
The cost of consultation varies depending on the expert and the complexity of the issue. Please visit HOW.EDU.VN for more information.
10.9. What if I’m not satisfied with the consultation?
We strive to provide the highest quality service. If you’re not satisfied, please contact us, and we’ll do our best to resolve the issue.
10.10. How do I get started with HOW.EDU.VN?
Visit HOW.EDU.VN, browse our experts, and request a consultation to get started.
Taking screenshots is a crucial skill in today’s digital world. Whether you’re documenting errors, creating tutorials, or sharing information, knowing how to capture your screen effectively is essential. By mastering the techniques outlined in this guide, you’ll be well-equipped to handle any screenshot task. Remember, for personalized assistance and expert advice, HOW.EDU.VN is always here to help. Our team of over 100 Ph.D. experts is ready to provide tailored solutions for your unique needs.
Don’t let technical challenges slow you down. Contact HOW.EDU.VN today and experience the benefits of expert consultation. Visit our website at HOW.EDU.VN, or reach out to us via WhatsApp at +1 (310) 555-1212. Our address is 456 Expertise Plaza, Consult City, CA 90210, United States. Let us help you achieve your goals with confidence and ease.
Ready to take your digital skills to the next level? Reach out to how.edu.vn and connect with the world’s leading experts today!