Taking a screenshot on a computer is a fundamental skill for everyone in the digital age. At HOW.EDU.VN, we understand the importance of capturing and sharing information efficiently, so here’s a detailed guide on how to take screenshots on various platforms. Whether you’re using Windows, macOS, or even a smartphone or tablet, mastering the art of screen capture can significantly enhance your ability to communicate, document, and troubleshoot. Let’s dive into the details, covering everything from basic methods to advanced tools, and addressing common user questions.
1. What is a Screenshot and Why is it Important?
A screenshot, also known as a screen capture or screen grab, is a digital image of what is currently displayed on your computer screen, smartphone, or tablet. It’s essentially a snapshot of your screen, saved as an image file. Screenshots are important for several reasons:
- Documentation: Capturing important information, such as error messages, software interfaces, or online resources, for future reference.
- Communication: Sharing visual information quickly and easily with colleagues, friends, or family.
- Troubleshooting: Documenting issues and errors to seek technical support or provide feedback to developers.
- Tutorials: Creating visual guides and tutorials by capturing step-by-step instructions.
- Evidence: Recording evidence of online activities, such as cyberbullying or inappropriate content, as mentioned in the original article.
- Archiving: Saving important data for compliance purposes or documentation.
Understanding how to take a screenshot is not just a basic computer skill, it’s a tool that enhances productivity and communication in various aspects of life.
2. How to Take a Screenshot on Windows
Windows offers several methods for taking screenshots, ranging from simple keyboard shortcuts to built-in tools with advanced features. Here are the primary ways to capture your screen on Windows:
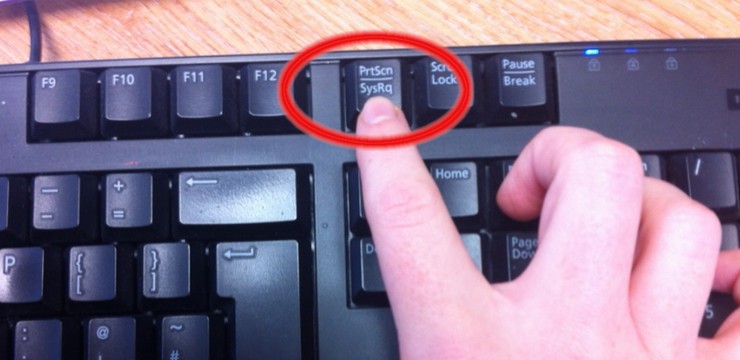
2.1. Using the Print Screen (PrtScn) Key
The Print Screen key, usually labeled as “PrtScn” or “Print Scrn,” is the most basic way to take a screenshot on Windows.
- Full-Screen Capture: Pressing the PrtScn key captures the entire screen and copies it to the clipboard. To save the screenshot, you need to open an image editing program like Paint or Word and paste the image (Ctrl + V). You can then edit and save the image as a file (e.g., PNG, JPG).
- Active Window Capture: To capture only the active window, press the Alt + PrtScn keys simultaneously. This will copy the active window to the clipboard, which you can then paste into an image editing program.
Advantages:
- Quick and easy for basic screen captures.
- No additional software is required.
Disadvantages:
- Requires an image editing program to save the screenshot.
- Limited editing capabilities.
2.2. Using the Snipping Tool
The Snipping Tool is a built-in utility in Windows that provides more control over your screenshots.
- Accessing the Snipping Tool: You can find the Snipping Tool by searching for it in the Windows Start menu.
- Screenshot Modes:
- Free-form Snip: Allows you to draw a free-form shape around the area you want to capture.
- Rectangular Snip: Lets you drag a rectangle around the area you want to capture.
- Window Snip: Captures a specific window.
- Full-screen Snip: Captures the entire screen.
- Taking a Screenshot: Select the desired mode, click “New,” and then select the area you want to capture.
- Editing and Saving: The Snipping Tool allows you to annotate the screenshot with a pen or highlighter before saving it as a file.
Advantages:
- Offers various screenshot modes for precise capture.
- Includes basic annotation tools.
- Allows direct saving without needing an external image editor.
Disadvantages:
- It may not be available on older versions of Windows.
- Limited editing features compared to dedicated image editing software.
2.3. Using the Snip & Sketch Tool
Snip & Sketch is the successor to the Snipping Tool in newer versions of Windows 10 and Windows 11.
- Accessing Snip & Sketch: You can access Snip & Sketch using the keyboard shortcut Windows Key + Shift + S or by searching for it in the Start menu.
- Screenshot Modes: Similar to the Snipping Tool, Snip & Sketch offers:
- Rectangular Snip
- Freeform Snip
- Window Snip
- Full-screen Snip
- Taking a Screenshot: Use the keyboard shortcut or open the app, select your mode, and capture the desired area.
- Editing and Saving: Snip & Sketch opens the captured image in an editor where you can annotate, crop, and share the screenshot.
Advantages:
- Modern interface with improved annotation tools.
- Direct integration with the Windows clipboard and sharing options.
- Easy keyboard shortcut access.
Disadvantages:
- It may not be available on older versions of Windows.
- Limited advanced editing features.
2.4. Using Game Bar
The Game Bar, primarily designed for gamers, can also be used to take screenshots of any application.
- Accessing Game Bar: Press Windows Key + G to open the Game Bar.
- Taking a Screenshot: Click the screenshot icon (camera) or use the keyboard shortcut Windows Key + Alt + PrtScn.
- Finding Screenshots: Screenshots taken with the Game Bar are saved in the “Captures” folder within your Videos library.
Advantages:
- Quick access via keyboard shortcut.
- Automatic saving of screenshots to a designated folder.
- Works with any application, not just games.
Disadvantages:
- May require enabling the Game Bar in Windows settings.
- Limited editing capabilities.
2.5. Third-Party Screenshot Tools
Numerous third-party screenshot tools offer advanced features and customization options. Some popular options include:
- Greenshot: A lightweight and versatile tool with annotation and editing capabilities.
- Lightshot: A simple and user-friendly tool with quick sharing options.
- ShareX: A powerful and feature-rich tool for advanced users.
- PicPick: An all-in-one tool with a built-in image editor.
Advantages:
- Advanced editing and annotation features.
- Customizable settings and workflows.
- Integration with cloud storage and sharing services.
Disadvantages:
- May require a purchase for advanced features or a license.
- Can be overwhelming for basic screenshot tasks.
3. How to Take a Screenshot on macOS
macOS provides several built-in keyboard shortcuts and tools for capturing screenshots. Here are the primary methods:
3.1. Using Keyboard Shortcuts
macOS offers powerful and convenient keyboard shortcuts for taking screenshots.
- Full-Screen Capture: Press Command + Shift + 3 to capture the entire screen. The screenshot is automatically saved as a PNG file on your desktop.
- Selected Area Capture: Press Command + Shift + 4 to select a specific area of the screen. Drag the crosshair to select the area you want to capture. The screenshot is saved as a PNG file on your desktop.
- Window Capture: After pressing Command + Shift + 4, press the Space bar. The cursor changes to a camera icon. Click on the window you want to capture. The screenshot is saved as a PNG file on your desktop.
- Copy to Clipboard: Add the Control key to any of the above shortcuts to copy the screenshot to the clipboard instead of saving it as a file. For example, Command + Control + Shift + 3 copies the full-screen capture to the clipboard.
Advantages:
- Fast and efficient for quick screenshots.
- No additional software is required.
- Options to save directly to the desktop or copy to the clipboard.
Disadvantages:
- Limited editing capabilities without additional software.
- Default save location (desktop) may require manual organization.
3.2. Using the Grab Utility
The Grab utility is a built-in tool in macOS for taking screenshots.
- Accessing Grab: You can find Grab in the Utilities folder within the Applications folder, or by searching for it in Spotlight (Command + Space).
- Screenshot Modes:
- Selection: Allows you to select a specific area to capture.
- Window: Captures a specific window.
- Screen: Captures the entire screen.
- Timed Screen: Captures the entire screen after a specified delay.
- Taking a Screenshot: Select the desired mode from the Capture menu and follow the prompts.
- Saving: Grab allows you to save the screenshot as a TIFF, PNG, or JPEG file.
Advantages:
- Offers various screenshot modes for precise capture.
- Includes a timed screenshot option.
- Allows saving in multiple file formats.
Disadvantages:
- The interface is somewhat outdated.
- Limited editing features.
3.3. Using Screenshot App (Shift-Command-5)
In macOS Mojave and later, Apple introduced a dedicated Screenshot app accessed with the shortcut Shift-Command-5. This app provides a modern interface and enhanced options.
- Accessing Screenshot App: Press Shift + Command + 5 to open the Screenshot app.
- Screenshot Options: A toolbar appears at the bottom of the screen, offering options to:
- Capture the entire screen
- Capture a selected window
- Capture a selected portion
- Record the entire screen
- Record a selected portion
- Saving Options: The Screenshot app allows you to choose where to save the screenshot (e.g., Desktop, Documents, Clipboard, Mail, Messages, Preview, or Other Location). You can also set a timer, show floating thumbnails, and remember the last selection.
Advantages:
- Modern interface with enhanced options.
- Integrated screen recording capabilities.
- Customizable save locations and timer settings.
Disadvantages:
- Available only on macOS Mojave and later.
- Limited advanced editing features.
3.4. Third-Party Screenshot Tools for macOS
Many third-party screenshot tools are available for macOS, offering advanced features and customization options. Some popular options include:
- Skitch: A powerful annotation and editing tool by Evernote.
- Snagit: A comprehensive screen capture and recording tool.
- CleanShot X: A versatile tool with cloud storage and advanced features.
- Monosnap: A free tool with annotation and cloud storage options.
Advantages:
- Advanced editing and annotation features.
- Cloud storage integration.
- Customizable workflows.
Disadvantages:
- May require a purchase for advanced features.
- Can be overwhelming for basic screenshot tasks.
4. How to Take a Screenshot on a Smartphone or Tablet
Taking a screenshot on a smartphone or tablet varies depending on the operating system and device model. Here are the common methods for Android and iOS devices:
4.1. Android
- Power and Volume Down Buttons: The most common method is to press the Power button and the Volume Down button simultaneously. Hold them for a second or two until you see a visual confirmation (e.g., a screen flash or animation).
- Gestures: Some Android devices support gesture-based screenshots. For example, swiping the edge of your hand across the screen. Check your device’s settings for available gestures.
- Google Assistant: You can also use Google Assistant to take a screenshot. Activate Google Assistant (e.g., by saying “OK Google” or pressing and holding the Home button) and say “Take a screenshot.”
Finding Screenshots: Screenshots are typically saved in the “Screenshots” folder in your device’s Gallery app.
4.2. iOS (Apple)
- iPhone with Face ID: Press the Side button (power button) and the Volume Up button simultaneously.
- iPhone with Home Button: Press the Home button and the Power button simultaneously.
- AssistiveTouch: If you have AssistiveTouch enabled, you can customize a gesture to take a screenshot.
Finding Screenshots: Screenshots are saved in the Photos app, in the “Screenshots” album.
5. How to Take a Screen Recording on a Phone
Screen recording is the process of capturing a video of what’s happening on your device’s screen. This can be useful for creating tutorials, demonstrating app features, or recording gameplay.
5.1. Android
Android has a built-in screen recording feature in recent versions.
- Accessing Screen Recording: Swipe down from the top of the screen to open the Quick Settings panel. Look for the “Screen Record” icon. If you don’t see it, you may need to edit the Quick Settings panel to add it.
- Starting and Stopping Recording: Tap the “Screen Record” icon to start recording. You may be prompted to grant permissions and choose audio settings (e.g., record audio from the microphone). Tap the stop icon to stop recording.
- Finding Screen Recordings: Screen recordings are typically saved in the “Movies” or “Videos” folder in your device’s Gallery app.
For older Android devices, you may need to use a third-party app like “AZ Screen Recorder” or “DU Recorder” to record your screen.
5.2. iOS (Apple)
iOS has a built-in screen recording feature that is accessible from the Control Center.
- Adding Screen Recording to Control Center: Go to Settings > Control Center > Customize Controls. Add “Screen Recording” to the included controls.
- Starting and Stopping Recording: Swipe down from the top-right corner of the screen (or up from the bottom on older iPhones) to open the Control Center. Tap the Screen Recording icon (a circle within a larger circle). A countdown will start, and then the recording will begin. Tap the red status bar at the top of the screen to stop recording.
- Finding Screen Recordings: Screen recordings are saved in the Photos app.
6. Common Issues and Troubleshooting
While taking screenshots is generally straightforward, you may encounter some issues. Here are some common problems and solutions:
6.1. Print Screen Key Not Working
- Check Keyboard Functionality: Ensure that the Print Screen key is functioning correctly. Test other keys to see if they are working.
- Function Lock (Fn Lock): Some keyboards have an Fn Lock key that can disable certain keys. Make sure the Fn Lock is not enabled.
- Driver Issues: Update your keyboard drivers. Go to Device Manager, find your keyboard, right-click, and select “Update driver.”
6.2. Screenshots Not Saving
- Clipboard Only: Remember that pressing the Print Screen key only copies the screenshot to the clipboard. You need to paste it into an image editing program and save it.
- Incorrect Save Location: Check the default save location for your screenshot tool. Make sure you know where your screenshots are being saved.
- Storage Issues: Ensure that you have enough storage space on your device.
6.3. Poor Screenshot Quality
- Image Format: Save screenshots in a lossless format like PNG for the best quality. JPEG format can introduce compression artifacts.
- Screen Resolution: High screen resolution results in better-quality screenshots.
6.4. Annotations Not Working
- Software Compatibility: Ensure that your annotation tool is compatible with your operating system.
- Permissions: Check that the screenshot tool has the necessary permissions to access and modify images.
7. Advanced Screenshot Techniques
For users who need more advanced screenshot capabilities, here are some techniques and tools to explore:
7.1. Scrolling Screenshots
Scrolling screenshots allow you to capture an entire webpage or document that extends beyond the visible screen area.
- Windows: Use third-party tools like ShareX or PicPick, which have built-in scrolling screenshot features.
- macOS: Use third-party tools like CleanShot X or Snagit, which offer scrolling capture options.
- Mobile: Some Android devices have a built-in scrolling screenshot feature. After taking a regular screenshot, look for an option to “Scroll” or “Capture more.” For iOS, you can use third-party apps or the built-in full-page capture in Safari.
7.2. Scheduled Screenshots
Scheduled screenshots allow you to automatically capture your screen at specified intervals. This can be useful for monitoring changes or documenting processes.
- Windows: Use third-party tools like ShareX, which has a built-in scheduled capture feature.
- macOS: Use Automator to create a custom workflow that takes screenshots at specified intervals.
7.3. Cloud Integration
Many screenshot tools offer integration with cloud storage services like Google Drive, Dropbox, or OneDrive. This allows you to automatically upload and share your screenshots.
- Windows and macOS: Tools like Lightshot, Monosnap, and Snagit offer built-in cloud integration.
8. The Importance of Screenshots in Various Fields
Screenshots are essential in various professional fields and industries. Here are a few examples:
8.1. Software Development
- Bug Reporting: Developers use screenshots to document bugs and errors, providing visual evidence for bug reports.
- UI/UX Design: Designers use screenshots to capture and share interface designs, gather feedback, and iterate on designs.
- Documentation: Technical writers use screenshots to create visual guides and tutorials for software applications.
8.2. Customer Support
- Troubleshooting: Support agents use screenshots to understand customer issues and provide step-by-step instructions.
- Knowledge Base Articles: Screenshots are used to create visual guides for self-service support.
8.3. Education
- Online Learning: Educators use screenshots to create visual aids for online courses and tutorials.
- Student Assignments: Students use screenshots to document their work and demonstrate their understanding of concepts.
8.4. Marketing and Sales
- Product Demos: Marketers use screenshots to create compelling product demos and showcase features.
- Social Media: Screenshots are used to share visual content on social media platforms.
8.5. Legal and Compliance
- Evidence Collection: Screenshots can be used as evidence in legal proceedings or compliance audits.
- Record Keeping: Organizations use screenshots to maintain records of important documents and communications.
9. Best Practices for Taking Screenshots
To ensure that your screenshots are clear, effective, and professional, follow these best practices:
- Crop Unnecessary Areas: Crop your screenshots to focus on the relevant information and remove distractions.
- Annotate Clearly: Use annotation tools to highlight important areas and add explanatory notes.
- Use High Resolution: Capture screenshots at a high resolution to ensure clarity and detail.
- Choose the Right File Format: Save screenshots in PNG format for lossless quality or JPEG format for smaller file sizes.
- Organize Your Screenshots: Create a consistent folder structure for organizing your screenshots.
- Redact Sensitive Information: Before sharing screenshots, redact any sensitive information, such as passwords or personal details.
10. Stay Updated with the Latest Screenshot Tools and Techniques
The world of technology is constantly evolving, and new screenshot tools and techniques are always emerging. Stay updated by:
- Reading Tech Blogs: Follow tech blogs and websites that cover screenshot tools and techniques.
- Watching Tutorials: Watch YouTube tutorials and online courses to learn new skills.
- Joining Online Communities: Participate in online forums and communities to share tips and tricks.
- Experimenting: Try out new tools and techniques to find what works best for you.
11. How HOW.EDU.VN Can Help
At HOW.EDU.VN, we understand that navigating the digital world can be challenging. That’s why we’ve assembled a team of over 100 PhDs and experts from various fields to provide you with the guidance and solutions you need. Whether you’re struggling with a complex technical issue, seeking advice on your career, or looking for ways to improve your business, our experts are here to help.
11.1. Expert Consultations
Connect with our experts for personalized consultations tailored to your specific needs. We offer one-on-one sessions where you can ask questions, discuss your challenges, and receive actionable advice.
11.2. Comprehensive Resources
Access our library of articles, guides, and tutorials covering a wide range of topics, from technology and business to personal development and health. Our resources are designed to provide you with the knowledge and skills you need to succeed.
11.3. Personalized Solutions
We understand that every individual and business is unique. That’s why we offer personalized solutions designed to address your specific challenges and goals. Our experts will work with you to develop a customized plan that fits your needs.
12. Why Choose HOW.EDU.VN?
- Expertise: Our team consists of over 100 PhDs and experts from various fields.
- Personalization: We offer personalized consultations and solutions tailored to your specific needs.
- Reliability: We are committed to providing accurate and reliable information.
- Accessibility: Our services are accessible online, allowing you to connect with experts from anywhere in the world.
- Confidentiality: We prioritize the privacy and confidentiality of our clients.
13. Addressing Customer Challenges
We understand the challenges you face when seeking expert advice:
- Finding Qualified Experts: It can be difficult to find experts with the right qualifications and experience.
- High Costs: Traditional consulting services can be expensive.
- Time Constraints: It can be time-consuming to schedule and attend in-person consultations.
- Confidentiality Concerns: You may be concerned about sharing sensitive information with consultants.
At HOW.EDU.VN, we address these challenges by:
- Providing Access to Top Experts: We have a team of highly qualified PhDs and experts from various fields.
- Offering Affordable Services: We offer competitive pricing and flexible payment options.
- Providing Online Consultations: Our consultations are conducted online, saving you time and travel costs.
- Ensuring Confidentiality: We have strict policies in place to protect your privacy and confidentiality.
14. Call to Action
Are you ready to take the next step? Contact HOW.EDU.VN today to connect with our team of experts and receive the guidance and solutions you need. Whether you’re facing a complex challenge or simply seeking advice, we’re here to help.
-
Contact Us:
- Address: 456 Expertise Plaza, Consult City, CA 90210, United States
- WhatsApp: +1 (310) 555-1212
- Website: HOW.EDU.VN
Don’t let your questions go unanswered. Reach out to HOW.EDU.VN and unlock the expertise you need to achieve your goals.
15. Frequently Asked Questions (FAQ)
Here are some frequently asked questions about taking screenshots and using our consultation services:
Q1: How do I take a screenshot on my Windows computer?
A: You can use the Print Screen key to capture the entire screen or Alt + Print Screen to capture the active window. Then, paste the screenshot into an image editing program like Paint to save it.
Q2: How do I take a screenshot on my Mac?
A: Press Command + Shift + 3 to capture the entire screen or Command + Shift + 4 to select a specific area. The screenshot will be saved as a PNG file on your desktop.
Q3: How do I take a screenshot on my Android phone?
A: Press the Power button and the Volume Down button simultaneously. The screenshot will be saved in your Gallery app.
Q4: How do I take a screenshot on my iPhone?
A: Press the Side button (power button) and the Volume Up button simultaneously on iPhones with Face ID, or the Home button and the Power button simultaneously on iPhones with a Home button.
Q5: What is a scrolling screenshot?
A: A scrolling screenshot captures an entire webpage or document that extends beyond the visible screen area. You may need a third-party tool to do this.
Q6: How can HOW.EDU.VN help me with my technical issues?
A: We offer expert consultations with PhDs and experts in various fields. You can connect with them to discuss your technical issues and receive personalized solutions.
Q7: How do I schedule a consultation with an expert at HOW.EDU.VN?
A: Visit our website at HOW.EDU.VN and fill out the contact form. We will get back to you to schedule a consultation.
Q8: Are the consultations at HOW.EDU.VN confidential?
A: Yes, we prioritize the privacy and confidentiality of our clients. Your information will be kept secure and confidential.
Q9: What types of experts are available at HOW.EDU.VN?
A: We have experts in various fields, including technology, business, personal development, health, and more. Our team consists of over 100 PhDs and experts.
Q10: How much does it cost to consult with an expert at how.edu.vn?
A: Our pricing varies depending on the type of consultation and the expertise required. Please visit our website or contact us for more information.