The question “How Much Are Minis?” encompasses a wide range of considerations, from miniature figurines and collectibles to miniature electronic components like the Arduino Pro Mini. Understanding the cost drivers, potential alternatives, and power requirements is essential for hobbyists, engineers, and anyone working with small-scale projects. At HOW.EDU.VN, we connect you with leading experts who can provide tailored advice for your specific needs. We deliver specialized knowledge and support, guiding you toward the most cost-effective and efficient solutions for your miniature projects.
1. What Factors Influence the Price of Miniatures?
The price of miniatures is influenced by several factors, including the materials used, the complexity of the design, the manufacturing process, and the brand reputation. For instance, metal miniatures are generally more expensive than plastic ones due to material costs and manufacturing processes. As stated on HOW.EDU.VN, our specialists can guide you in understanding these factors and finding options that balance cost and quality.
1.1. Material Costs
The material used plays a significant role in determining the cost of a miniature. Common materials include:
- Plastic: Affordable and easy to mold, making it suitable for mass production.
- Metal (e.g., pewter, white metal, brass): More expensive but offers greater detail and durability.
- Resin: Provides high detail and is often used for limited-edition or collector’s items.
- Wood: Offers a unique aesthetic and is often used in model building and crafting.
The choice of material impacts not only the cost but also the miniature’s weight, durability, and level of detail.
1.2. Design Complexity
Intricate designs require more time and skill to produce, which increases the overall cost. Simple designs with fewer details are generally more affordable. Factors affecting design complexity include:
- Level of Detail: Highly detailed miniatures require more intricate molds and casting processes.
- Number of Parts: Miniatures with multiple parts need more assembly time.
- Sculpting Time: Hand-sculpted miniatures are more expensive than those created using CAD software.
1.3. Manufacturing Process
The manufacturing process significantly impacts the final cost. Common manufacturing methods include:
- Injection Molding: Cost-effective for large production runs, typically used for plastic miniatures.
- Casting (e.g., spin casting, pressure casting): Suitable for metal and resin miniatures, allowing for greater detail but higher per-unit costs.
- 3D Printing: Ideal for prototyping and small production runs, offering flexibility in design but can be more expensive for mass production.
1.4. Brand Reputation
Well-known brands often command higher prices due to their reputation for quality and attention to detail. Established brands have invested in creating high-quality products and building customer trust, which justifies the higher price point.
1.5. Production Volume
Economies of scale play a crucial role in determining the price of miniatures. Larger production runs typically result in lower per-unit costs due to the distribution of fixed expenses. Limited edition or small batch productions often have higher prices because they do not benefit from these economies of scale.
1.6. Licensing and Intellectual Property
If a miniature is based on licensed intellectual property (IP), such as characters from movies, TV shows, or video games, the cost will be higher due to licensing fees. Companies that hold the rights to popular IPs charge royalties for the use of their characters and designs, which adds to the production cost.
1.7. Finishing and Painting
The finishing and painting of miniatures also contribute to the overall cost. Hand-painted miniatures are generally more expensive than those that are mass-produced with automated painting techniques. The level of detail and the number of colors used can also affect the price.
1.8. Packaging and Distribution
The cost of packaging and distribution can also influence the final price. High-quality packaging that protects the miniature during shipping and enhances its presentation adds to the cost. Distribution costs, including shipping fees, import duties, and retailer markups, also play a role in determining the final price.
1.9. Regional Economic Factors
Economic factors such as labor costs, currency exchange rates, and trade tariffs can also affect the price of miniatures. Miniatures produced in countries with lower labor costs may be more affordable, while those imported from countries with high tariffs may be more expensive.
1.10. Aftermarket Value and Collectibility
The aftermarket value and collectibility of miniatures can significantly influence their price. Rare or highly sought-after miniatures can fetch high prices on the secondary market, especially if they are in mint condition or part of a limited edition. The perceived value of a miniature among collectors can drive up its price, regardless of its original production cost.
2. What Are the Average Costs for Different Types of Miniatures?
The average costs for different types of miniatures vary widely. Board game miniatures might cost a few dollars each, while high-end collector’s items can range from hundreds to thousands of dollars. HOW.EDU.VN offers consultations with experts who can provide precise cost estimations for your project’s specific needs.
2.1. Board Game Miniatures
Board game miniatures are typically made of plastic and produced in large quantities using injection molding. The average cost per miniature can range from $1 to $5, depending on the size, detail, and complexity of the design. Games with a large number of miniatures or highly detailed figures will generally be more expensive.
2.2. Tabletop Wargaming Miniatures
Tabletop wargaming miniatures, such as those used in games like Warhammer 40,000 and Age of Sigmar, are often made of plastic or metal. Plastic miniatures can cost between $3 and $10 each, while metal miniatures are typically more expensive, ranging from $10 to $30 or more. These miniatures often require assembly and painting, which can add to the overall cost.
2.3. Role-Playing Game (RPG) Miniatures
RPG miniatures, used in games like Dungeons & Dragons, come in a variety of materials, including plastic, metal, and resin. Plastic miniatures can cost between $5 and $15, while metal and resin miniatures can range from $15 to $50 or more. Highly detailed or custom-designed miniatures will typically be more expensive.
2.4. Scale Model Miniatures
Scale model miniatures, such as model trains, cars, and airplanes, vary widely in price depending on the scale, detail, and manufacturer. Simple plastic models can cost as little as $10, while highly detailed, larger-scale models can range from $50 to several hundred dollars. These models often require assembly and painting, and additional accessories can add to the cost.
2.5. Dollhouse Miniatures
Dollhouse miniatures include a wide range of items, from furniture and appliances to food and accessories. The cost of dollhouse miniatures can vary significantly depending on the material, level of detail, and craftsmanship. Simple plastic items can cost a few dollars, while handcrafted, high-quality miniatures can range from $20 to $100 or more.
2.6. Collectible Miniatures
Collectible miniatures, such as figurines and statues, are often made of resin or high-quality plastic and feature intricate designs. These miniatures can range in price from $20 to several hundred dollars, depending on the brand, rarity, and level of detail. Limited edition or autographed collectibles will typically be more expensive.
2.7. Miniature Electronic Components
Miniature electronic components, such as the Arduino Pro Mini, have a different cost structure. The Arduino Pro Mini typically costs between $5 and $15, depending on the retailer and quantity purchased. Other miniature electronic components, such as sensors, resistors, and capacitors, can range from a few cents to several dollars each, depending on their specifications and features.
2.8. Custom-Designed Miniatures
Custom-designed miniatures, whether 3D-printed or hand-sculpted, can be significantly more expensive than mass-produced items. The cost of a custom miniature will depend on the complexity of the design, the material used, and the time required to create it. Prices can range from $50 to several hundred dollars or more.
2.9. Historical Miniatures
Historical miniatures, used for wargaming or collecting, often depict soldiers, vehicles, and equipment from various historical periods. These miniatures can be made of metal, plastic, or resin, and their cost can vary depending on the scale, detail, and manufacturer. Prices can range from $5 to $30 or more per miniature.
2.10. Architectural Miniatures
Architectural miniatures, used for architectural models and displays, can range from simple cardboard models to highly detailed, laser-cut structures. The cost of architectural miniatures will depend on the size, complexity, and materials used. Prices can range from a few dollars for basic models to several hundred dollars or more for intricate, professional-quality models.
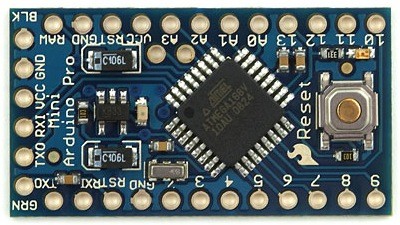
3. What is the Arduino Pro Mini and How Much Does It Cost?
The Arduino Pro Mini is a small, low-cost microcontroller board ideal for projects where space is limited. It typically costs between $5 and $15, depending on the vendor and quantity purchased. For expert advice on integrating the Arduino Pro Mini into your projects, consult with our specialists at HOW.EDU.VN.
3.1. Overview of Arduino Pro Mini
The Arduino Pro Mini is a microcontroller board based on the ATmega328P microcontroller. It is designed to be as small and lightweight as possible, making it ideal for projects where space is limited. The Pro Mini does not come with USB connectivity built-in, so an external USB-to-serial adapter is required for programming.
3.2. Key Features and Specifications
- Microcontroller: ATmega328P
- Operating Voltage: 5V or 3.3V (depending on the model)
- Digital I/O Pins: 14 (6 of which can be used as PWM outputs)
- Analog Input Pins: 6
- Flash Memory: 32 KB (0.5 KB used by bootloader)
- SRAM: 2 KB
- EEPROM: 1 KB
- Clock Speed: 16 MHz (5V model) or 8 MHz (3.3V model)
- Dimensions: 18mm x 33mm
- Weight: Approximately 5 grams
3.3. Typical Applications
The Arduino Pro Mini is used in a wide range of projects, including:
- Wearable Electronics: Its small size makes it suitable for integration into clothing and accessories.
- Robotics: Used for controlling motors, sensors, and other components in robots.
- IoT (Internet of Things) Devices: Can be used to collect and transmit data from sensors to the internet.
- Home Automation: Used for controlling lights, appliances, and other devices in a home automation system.
- Remote Control Systems: Can be used to build custom remote controls for various applications.
3.4. Cost Breakdown
The cost of an Arduino Pro Mini can vary depending on several factors:
- Vendor: Different vendors may offer the Pro Mini at different prices.
- Quantity: Purchasing in bulk can often result in lower per-unit costs.
- Shipping Costs: Shipping costs can add to the overall cost, especially if purchasing from overseas vendors.
- Included Accessories: Some vendors may include accessories such as headers or USB-to-serial adapters, which can affect the price.
3.5. Where to Buy
The Arduino Pro Mini can be purchased from a variety of online retailers, including:
- Amazon: Offers a wide selection of Arduino Pro Minis from various vendors.
- eBay: Can be a good source for finding deals on Arduino Pro Minis.
- Adafruit: A reputable vendor that offers high-quality Arduino Pro Minis and accessories.
- SparkFun: Another reputable vendor that offers a wide range of Arduino products and components.
- AliExpress: A good source for purchasing Arduino Pro Minis in bulk at lower prices.
3.6. Alternatives to Arduino Pro Mini
There are several alternatives to the Arduino Pro Mini, depending on the specific requirements of your project:
- Arduino Nano: A small, USB-enabled board that is similar in size to the Pro Mini but easier to program.
- Arduino Micro: A smaller, USB-enabled board that is ideal for projects where space is extremely limited.
- ESP8266: A low-cost Wi-Fi enabled microcontroller that is ideal for IoT projects.
- ESP32: A more powerful Wi-Fi and Bluetooth enabled microcontroller that is ideal for more demanding IoT projects.
3.7. Power Consumption
The Arduino Pro Mini typically draws between 10mA and 20mA when running at 5V, but this can vary depending on the specific application and the components connected to the board. It is important to consider the power consumption of all components in your project to ensure that the power supply is adequate.
3.8. Programming the Arduino Pro Mini
The Arduino Pro Mini can be programmed using the Arduino IDE, which is a free and open-source software development environment. To program the Pro Mini, you will need a USB-to-serial adapter to connect it to your computer. The Arduino IDE allows you to write and upload code to the Pro Mini, and it also provides a library of functions and examples to help you get started.
3.9. Advantages and Disadvantages
Advantages:
- Small size and lightweight
- Low cost
- Wide range of applications
- Easy to program using the Arduino IDE
Disadvantages:
- Requires an external USB-to-serial adapter for programming
- Limited number of I/O pins compared to larger Arduino boards
- No built-in USB connectivity
3.10. Tips for Using the Arduino Pro Mini
- Use a USB-to-serial adapter with a reliable driver to avoid programming issues.
- Consider using a logic level converter if interfacing with 3.3V devices.
- Use a stable power supply to avoid voltage fluctuations that can damage the board.
- Consult the Arduino documentation and online forums for help with troubleshooting and project ideas.
4. How to Calculate Power Requirements for Miniature Electronics Projects
Calculating power requirements is crucial to ensure your miniature electronics projects function correctly. The formula Pd = (Tj – Ta) / RθJA can help determine power dissipation. Consulting with experts at HOW.EDU.VN can provide deeper insights into power management and optimization for your projects.
4.1. Understanding Power Requirements
Power requirements refer to the amount of electrical power needed for a circuit or device to operate correctly. In miniature electronics projects, understanding power requirements is essential for selecting the appropriate power source, ensuring stable operation, and preventing damage to components.
4.2. Key Parameters to Consider
- Voltage (V): The electrical potential difference that drives current through a circuit.
- Current (I): The flow of electrical charge, measured in amperes (A) or milliamperes (mA).
- Power (P): The rate at which electrical energy is consumed or dissipated, measured in watts (W) or milliwatts (mW).
- Resistance (R): The opposition to the flow of current, measured in ohms (Ω).
4.3. Ohm’s Law
Ohm’s Law is a fundamental principle that relates voltage, current, and resistance in an electrical circuit:
- *V = I R** (Voltage equals current times resistance)
- I = V / R (Current equals voltage divided by resistance)
- R = V / I (Resistance equals voltage divided by current)
4.4. Power Calculation Formula
The power consumed by a component or circuit can be calculated using the following formulas:
- *P = V I** (Power equals voltage times current)
- *P = I^2 R** (Power equals current squared times resistance)
- P = V^2 / R (Power equals voltage squared divided by resistance)
4.5. Calculating Total Current Draw
To calculate the total current draw of a miniature electronics project, you need to determine the current requirements of each component and then sum them up. Here’s a step-by-step approach:
- Identify all components: List all the components in your circuit, including microcontrollers, LEDs, sensors, motors, and other devices.
- Determine current requirements: Find the current requirements for each component from datasheets or specifications. For LEDs, note the forward current (typically 20mA). For microcontrollers, check the operating current under typical conditions.
- Sum the current values: Add up the current values for all components to get the total current draw.
4.6. Example Calculation
Let’s say you have the following components in your project:
- Arduino Pro Mini: 20mA
- LED (with a 220Ω resistor): V = 5V, R = 220Ω, I = V/R = 5V / 220Ω = 0.0227A = 22.7mA
- Sensor: 5mA
- Total Current Draw: 20mA (Arduino) + 22.7mA (LED) + 5mA (Sensor) = 47.7mA
4.7. Power Dissipation
Power dissipation is the amount of power converted into heat by a component. Excessive power dissipation can lead to overheating and damage to the component. To calculate power dissipation, use the formulas mentioned earlier (P = V I, P = I^2 R, P = V^2 / R).
4.8. Voltage Regulators
Voltage regulators are used to provide a stable voltage supply to a circuit. They regulate the input voltage to a constant output voltage, even when the input voltage or load current changes. However, voltage regulators also dissipate power in the form of heat.
4.9. Calculating Power Dissipation in Voltage Regulators
The power dissipation in a voltage regulator can be calculated using the following formula:
- *P = (Vin – Vout) Iout**
Where:
- Vin is the input voltage to the regulator.
- Vout is the output voltage of the regulator.
- Iout is the output current of the regulator.
4.10. Example Calculation
Suppose you are using a 9V battery to power an Arduino Pro Mini that requires 5V. You are using a voltage regulator to step down the voltage from 9V to 5V. The Arduino Pro Mini draws 20mA of current. The power dissipation in the voltage regulator can be calculated as follows:
- P = (9V – 5V) 0.020A = 4V 0.020A = 0.08W = 80mW
4.11. Thermal Considerations
When calculating power dissipation, it is important to consider the thermal characteristics of the components. Components have a maximum operating temperature, and exceeding this temperature can lead to failure.
4.12. Thermal Resistance
Thermal resistance is a measure of how effectively a component can dissipate heat. It is typically expressed in degrees Celsius per watt (°C/W). There are two types of thermal resistance:
- Junction-to-case thermal resistance (RθJC): The thermal resistance between the component’s junction (the point where heat is generated) and its case.
- Junction-to-ambient thermal resistance (RθJA): The thermal resistance between the component’s junction and the ambient air.
4.13. Calculating Junction Temperature
The junction temperature (Tj) of a component can be calculated using the following formula:
- *Tj = Ta + (P RθJA)**
Where:
- Tj is the junction temperature.
- Ta is the ambient temperature.
- P is the power dissipation.
- RθJA is the junction-to-ambient thermal resistance.
4.14. Example Calculation
Suppose a voltage regulator has a power dissipation of 0.1W and a junction-to-ambient thermal resistance of 100°C/W. The ambient temperature is 25°C. The junction temperature can be calculated as follows:
- *Tj = 25°C + (0.1W 100°C/W) = 25°C + 10°C = 35°C**
4.15. Heatsinks
If the junction temperature exceeds the maximum operating temperature, a heatsink may be necessary to dissipate heat more effectively. A heatsink is a device that increases the surface area available for heat transfer, thereby reducing the thermal resistance.
4.16. Selecting a Power Source
When selecting a power source for your miniature electronics project, consider the following factors:
- Voltage: The voltage of the power source must be compatible with the voltage requirements of the components.
- Current Capacity: The power source must be able to supply enough current to meet the total current draw of the circuit.
- Stability: The power source should provide a stable voltage, even when the load current changes.
- Size and Weight: The size and weight of the power source should be appropriate for the application.
- Battery Life: If using a battery, consider the battery life and how often it will need to be recharged or replaced.
4.17. Common Power Sources
- Batteries: Batteries are a common power source for portable electronics projects. They come in a variety of voltages and capacities.
- USB Power: USB ports can provide 5V of power and are a convenient option for projects that need to be connected to a computer.
- Wall Adapters: Wall adapters convert AC voltage from a wall outlet to DC voltage suitable for electronics projects.
- Power Supplies: Power supplies provide a stable voltage and current and are often used for benchtop testing and development.
4.18. Tips for Efficient Power Management
- Use low-power components: Select components that consume less power.
- Optimize code: Write efficient code that minimizes processing time and reduces power consumption.
- Use sleep modes: Put components into sleep mode when they are not in use.
- Reduce voltage: Use the lowest possible voltage that is compatible with the components.
- Use switching regulators: Switching regulators are more efficient than linear regulators.
4.19. Safety Precautions
- Avoid short circuits: Short circuits can cause excessive current flow and damage components.
- Use appropriate fuses: Fuses can protect against overcurrent conditions.
- Insulate wires: Insulate wires to prevent accidental contact and short circuits.
- Follow component specifications: Adhere to the voltage and current specifications of the components.
4.20. Consulting Experts
If you are unsure about calculating power requirements or selecting a power source, consult with experts at HOW.EDU.VN. Our specialists can provide personalized guidance and help you design a power system that meets the needs of your miniature electronics project.
 Arduino Pro Mini Power
5. How Does Ambient Temperature Affect Electronic Components?
Ambient temperature significantly affects the performance and reliability of electronic components. High temperatures can reduce the lifespan of components and affect their electrical characteristics. At HOW.EDU.VN, our experts can advise you on thermal management techniques to mitigate these effects.
5.1. The Impact of Ambient Temperature
Ambient temperature is the temperature of the surrounding environment in which electronic components operate. It plays a crucial role in determining the performance, reliability, and lifespan of these components. High ambient temperatures can lead to a variety of issues, including:
- Reduced Lifespan: Elevated temperatures accelerate the degradation of materials and components, leading to a shorter lifespan.
- Performance Degradation: The electrical characteristics of components can change with temperature, affecting their performance and accuracy.
- Increased Failure Rate: High temperatures can cause components to fail prematurely, leading to system downtime and increased maintenance costs.
- Thermal Runaway: In some cases, high temperatures can lead to thermal runaway, a condition in which the component’s temperature increases uncontrollably, resulting in catastrophic failure.
5.2. Key Temperature Parameters
- Operating Temperature Range: The range of temperatures within which a component is designed to operate reliably.
- Maximum Junction Temperature (Tjmax): The maximum temperature that the component’s internal junction (the point where heat is generated) can withstand without damage.
- Storage Temperature Range: The range of temperatures within which a component can be stored without degradation.
- Thermal Resistance (RθJA and RθJC): Measures of how effectively a component can dissipate heat to the surrounding environment.
5.3. Effect on Different Components
Different types of electronic components are affected differently by ambient temperature:
- Semiconductors (e.g., Microcontrollers, Transistors): High temperatures can cause changes in their electrical characteristics, such as increased leakage current and reduced gain.
- Capacitors: High temperatures can reduce their capacitance and increase their leakage current.
- Resistors: High temperatures can cause their resistance to drift from the specified value.
- LEDs: High temperatures can reduce their light output and shorten their lifespan.
- Batteries: High temperatures can reduce their capacity and shorten their lifespan.
5.4. Thermal Management Techniques
To mitigate the effects of ambient temperature, various thermal management techniques can be employed:
- Heatsinks: Devices that increase the surface area available for heat transfer, thereby reducing the component’s temperature.
- Fans: Devices that force air circulation to remove heat from the components.
- Liquid Cooling: A more advanced cooling technique that uses a liquid coolant to transfer heat away from the components.
- Thermal Interface Materials (TIMs): Materials that improve the thermal contact between the component and the heatsink, reducing thermal resistance.
- Forced Air Cooling: Using fans or blowers to force air over the components, increasing the rate of heat transfer.
- Natural Convection: Allowing air to circulate naturally around the components, relying on convection to remove heat.
5.5. Design Considerations
When designing electronic systems, it is important to consider the ambient temperature and its effects on the components. Here are some design considerations:
- Component Selection: Choose components that are rated for the expected operating temperature range.
- Placement: Place heat-generating components away from temperature-sensitive components.
- Ventilation: Provide adequate ventilation to allow for air circulation and heat removal.
- Heatsink Design: Design heatsinks that are appropriately sized for the power dissipation of the components.
- Temperature Monitoring: Implement temperature monitoring to detect overheating conditions and take corrective action.
5.6. Calculating Temperature Rise
The temperature rise of a component can be calculated using the following formula:
- *ΔT = P RθJA**
Where:
- ΔT is the temperature rise.
- P is the power dissipation.
- RθJA is the junction-to-ambient thermal resistance.
5.7. Example Calculation
Suppose a component has a power dissipation of 0.1W and a junction-to-ambient thermal resistance of 100°C/W. The temperature rise can be calculated as follows:
- *ΔT = 0.1W 100°C/W = 10°C**
If the ambient temperature is 25°C, the junction temperature of the component will be:
- Tj = Ta + ΔT = 25°C + 10°C = 35°C
5.8. Derating Curves
Many components have derating curves that show how their performance and reliability are affected by temperature. These curves provide information on how much the component’s ratings (e.g., voltage, current, power) should be reduced as the temperature increases.
5.9. Environmental Testing
Environmental testing involves subjecting electronic systems to various temperature conditions to verify their performance and reliability. Common environmental tests include:
- High-Temperature Operating Life (HTOL): A test that subjects components to high temperatures for extended periods to assess their lifespan.
- Temperature Cycling: A test that subjects components to repeated cycles of high and low temperatures to assess their resistance to thermal stress.
- Thermal Shock: A test that subjects components to rapid changes in temperature to assess their resistance to thermal shock.
5.10. Simulation Tools
Simulation tools can be used to model the thermal behavior of electronic systems and predict their temperature distribution. These tools can help identify potential hotspots and optimize the thermal design of the system.
5.11. Tips for Managing Ambient Temperature
- Monitor the temperature: Use temperature sensors to monitor the ambient temperature and the temperature of critical components.
- Provide adequate ventilation: Ensure that there is sufficient airflow around the components to remove heat.
- Use heatsinks: Use heatsinks to dissipate heat from high-power components.
- Consider liquid cooling: For high-performance systems, consider using liquid cooling to remove heat more effectively.
- Choose appropriate components: Select components that are rated for the expected operating temperature range.
5.12. Consulting Experts
If you are unsure about how to manage ambient temperature in your electronic systems, consult with experts at HOW.EDU.VN. Our specialists can provide personalized guidance and help you design a thermal management solution that meets the needs of your application.
6. What Are Some Common Mistakes When Calculating Current Requirements?
Common mistakes include overlooking the peak current draw, not accounting for efficiency losses, and using inaccurate data. HOW.EDU.VN provides access to experts who can review your calculations and help you avoid these pitfalls.
6.1. Overview of Common Mistakes
Calculating current requirements is a critical step in designing electronic circuits and systems. However, several common mistakes can lead to inaccurate calculations, resulting in inadequate power supplies, overheating, and component failures. Understanding these mistakes and how to avoid them is essential for ensuring the reliable operation of your projects.
6.2. Ignoring Peak Current Draw
One of the most common mistakes is failing to account for the peak current draw of components. Many components, such as motors, LEDs, and microcontrollers, may draw significantly more current during startup or during certain operating conditions. Ignoring these peak current demands can lead to an undersized power supply that cannot meet the needs of the circuit, causing it to malfunction or fail.
6.3. Not Accounting for Efficiency Losses
Efficiency losses in power supplies, voltage regulators, and other components can significantly impact the actual current available to the circuit. These losses are typically expressed as a percentage, and they represent the amount of power that is wasted as heat. Failing to account for these losses can lead to an overestimation of the available current, resulting in an undersized power supply that cannot meet the actual needs of the circuit.
6.4. Using Inaccurate Data
Using inaccurate or outdated data from datasheets or specifications can also lead to errors in current calculations. It is important to always use the most up-to-date datasheets and to verify the accuracy of the data before using it in your calculations. Inaccurate data can lead to both underestimation and overestimation of current requirements, both of which can have negative consequences.
6.5. Overlooking Quiescent Current
Quiescent current, also known as standby current or idle current, is the current that a component draws when it is not actively performing its primary function. Many components, such as microcontrollers and op-amps, continue to draw a small amount of current even when they are in a low-power or sleep mode. Overlooking this quiescent current can lead to an underestimation of the total current draw of the circuit, especially in low-power applications.
6.6. Failing to Account for Tolerance
Components have tolerance ratings that specify the acceptable range of variation in their values. For example, a resistor may have a tolerance of ±5%, meaning that its actual resistance can vary by up to 5% from its nominal value. Failing to account for these tolerances can lead to errors in current calculations, especially when dealing with sensitive circuits.
6.7. Not Considering Temperature Effects
Temperature can have a significant impact on the electrical characteristics of components, including their current draw. For example, the forward voltage of an LED decreases as its temperature increases, which can lead to an increase in its current draw. Failing to consider these temperature effects can lead to inaccuracies in current calculations, especially in applications where the temperature varies significantly.
6.8. Ignoring Inrush Current
Inrush current is the high initial current that flows into a component when it is first turned on. This current can be significantly higher than the component’s steady-state current draw, and it can cause voltage drops and other issues if not properly accounted for. Failing to consider inrush current can lead to an undersized power supply that cannot handle the initial surge of current, causing the circuit to malfunction or fail.
6.9. Misunderstanding Component Specifications
Misunderstanding the specifications of components can also lead to errors in current calculations. For example, confusing the maximum current rating with the typical current draw can lead to an overestimation of the current requirements, resulting in an oversized and unnecessarily expensive power supply.
6.10. Using Simplified Models
Using simplified models or approximations can also lead to errors in current calculations. While simplified models can be useful for quick estimates, they often do not capture all of the complexities of the real-world behavior of components. Using more accurate and detailed models can help to improve the accuracy of current calculations.
6.11. Overlooking Dynamic Load Changes
Dynamic load changes occur when the current draw of a circuit varies over time. For example, a motor may draw more current when it is starting up or when it is under load. Failing to account for these dynamic load changes can lead to an undersized power supply that cannot meet the peak current demands of the circuit, causing it to malfunction or fail.
6.12. Not Considering Power Supply Ripple
Power supply ripple is the small AC voltage that is superimposed on the DC output voltage of a power supply. This ripple voltage can cause issues in sensitive circuits, and it can also affect the accuracy of current measurements. Failing to consider power supply ripple can lead to errors in current calculations, especially in applications where precision is important.
6.13. Ignoring Wiring Resistance
The resistance of the wiring and connections in a circuit can also affect the current flow. Even small amounts of resistance can cause voltage drops and reduce the amount of current available to the components. Failing to account for wiring resistance can lead to an underestimation of the current requirements, especially in circuits with long or thin wires.
6.14. Tips for Avoiding Common Mistakes
- Use Accurate Datasheets: Always use the most up-to-date datasheets and verify the accuracy of the data.
- Consider Peak Current: Account for the peak current draw of components, especially during startup or under load.
- Account for Efficiency Losses: Factor in efficiency losses in power supplies and voltage regulators.
- Include Quiescent Current: Consider the quiescent current of components, especially in low-power applications.
- Account for Tolerance: Factor in component tolerances when performing current calculations.
- Consider Temperature Effects: Consider the effects of temperature on component characteristics.
- Account for Inrush Current: Consider the inrush current of components when selecting a power supply.
- Understand Component Specifications: Understand the specifications of components and avoid misinterpretations.
- Use Detailed Models: Use more accurate and detailed models when performing current calculations.
- Account for Dynamic Load Changes: Consider dynamic load changes and ensure that the power supply can meet the peak current demands.
- Consider Power Supply Ripple: Consider the effects of power supply ripple on circuit performance.
- Account for Wiring Resistance: Factor in the resistance of wiring and connections in the circuit.
- Test and Verify: Test and verify your current calculations with real-world measurements.
6.15. Consulting Experts
If you are unsure about calculating current requirements or avoiding common mistakes, consult with experts at how.edu.vn. Our specialists can provide personalized guidance and help you design a power system that meets the needs of your application.
![Electronics Current Calculation](https://eepower.com/uploads/articles/Fig-1-Estimating-power-supply-current-requirements.