Adjusting margins in Google Docs is crucial for creating professional-looking documents, and at HOW.EDU.VN, we understand the importance of precise formatting. You can easily adjust margins using the Page Setup option or the ruler feature. Understanding these methods ensures your documents meet specific requirements and enhance readability.
1. Why Adjust Margins in Google Docs?
Adjusting margins in Google Docs is essential for several reasons:
- Professional Appearance: Consistent margins give your document a polished, professional look.
- Readability: Proper margins improve readability by providing adequate white space around the text.
- Specific Requirements: Many academic and professional documents have specific margin requirements that must be met.
- Customization: Adjusting margins allows you to customize the layout of your document to fit your needs.
- Printing: Correct margins ensure that your document prints correctly without any text being cut off.
2. Understanding Margins
Margins are the blank spaces around the edges of your document. In Google Docs, you can adjust four margins:
- Top Margin: The space at the top of the page.
- Bottom Margin: The space at the bottom of the page.
- Left Margin: The space on the left side of the page.
- Right Margin: The space on the right side of the page.
3. Adjusting Margins Using Page Setup
The Page Setup dialog box is one of the primary methods for adjusting margins in Google Docs.
3.1. Step-by-Step Guide
-
Open Google Docs: Open the document you want to adjust.
-
Navigate to Page Setup:
- Click on File in the top menu.
- Select Page Setup from the dropdown menu.
-
Adjust Margins:
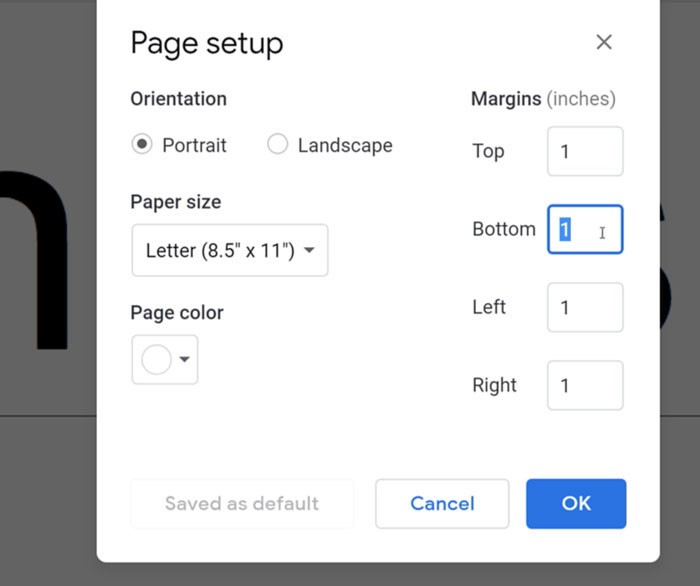
- In the Page Setup dialog box, you will see options for Top, Bottom, Left, and Right margins.
- Click on each box and type in the new measurements you desire. The default is typically one inch on each side.
-
Apply Changes:
- Click OK to apply the changes.
3.2. Setting Default Margins
To set your custom margins as the default for all new documents:
-
Adjust Margins: Follow the steps above to adjust the margins to your desired settings.
-
Set as Default:
- In the Page Setup dialog box, click the Set as Default button.
-
Confirm:
- Click OK. This ensures that every new document you create will use these margins.
3.3. Use Cases
- Academic Papers: Set margins to meet specific university or publication guidelines (e.g., 1-inch margins for all sides).
- Business Reports: Customize margins for a professional and readable layout.
- Legal Documents: Adhere to legal requirements, often requiring larger left margins for binding.
4. Adjusting Margins Using the Ruler
The ruler in Google Docs provides a visual way to adjust margins directly on the document.
4.1. Step-by-Step Guide
-
Show the Ruler:
- If the ruler is not visible, click View in the top menu.
- Select Show ruler. The ruler will appear at the top and left side of the document.
-
Identify Margin Boundaries:
- Look for the gray areas on either end of the ruler. These represent the margins.
-
Adjust Margins:
- Hover your cursor over the boundary between the white and gray areas. The cursor will change into a double-sided arrow.
- Click and drag the arrow to adjust the margin. As you drag, the text in your document will reflow to reflect the new margin setting.
-
Repeat for All Margins:
- Adjust the left and right margins using the top ruler.
- Adjust the top and bottom margins using the left ruler.
4.2. Use Cases
- Quick Adjustments: Use the ruler for quick, visual adjustments to margins.
- Visual Alignment: Align text and other elements visually by adjusting margins.
- Draft Documents: Quickly modify margins in draft documents to assess layout options.
5. Advanced Margin Settings
For more advanced control, you can explore additional settings within Google Docs.
5.1. Custom Paper Sizes
In Page Setup, you can also specify custom paper sizes, which can affect how margins are displayed and printed.
- Navigate to Page Setup:
- Click on File in the top menu.
- Select Page Setup from the dropdown menu.
- Select Paper Size:
- Choose a predefined paper size from the Paper size dropdown menu, such as Letter, Legal, or A4.
- For a custom size, select Custom size and enter the dimensions.
- Adjust Margins:
- Adjust the margins as needed for the selected paper size.
5.2. Orientation
You can also change the orientation of your document between Portrait (vertical) and Landscape (horizontal) in Page Setup. This affects how margins are applied.
- Navigate to Page Setup:
- Click on File in the top menu.
- Select Page Setup from the dropdown menu.
- Select Orientation:
- Choose either Portrait or Landscape.
- Adjust Margins:
- Adjust the margins to fit the new orientation.
5.3. Applying Changes to the Entire Document
Margin adjustments in Google Docs apply to the entire document. Google Docs does not natively support different margins for different sections of the document. However, there are workarounds.
5.4. Workarounds for Different Margins in Sections
While Google Docs doesn’t directly support different margins for sections, you can use these workarounds:
- Use Section Breaks:
- Insert section breaks (Insert > Break > Section break (next page)) to divide your document into sections.
- Create Separate Documents:
- For sections requiring different margins, create separate Google Docs and combine them into a single PDF for final output.
- Tables:
- Insert a table without borders and place your content inside the table cells. You can then adjust the cell margins to simulate different section margins.
6. Common Margin Issues and Solutions
6.1. Margins Not Saving
Issue: Margins revert to default settings.
Solution:
- Set as Default: Ensure you click Set as Default in Page Setup after adjusting margins.
- Browser Issues: Clear your browser cache and cookies or try a different browser.
6.2. Incorrect Margin Display
Issue: The ruler shows incorrect margin measurements.
Solution:
- Zoom Level: Ensure your zoom level is set to 100% to accurately view the ruler.
- Ruler Visibility: Confirm that the ruler is enabled (View > Show ruler).
6.3. Printing Issues
Issue: Text is cut off when printing.
Solution:
- Check Margins: Verify that the margins are within the printable area of your printer.
- Print Settings: Adjust print settings to Fit to Page or reduce the scale.
7. Margin Best Practices
- Consistency: Maintain consistent margins throughout your document for a professional look.
- Readability: Use margins that provide enough white space for comfortable reading.
- Guidelines: Adhere to specific margin guidelines for academic or professional submissions.
- Preview: Always preview your document before printing to ensure margins are correct.
- Accessibility: Consider accessibility by using reasonable margins that are easy to read for people with visual impairments.
8. The Expertise of HOW.EDU.VN
At HOW.EDU.VN, we understand the importance of precise formatting in professional and academic documents. Our team of over 100 distinguished Ph.D. experts can provide tailored advice on document formatting, ensuring your work meets the highest standards.
8.1. Why Choose HOW.EDU.VN?
- Expert Guidance: Access advice from Ph.D. experts in various fields.
- Personalized Support: Receive customized formatting recommendations for your specific needs.
- Time-Saving Solutions: Get quick and effective solutions to your formatting challenges.
- Confidentiality: Your documents and consultations are handled with the utmost privacy and security.
- Comprehensive Assistance: From margin adjustments to complete document reviews, we offer a full range of services.
8.2. Benefits of Consulting Our Experts
- Improved Document Quality: Ensure your documents are polished and professional.
- Compliance with Guidelines: Meet specific formatting requirements for submissions and publications.
- Enhanced Readability: Optimize your document’s layout for better reader engagement.
- Increased Confidence: Present your work with confidence, knowing it meets the highest standards.
- Reduced Stress: Let our experts handle the technical details so you can focus on your content.
8.3. Real-World Examples
- Case Study 1: Academic Submission: A Ph.D. candidate needed to format their dissertation according to strict university guidelines. Our expert provided a detailed formatting template, ensuring the dissertation was accepted without revisions.
- Case Study 2: Business Report: A business executive required a visually appealing and readable report for stakeholders. Our team optimized the margins and layout, resulting in positive feedback from investors.
- Case Study 3: Legal Document: A law firm needed to ensure their legal documents met specific court requirements. Our expert provided precise margin and formatting advice, ensuring compliance and professionalism.
8.4. Testimonials
- Dr. Emily Carter, University Professor: “HOW.EDU.VN provided invaluable assistance in formatting my research paper. The expert’s attention to detail and knowledge of academic guidelines were exceptional.”
- John Smith, Business Executive: “I was struggling to create a professional-looking report for my company. HOW.EDU.VN transformed my document into a polished and engaging presentation.”
- Sarah Johnson, Law Firm Associate: “The formatting advice I received from HOW.EDU.VN was critical in ensuring our legal documents met court standards. I highly recommend their services.”
9. Connect with Our Experts
Ready to perfect your document formatting? Contact HOW.EDU.VN today for expert guidance and support.
9.1. How to Get in Touch
- Visit Our Website: HOW.EDU.VN for more information and to schedule a consultation.
- Call Us: +1 (310) 555-1212 to speak with one of our knowledgeable representatives.
- Email Us: [email protected] to submit your questions and receive a prompt response.
- Visit Our Office: 456 Expertise Plaza, Consult City, CA 90210, United States.
9.2. What to Expect During a Consultation
- Initial Assessment: We will review your document and formatting requirements.
- Customized Recommendations: Our expert will provide tailored advice and solutions.
- Step-by-Step Guidance: We will walk you through the necessary steps to adjust your margins and layout.
- Ongoing Support: We are available to answer any questions and provide additional assistance.
9.3. Special Offers
- First-Time Consultation Discount: Get 20% off your first consultation.
- Package Deals: Save up to 30% with our bundled service packages.
- Referral Program: Refer a friend and receive a free consultation.
10. Frequently Asked Questions (FAQ)
10.1. How do I change margins in Google Docs?
You can change margins in Google Docs by going to File > Page Setup and adjusting the Top, Bottom, Left, and Right margin settings. Alternatively, you can use the ruler to drag the margin boundaries to your desired positions.
10.2. Can I set different margins for different pages in Google Docs?
No, Google Docs does not natively support different margins for different pages. However, you can use workarounds such as creating separate documents for sections requiring different margins or using tables to simulate different margins.
10.3. How do I set default margins in Google Docs?
To set default margins, go to File > Page Setup, adjust the margins to your desired settings, and click “Set as default” before clicking “OK.”
10.4. Why are my margins not saving in Google Docs?
If your margins are not saving, ensure that you click “Set as default” in the Page Setup dialog box. Also, clear your browser’s cache and cookies or try using a different browser.
10.5. How do I show the ruler in Google Docs?
To show the ruler, click on “View” in the top menu and select “Show ruler.”
10.6. What are the default margins in Google Docs?
The default margins in Google Docs are typically one inch on each side (Top, Bottom, Left, and Right).
10.7. How can HOW.EDU.VN help with document formatting?
HOW.EDU.VN provides expert guidance from over 100 Ph.D. experts who can offer tailored advice on document formatting, ensuring your work meets the highest standards. They can provide personalized support, time-saving solutions, and comprehensive assistance for all your formatting needs.
10.8. What should I do if my text is cut off when printing from Google Docs?
If your text is cut off when printing, check your margins to ensure they are within the printable area of your printer. Also, adjust your print settings to “Fit to Page” or reduce the scale.
10.9. Can I change the paper size in Google Docs?
Yes, you can change the paper size by going to File > Page Setup and selecting a predefined paper size from the dropdown menu or choosing a custom size.
10.10. Is it possible to get a discount on consultations from HOW.EDU.VN?
Yes, HOW.EDU.VN offers a first-time consultation discount, package deals, and a referral program to help you save on their services.
Adjusting margins in Google Docs is a straightforward process that can significantly enhance the quality and professionalism of your documents. Whether you use the Page Setup dialog box or the ruler, understanding these methods allows you to create perfectly formatted documents every time. For personalized assistance and expert advice, don’t hesitate to contact the team of Ph.D. experts at HOW.EDU.VN, located at 456 Expertise Plaza, Consult City, CA 90210, United States. Reach out via WhatsApp at +1 (310) 555-1212 or visit our website at how.edu.vn. Let us help you achieve perfection in your document formatting.